Plan availability | Paid plans only |
Permissions |
|
Platform(s) | Web/Browser, Mac app, and Windows App |
Related reading |
|
Airtable terminology |
|
Example use case and sub-records
Airtable's record templates are a way for you and your team to automate repetitive record creation. Once configured, a record template can create a predefined record and/or set of related records (sub-records) with a single click, ensuring consistent data and increasing the efficiency of your workflows. In particular, project management or marketing campaign "one-to-many" use cases that often involve the same set of tasks, subtasks, or milestones will benefit from implementing record templates.
NOTE
Before configuring a record template for the first time, it's important to think a bit more about your particular use case and how sub-records (linked records) might fit in. No generic example will cover the needs of every workflow, but the project tracking use case is best for understanding the general foundations and benefits of setting up record templates.
Example: Product lifecycle management
Let's say you manage a product team. You track product releases in an Airtable project tracking base that has two tables. One table is named "Projects" which acts as the parent and another is named "Tasks" which has a linked record field connected to the "Projects" table. Records in the "Tasks" table will act as the child sub-records. Each time your team is tasked with bringing a new product to market some common tasks occur leading up to a launch. To simplify let's say that there are 5 tasks:
Create design mock-up
Engineer beta version
Feedback and bug bash
Final touches and staging
Launch/Release
With a record template, instead of having to go create these 5 tasks (sub-records) in the "Tasks" table and then manually link each task to the corresponding project/product in the "Project" table, you would configure the template one time and then simply add the template or apply the template to your base with the click of a button.
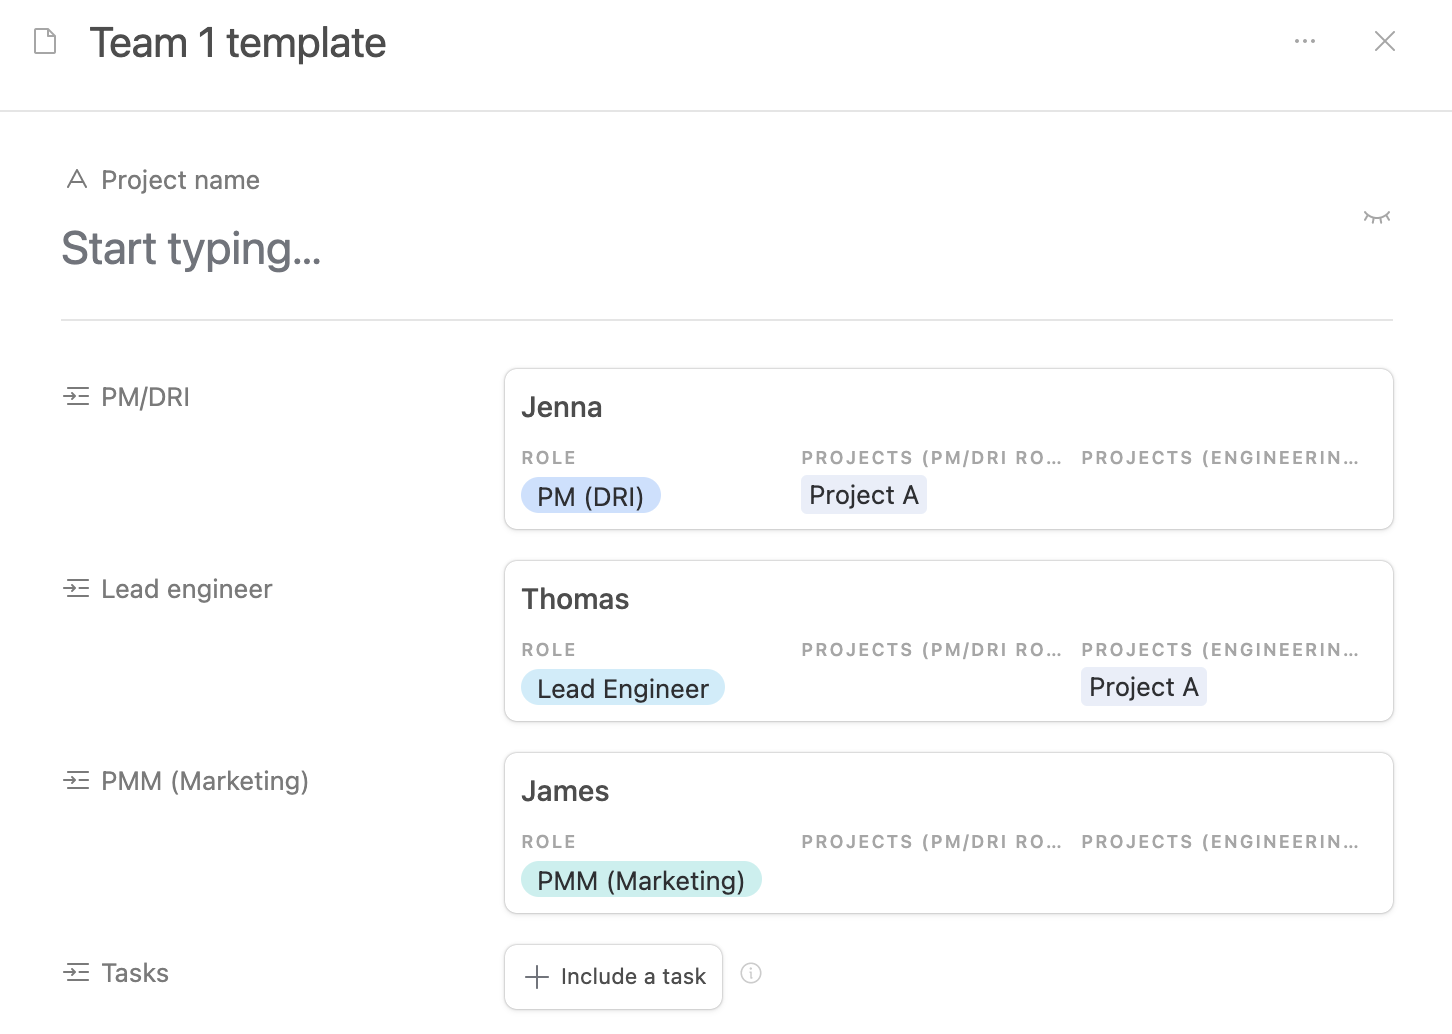
Let's throw one more complexity into the equation though. Let's say there are two different teams that may work on a product release project. If a product release is in a certain category then "Team 1" would work on it, in other instances, it would be assigned to "Team 2." In this case, you could build out one template for "Team 1" product releases and another for "Team 2." As a manager, you can now choose which set of records will be created depending on which template you use. Consider the image below and then move on to learn how to configure a template in Airtable.
.png)
Note
Note that the yellow field information in the project table is configured differently depending on the team template being used, but the general tasks (sub-records) remain the same. For simplicity, the fields in the green sub-records are not shown, but that is also configurable with record templates.
Configuring a record template
Follow the general steps below to build out a record template in your base. If you want to follow along using the base used in the walkthrough below, then click this link and then click Copy base to create a copy in one of your workspaces.
Step 1: Find and add a new template
Open the base where you want to create a record template.
Find the Record templates feature under the Tools dropdown in the upper right portion of the screen.
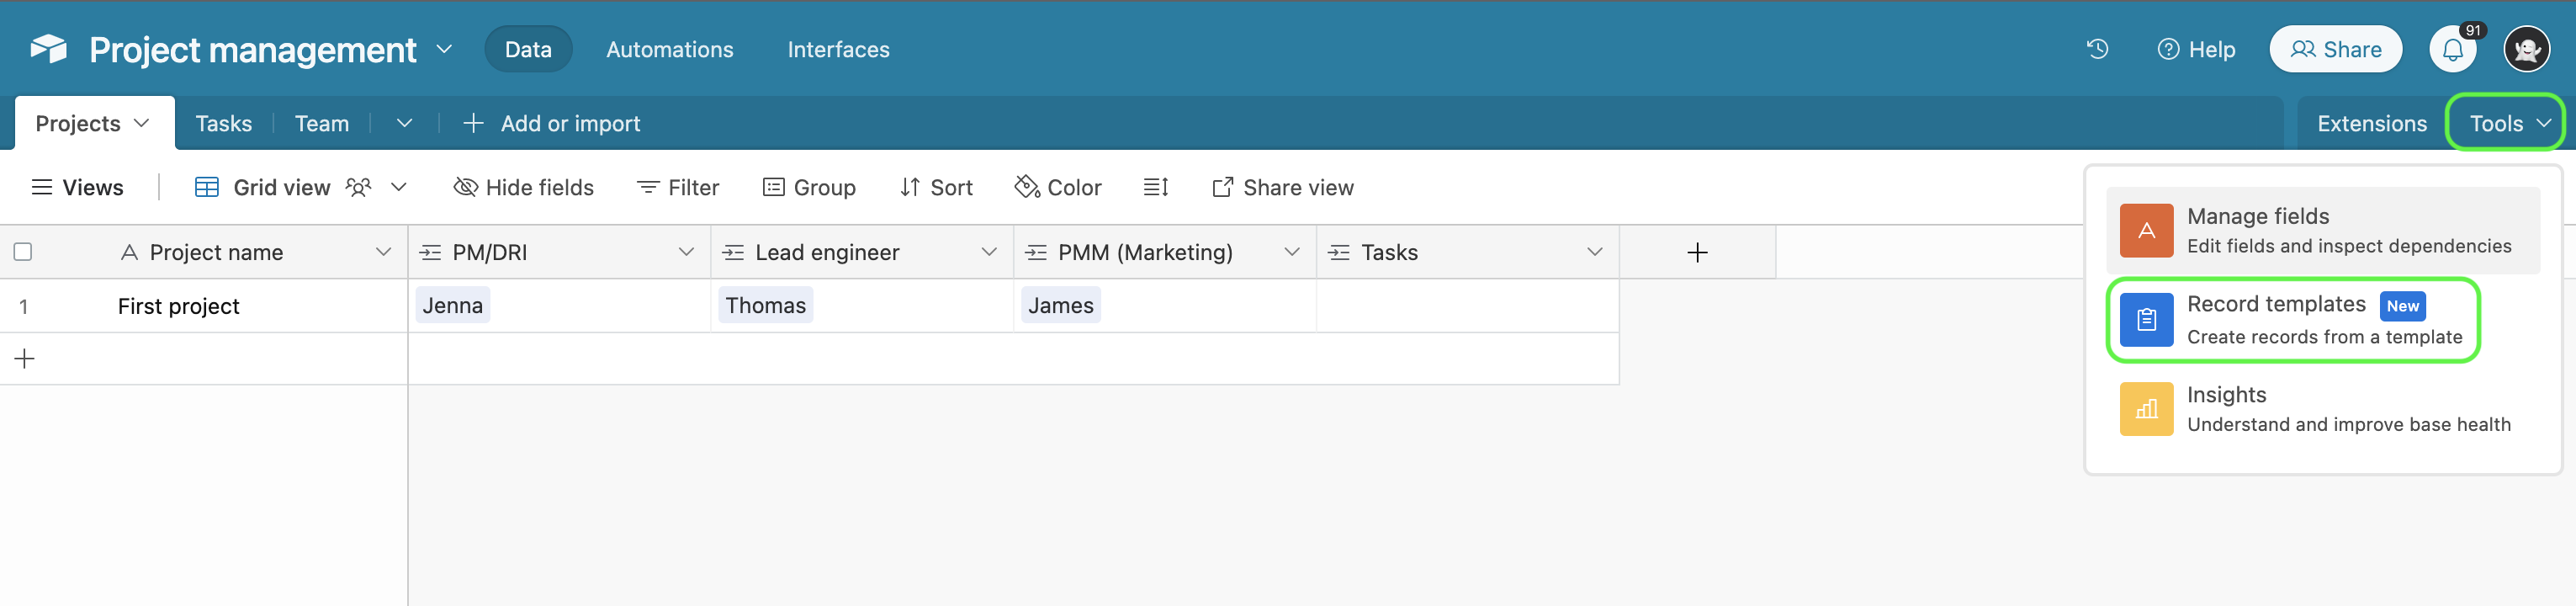
If this is the first template being created in this base, then click the Get started dropdown and choose the table you would like to use as the parent record that will be created in your base. In our example, we'll use the "Projects" table to configure the template.
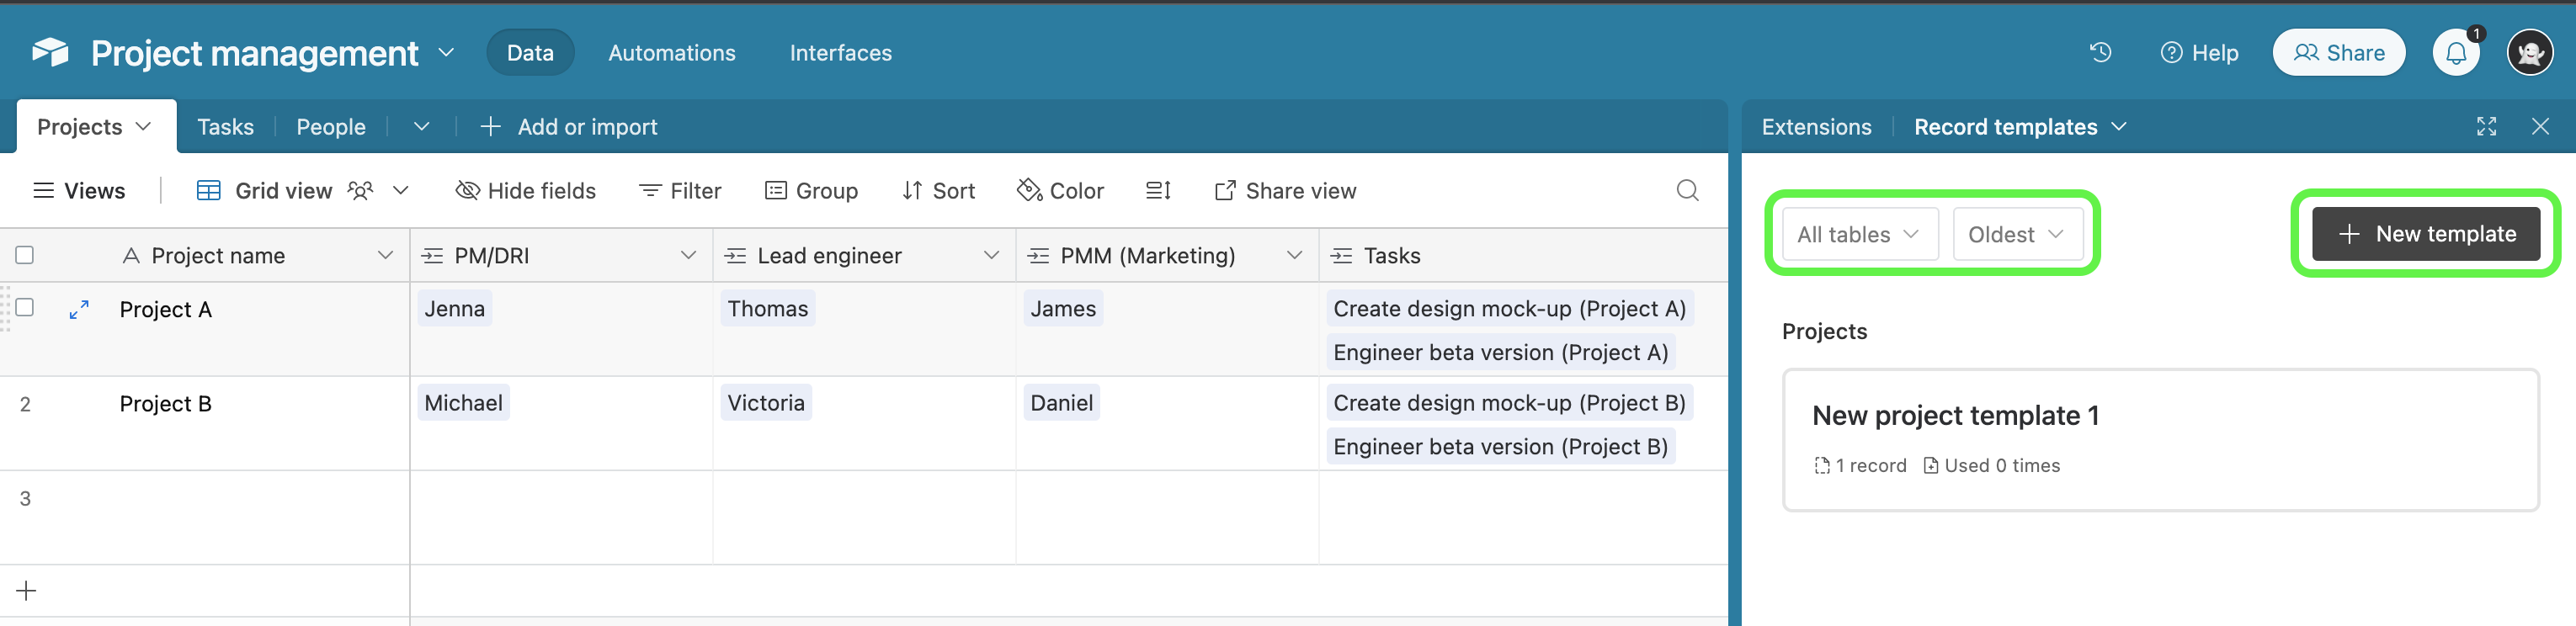
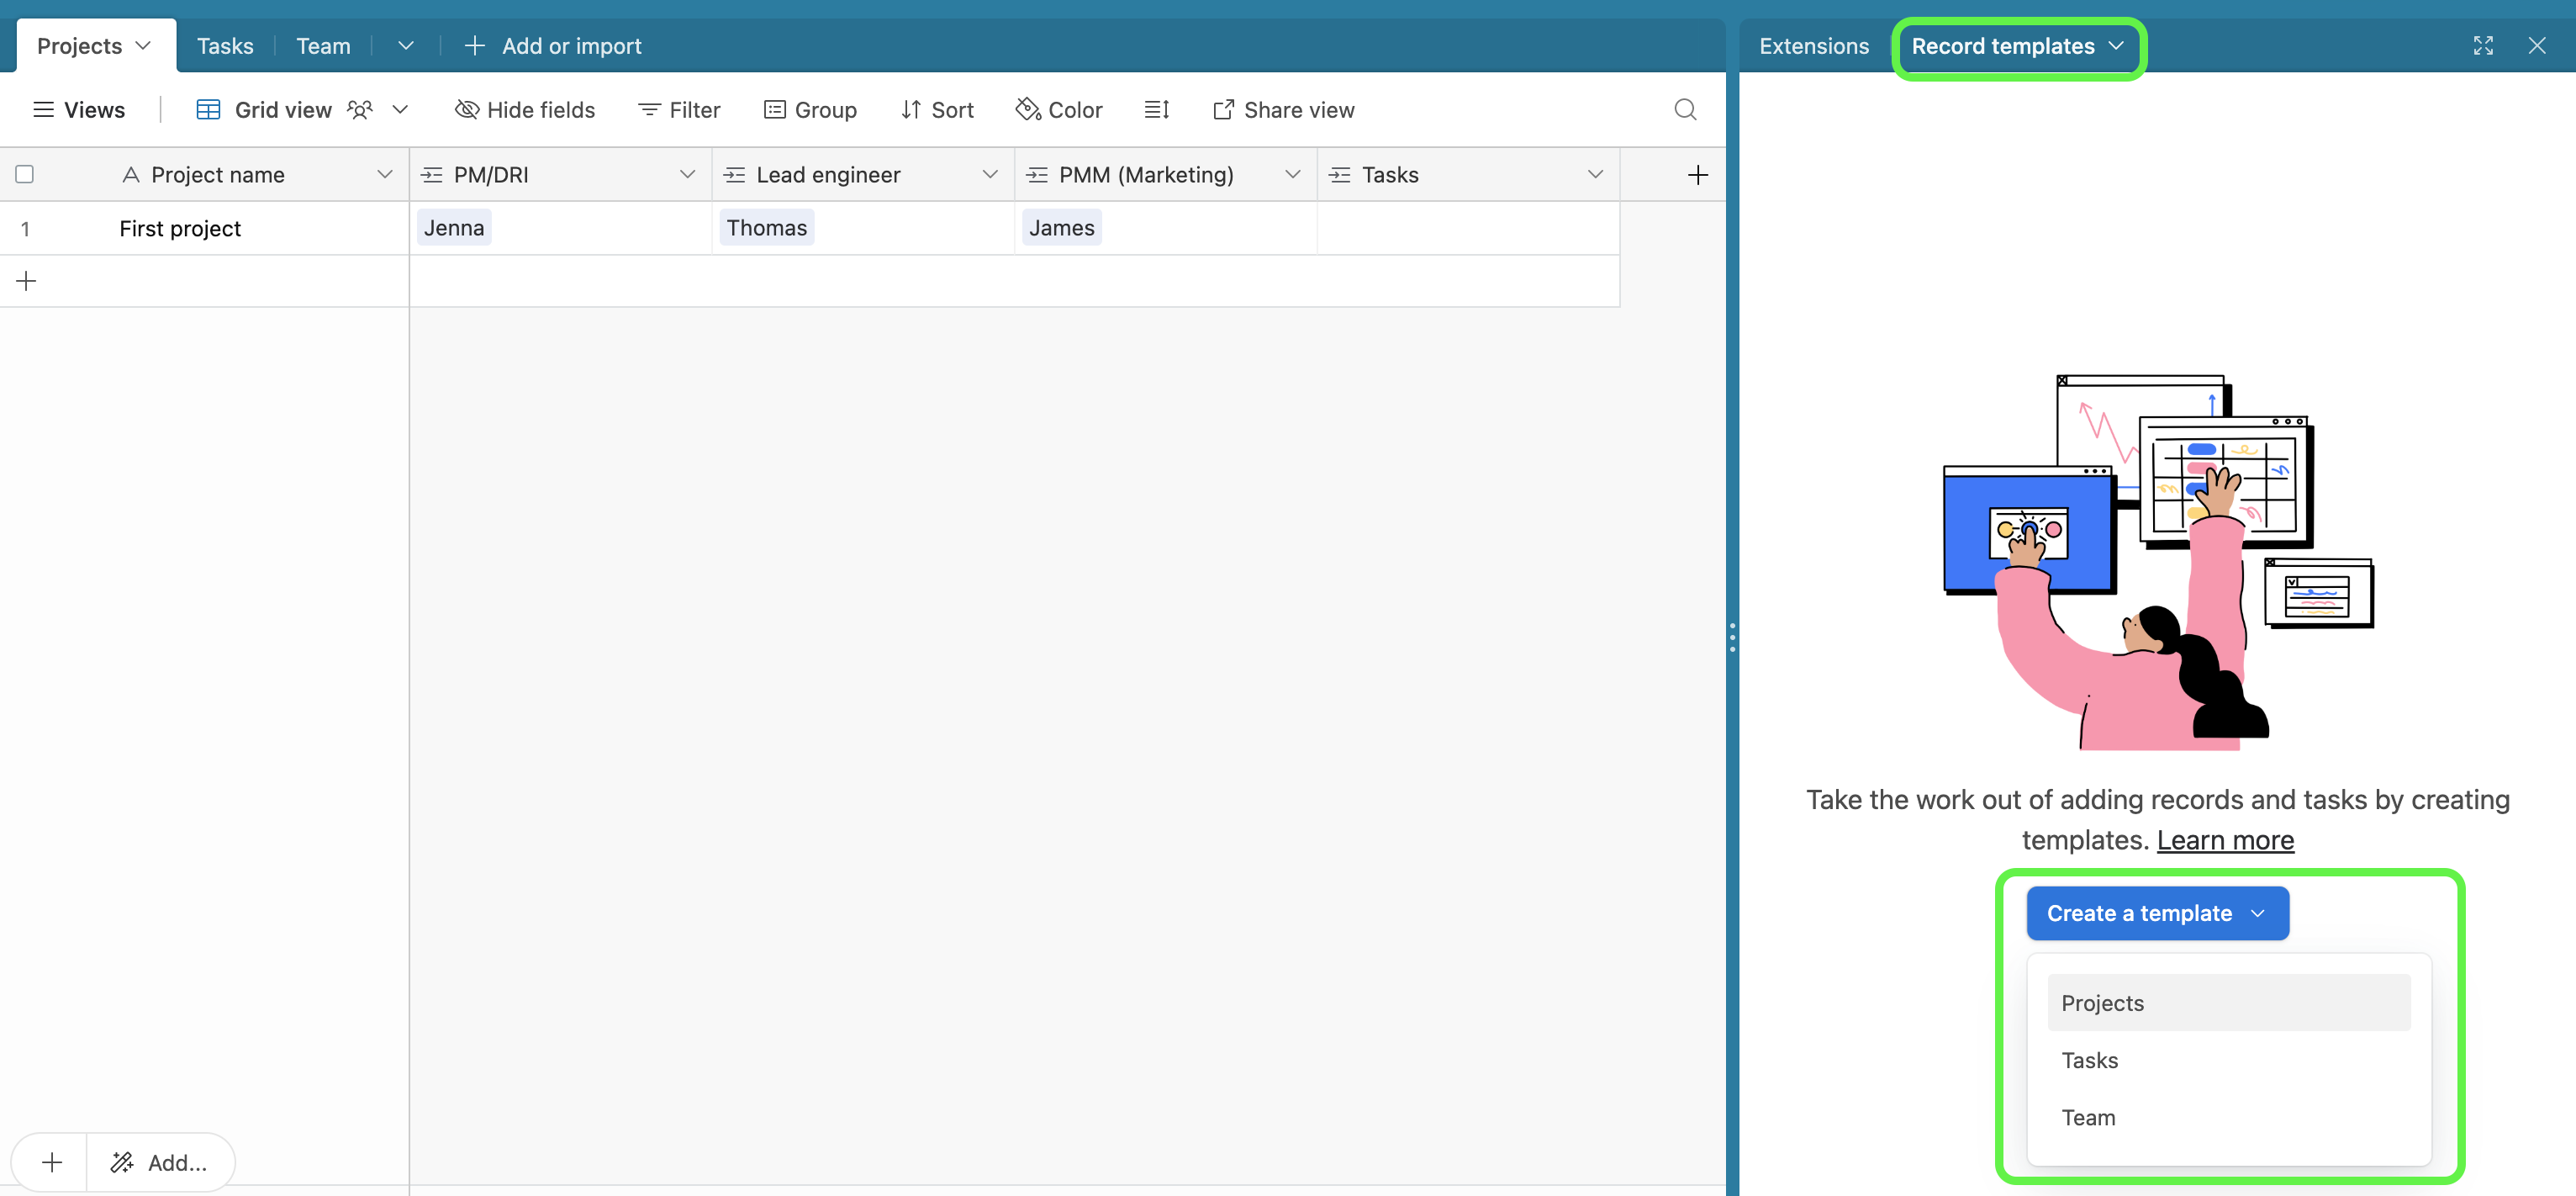 Otherwise, if this isn't the first template, then click the New template option and select a table to begin. You can also click either of the dropdowns to filter and sort previously configured templates to view or modify a specific template.
Step 2: Name the template
The first step to accomplish in the template configuration window is to name your template. You can also find other options, including the ability to add a description of the template by clicking the ... icon next to the name. .png)
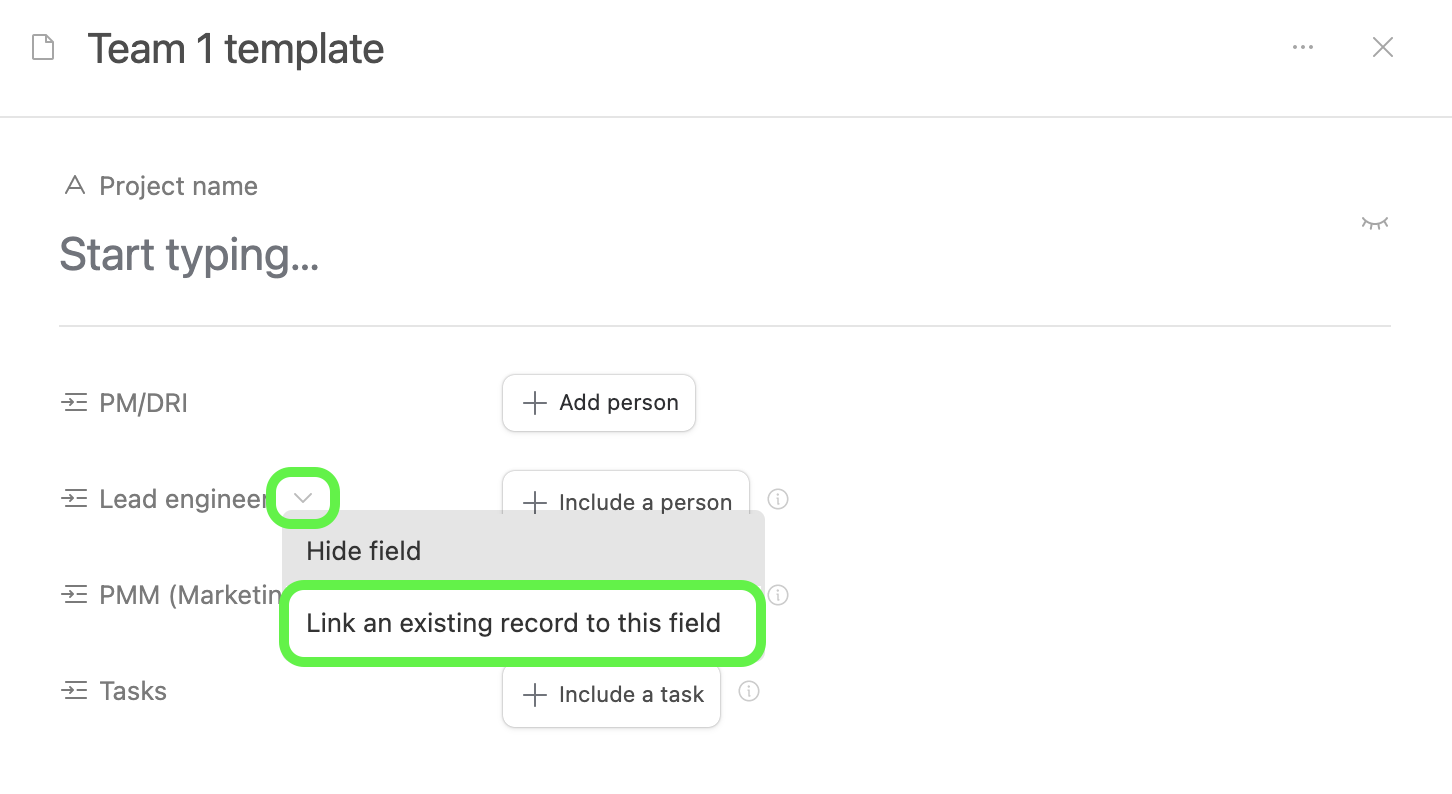
Step 3: Assign people to roles
In the template configuration window, there will be different options depending on the field types and the number of fields in the table you chose to use as the parent record. In this example, we will skip the "Project name" field and fill this in manually after each time we use the template.
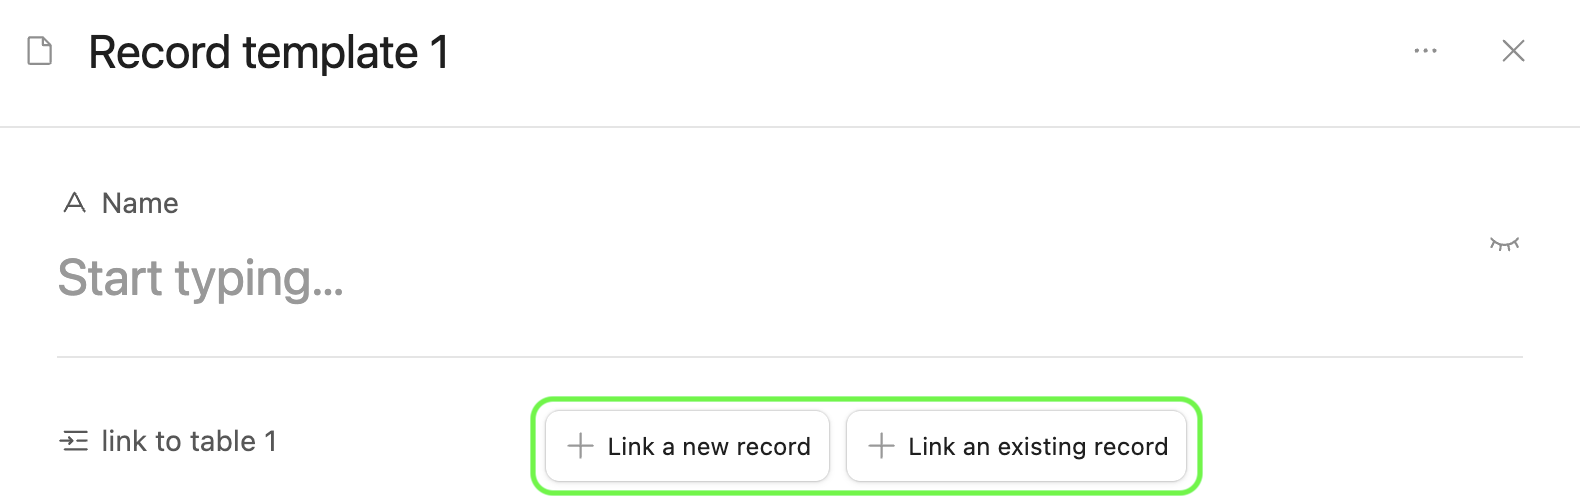
Now, we are wanting to assign specific people from the "People" table as the PM, Engineering lead, and PMM roles in the corresponding linked record fields in the "Projects" table. To accomplish this, we want to set each of those linked record fields to the Link an existing record option.
Once the three linked records fields linked to the People table have been updated in this way, you can move on to picking the specific people to assign to each role. Clicking Add person will cause a record picker to appear where you can choose the appropriate person. The template should now look something like this:
The next step will cover configuring tasks for this record template.
Step 4: Configuring tasks (sub-records) to be created
Now we want to configure the template to create 5 new task records that will be linked to the project we are starting. Click the + Include a task option next to the "Tasks" field. This will bring you to an individual task configuration page. Here, we want to fill in the task type, hide the "End date" field since we won't use this in our template, and set the "Status" field to "Todo."
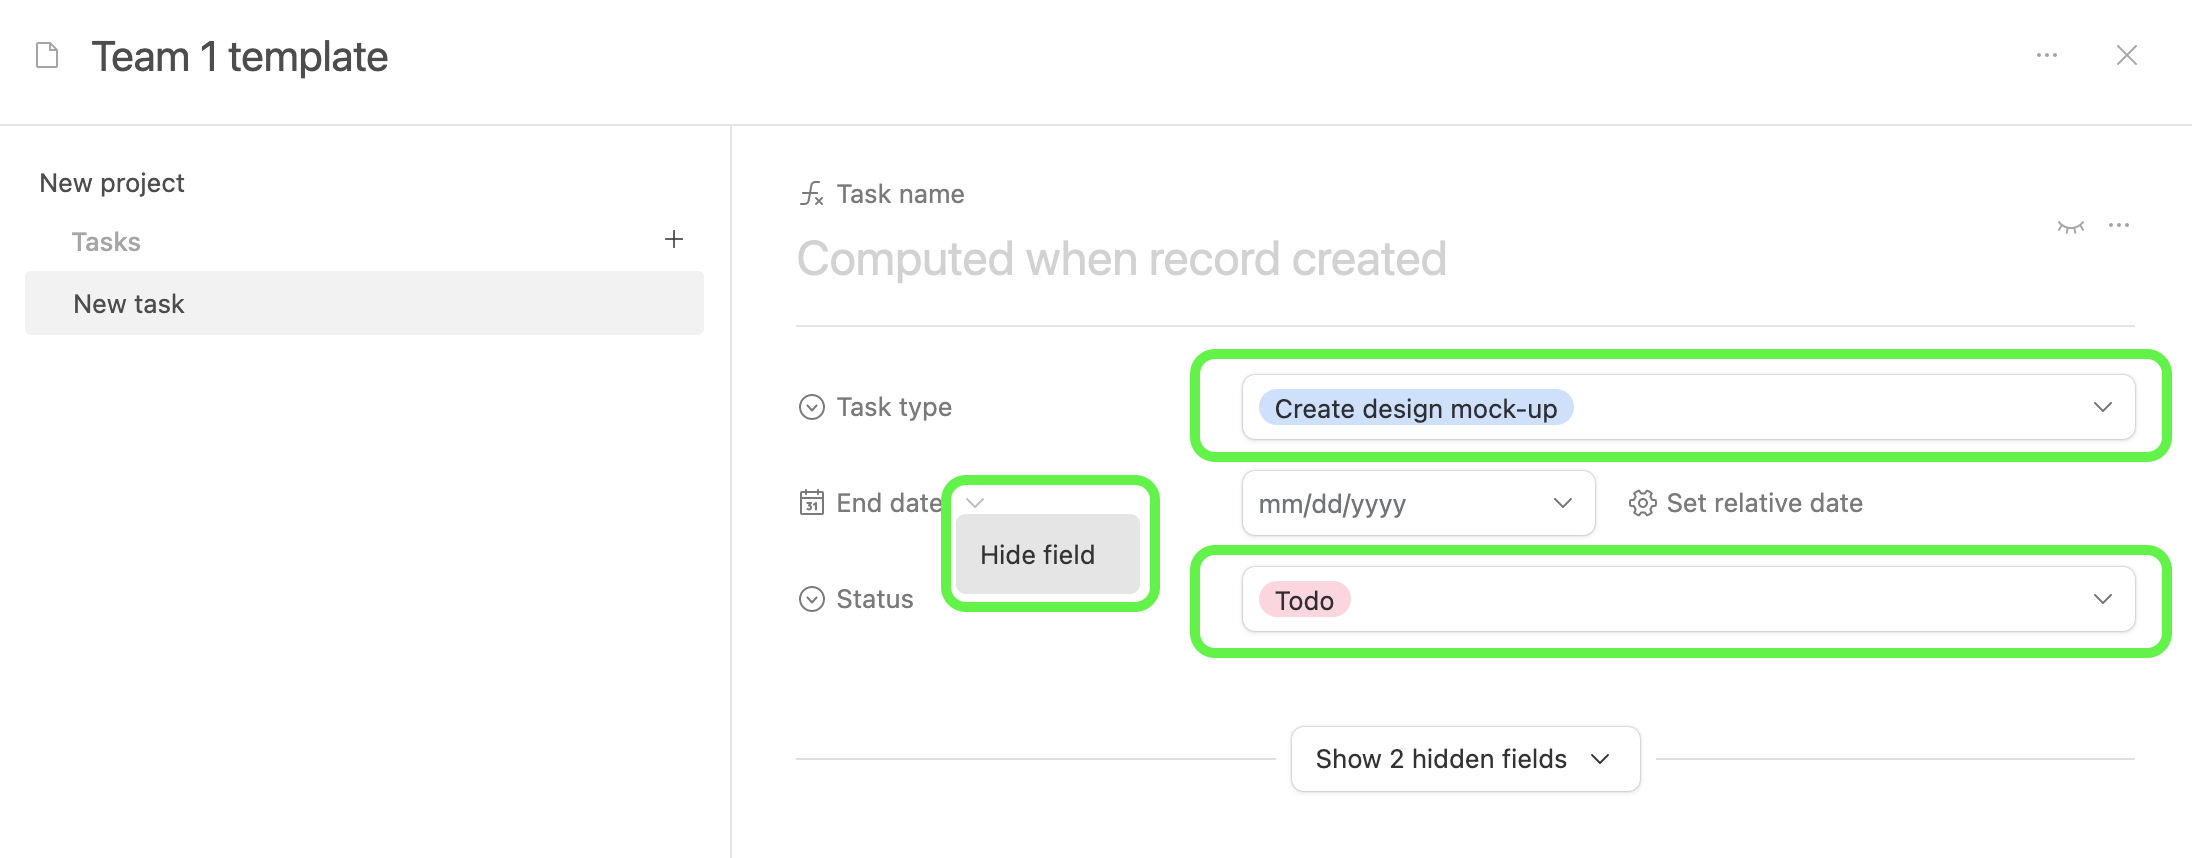
Repeat this process for each of the 4 other tasks by clicking the + Add task option on the left side next to Tasks. Once you've completed this for all of the tasks you can click on the New project tab on the left to view the entire template you've created. Scroll down to see all of the tasks steps you've j ust created.
You can now "x" out of the template configuration window and see the completed template on the right. At this point, you can duplicate the "Team 1" template, rename it to "Team 2," and configure the appropriate people to the roles for that team that map to the linked records covered in Step 3 above.
Using a record template
There are two ways to utilize templates. You can either:
Add the template to the base
Adding a template to a base will cause a new parent record to be created along with any sub-records that have been configured in that template. To add a template to the base, click the ... option from within the record templates sidebar of the record template you want to use. Then click + Create record with template. 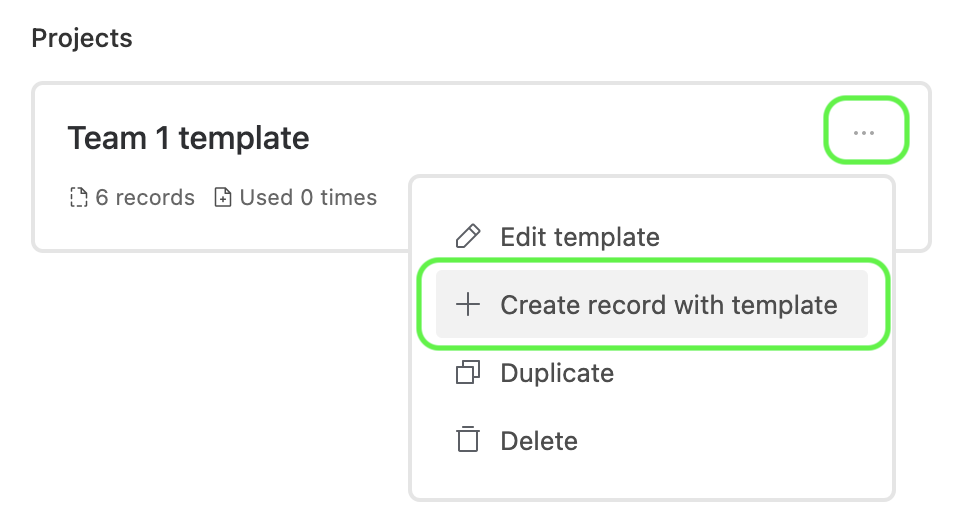
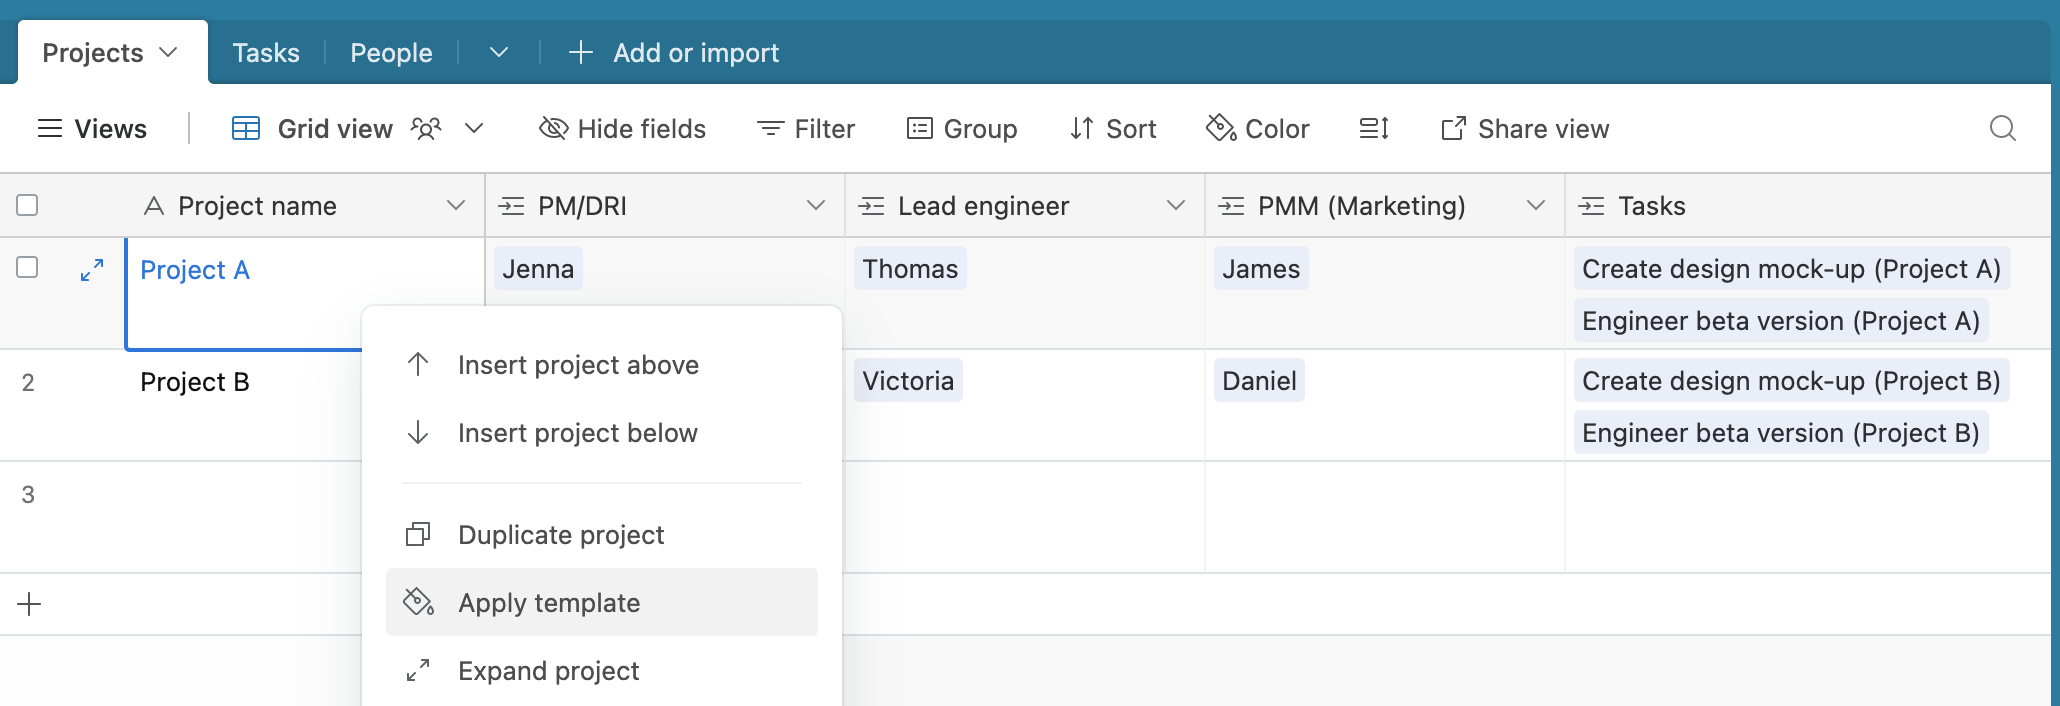
Apply the template to a record that has already been created
Applying a template to a record will have different behavior depending upon the field types that are configured in the template:
Empty non-array type fields are filled according to the template's configuration
Array-type fields are always appended to and deduplicated
Non-empty, non-array type fields are ignored
Computed field types cannot be directly modified by templates
To apply a template, right-click on the record you would like to apply the template to then click "Apply template." This will open a pop-over window where you can choose which template to apply.
Using record templates in automations
If you've already built out one or more record templates, then you can leverage those templates when setting up automations that contain one or more Create record or Update record actions. To utilize this functionality:
Step 1: Add a new automation or find an existing one
From an open base, click the Automations tab in the upper left corner of the screen. Then navigate to an existing automation or start building a new one. In the Actions section add a Create record or Update record action or click on an existing one.
Step 2: Choose the template option
Under the Configuration section to the right, choose the table containing the record template that you want to leverage. Then, click the dropdown menu below Create record and select the option From a template. 
Step 3: Choose a record template
This will cause the Record template dropdown to appear. Click that dropdown and select the record template you want this automation to use to create records when it is triggered to run. 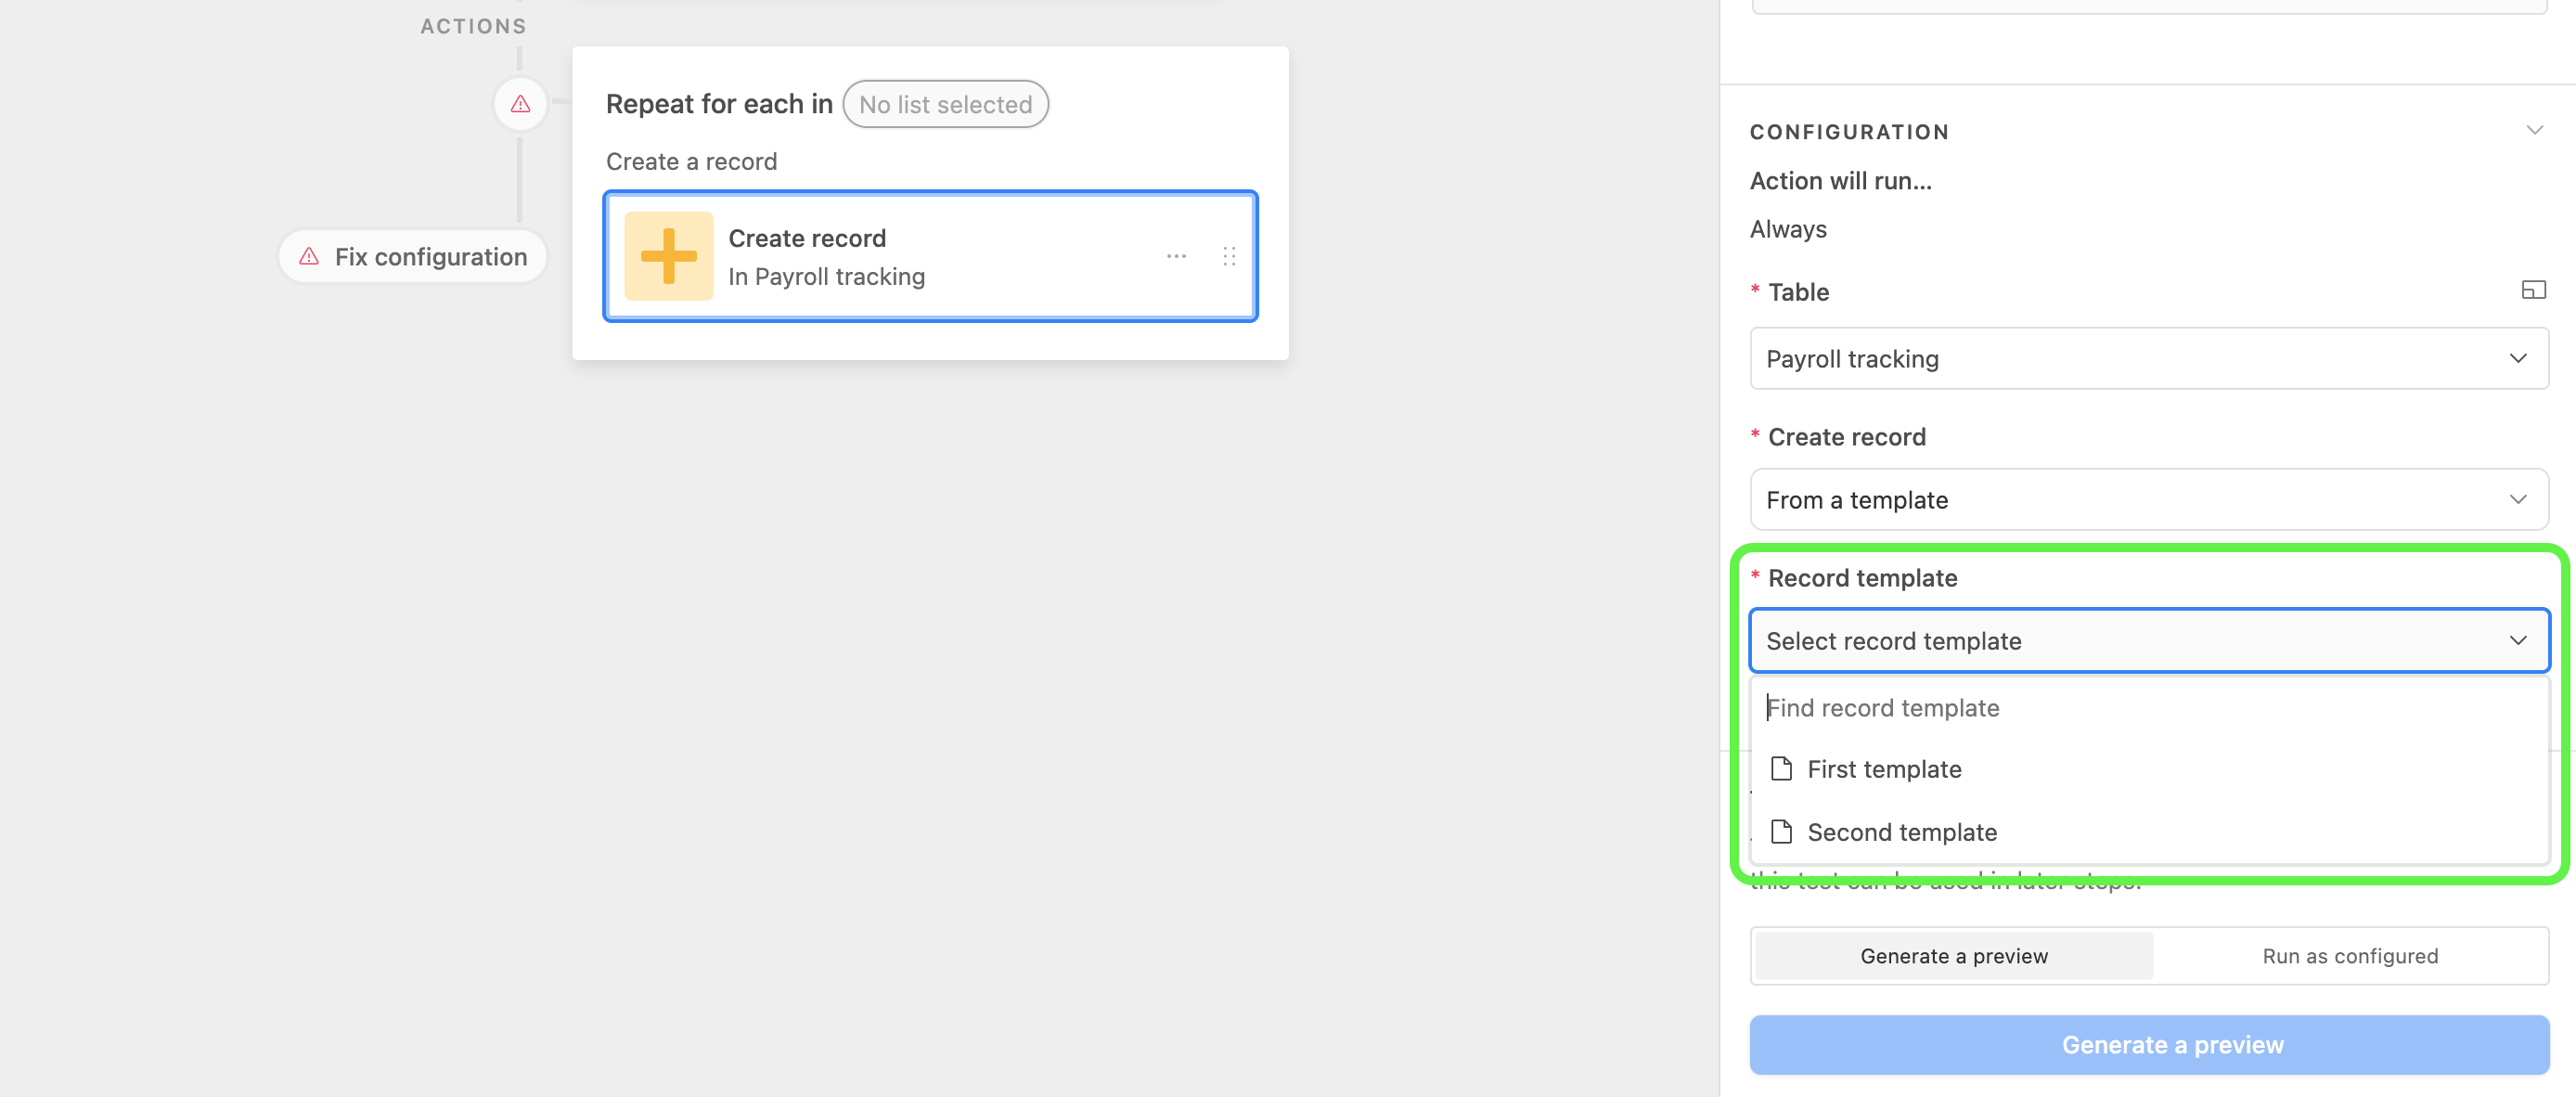
Step 4: Test the automation
You can click Generate a preview to test out what the record will look like when the automation runs. This will directly match the current configuration of the template chosen in the previous step. It’s important to note that any changes to the record templates used will affect the live automation's runs, even if the live automation isn't updated.
Other record template options
Multiple child table relationships per parent table
Ex: Project templates can contain both child "Tasks" and child "Subtasks" templates
Grandchildren level relationships
Ex: OKR -> Project -> Task
Reordering child/sub-record templates via drag and drop
Template duplication
Relative datetime values in child templates fields, relative to top-level template fields
This allows for dynamic dates in resulting record values, accounting for end user input at template use time
Option to include/exclude weekends in date calculations, default exclude
Delete templates
FAQs
What are record templates?
Record templates help you define sets of linked records that can be created over and over again. These sets of records typically have a hierarchical relationship (such as a project > tasks > subtasks or a campaign > assets). They’re used to create linked records in one or more tables, and can be linked for cascading creation. This makes it easy to orchestrate workflows for projects with the same set of tasks and requirements in a repeatable way.
Are record templates records?
No, they are not. Record templates are separate from records and won't appear in the underlying data of the table. But they follow the same schema of the table they exist in.
Are there any limits to the number of record templates that can be created in a single base?
The limits vary depending upon the plan type that your base is associated with:
Enterprise Scale - 2000 record templates per base (across all tables)
Business - 500 record templates per base (across all tables)
Team - 100 record templates in a base (across all tables)
The number of templates in the base is reflected in the template sidebar. When you create a multi-level template that contains details for multiple records (such as a project and its tasks), each record within this template counts towards this total. So, each sub-record will count against the record limit.
Is there a limit to the number of table levels in record templates?
Record templates have a 3 table level limit across the entire base. This takes into account all record templates in the entire base, even when creating new record templates.
I already have records in my base. Can I use them as templates?
Yes, you can convert existing hierarchical records into record templates in a list view. This can be done by right-clicking on the top level of the record and clicking Create record template. This will create a record template for each record in the hierarchy and copy over field values. These fields can be edited further before the template is saved.
Currently, templates can only be created from a list view within the base. Note that list views need to be created at the most granular level of your linked record hierarchy. So for a set of linked Projects > Tasks > Subtasks tables, the list view needs to be created at the Subtask level within the base.
What happens when I apply a template to an existing record?
Applying a record template will populate template values into any empty fields and append template values into multi-value fields (such as multiple select fields). It will not overwrite any existing values on the record. If the template has linked child templates, the appropriate linked records will be created.
Applying templates is especially useful in approval and categorization use cases. For example, applying a “social media announcements” template to a marketing campaign might check a “social media required” field on the campaign and add linked tasks for drafting, approving, and posting to various platforms.
Can record templates be integrated with date dependencies?
Can I import record templates from an external source, such as a CSV?
While you cannot directly import templates from a CSV, you can import templates into a base using the existing CSV import and structure them using a list view. Then, you can use Create record template functionality in the list view to customize those templates to fit your needs.
Can I link existing records in record templates?
Yes. Within the template configuration window, there is a dropdown arrow that will appear when hovering over a linked record field. Choose the Link an existing record to this field. This will allow you to pick a linked record (or records) that already exists as a default value in the record template you are creating.