Plan Availability | All plan types |
Permissions |
|
Platform(s) | Web/Browser, Mac app, and Windows app (with some additional limited support on mobile) |
Filtering in Airtable overview
Using filters in Airtable allows you to limit what collaborators can access, review, or edit.
Interfaces: Filters in interfaces allow builders to create a way for collaborators to interact with specific information that may only relate to individual teams, projects, or insights across visualizations on an interface page.
Views: View filters allow builders to filter out records from a view based on your conditions. When a record is filtered out based on a condition, it is not deleted—it's just hidden from the particular view you're using to look at your table.
Automations: Conditions in automations allow builder to apply logic so that the automation only runs or performs certain actions when particular conditions are met. The When record matches conditions trigger, Conditional logic in groups of automation actions, and Find records action all leverage conditions to increase the precision of automation runs.
Forms: Visibility rules in forms allow builders to control when and whether form submitters can input information in form fields.
What is a condition and how can I use it in Airtable?
Conditions are rules that allow you to:
Records to be visible in a particular view or interface
Records to be found or watched in an automation run or for particular groups of automation actions to be run
Fields to be hidden in forms until some other field has been entered or entered in a particular way
Use conditions when you want to:
Find a record(s) that meet certain conditions quickly (e.g., records that have a due date after X date and before Y date).
Focus on records that meet certain conditions (e.g., the records that have been assigned to me AND have not been marked as completed).
Prevent collaborators from seeing certain records.
Conditions in Airtable
Cconditions read much like sentences. The example below reads: "Show me the records where the DRI is Jordan Peretz."
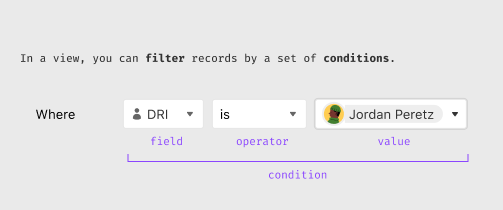
Field: Any field in your table. (The “DRI” field using the example above)
Operator: After selecting a field, choose an operator from the pre-populated dropdown menu.
Which filter operators are available is determined by the field type. For example, text fields will have filter operators like "contains," "does not contain," "is empty," or "is not empty"; number fields will have filter operators like "is greater than" or "is less than."
Note that operators "Is empty" and "Is not empty" do not require you to input a value because the default value is empty.
Airtable also offers functionality that lets you filter by specific linked records by using filter operators such as "Is exactly", "Has any of", "Has all of", or "Has none of" along with a linked record field. This eliminates the need for complex string-matching filters.
Value: This is the value you compare all of your records against using the field you specified earlier in the conditional statement.
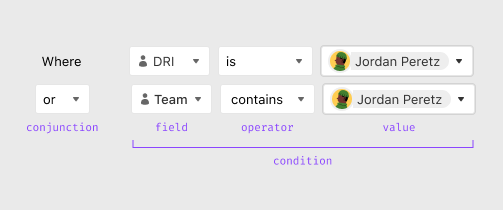
Conjunctions in Airtable
Conjunctions are used to logically connect multiple conditions within filter groups, allowing you to create more complex and precise filtering rules. The two available conjunctions are "And" and "Or".
You can use "And" when you want all conditions in a group to be met.
Otherwise, you can use "Or" when you'd like any condition in a group to be met.
Using the “And” conjunction example:
In this example, will use the "And" conjunction to create a new condition group where records must meet all of our conditions. Let's get a little more complex with our rules: "We want to see all chairs with a unit cost of over $1,000".
We can break this down into two conditions:
Where the "[Type] [is] [Chairs]", and
The "[Unit cost] is [greater] than [$1,000]".
When adding a second condition, clicking the "Add Condition" button will add both a conjunction and a new condition to be filled in. The "And" conjunction is selected by default. Now we can add our second condition, and by using "And" as our conjunction, we ensure that all records must meet both conditions to be visible in the view.
Using the “Or” conjunction example
If you want any of your conditions to be met in a condition group, you can use the "Or" conjunction. In this example, we'll create a view where we want to see records either:
Where the "[Type] [is] [Chairs]", or
The "[Materials] [has any of] [Reclaimed wood]".
By clicking on the conjunction type, you can choose between "And" & "Or.”
Rearranging conditions
With the conditions menu open from any surface that supports filters, find the six-dot icon to the far right of the condition that you want to move. When hovering over that icon, you should see your cursor/mouse change to a hand. Click and drag the filtering condition to the appropriate ordering location of your choice. Keep in mind that conjunctions (And/Or) may be altered depending on how many conditions you have set or the position of the condition that you are moving.
Removing conditions
With the conditions menu open from any surface that supports filters, find and click the trash icon next to the condition or conditional group that you want to delete.
Using conditions outside of views in Airtable
Using conditions in interfaces:
Setting conditional filters for interface visualization layouts
Allowing users who have access to an interface visualization the ability to configure their own filters
Setting filters for dashboard layouts to gain specific insights into underlying data
Utilizing and configuring filter elements (Blank, Record Review, and Record summary layouts only) on interface pages
Conditions in automations:
Adding filters to automations allows you to prevent unexpected runs and only perform certain actions or groups of actions when conditions are met. This is important because narrowly-scoped automations are generally more trustworthy and will only update records when necessary.
Conditions in forms:
Hiding fields until other fields are entered
Limiting which form fields certain form submitters can see
Creating efficient form flows to save submitters time and ensure they only fill out absolutely necessary fields
Condition groups and advanced filtering
Nesting condition groups
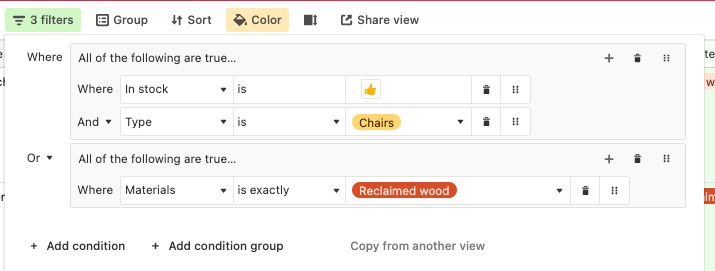
Now let's expand on this concept of conditional filtering. You can use conjunctions to combine and connect condition groups nested within other condition groups.
Combining conditional groups allows you to start building more and more complex filters. For example, we can create a rule to “Show chairs, AND those chairs must be in stock OR show furniture made of reclaimed wood”:
We strongly recommend playing with conditional groups as you read along. Advanced filtering is a feature with a delightfully mix-and-match feel that is best learned by doing.
Creating new condition groups
There are two ways to create a new condition group.
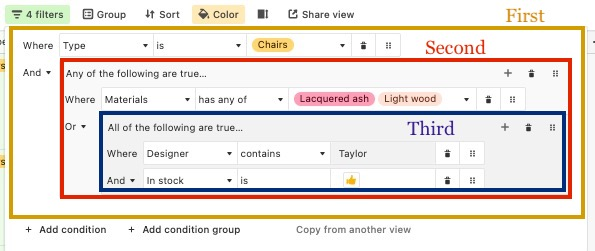
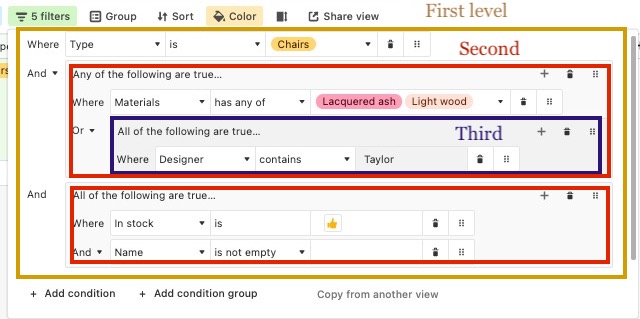
The first way is from the first level condition group, by clicking on the Add condition group button. This will add an additional condition group nested within the first level condition group we’ve been using up to this point:
The second way to create a new condition group is from within a second level nested condition group. Click the + button inside of the existing condition group and then click Add condition group. This will create a nested condition group on the third level. You can nest condition groups for a maximum depth of three levels:
Some important things to note:
You cannot nest a group any deeper than the third level and the option to add a group will be grayed out
Though three levels are the maximum depth level possible, you can still achieve complex and precise filtering by combining conjunctions with multiple levels of condition groups:
Each level of a condition group can have multiple conditions, but only a single conjunction. Meaning that each condition group can use either “And” or “Or,” but not both.
Understanding relative date filters
When using date field operators like "is within the past month," "is within the past week," or "is within the past year," it's important to understand how Airtable calculates these time periods:
"Is within the past month" means the past 30 days from today, not the previous calendar month. For example, if today is March 11, this filter will show records dated from February 9 through March 11 on a non-leap year.
"Is within the past week" means the past 7 days from today, not the previous calendar week.
"Is within the past year" means the past 365 days from today, not the previous calendar year.
It’s worth noting that the same holds true for “the next year”, “the next month”, and “the next week” operators. i.e. next year is 365 days in the future from today and so on.
If you need to filter by calendar month (e.g., all records from February 1–28), use a formula field approach instead. Create a formula field that extracts the month and year from your date field, then filter based on that formula field. You can also create a multi-conditional filter where one condition is on or after a specific date and the other condition is on or before a specific date.
FAQs
Are there any special considerations to be aware of when changing filters in views?
Yes. When you change view filters we recommend turning off any automations that may be associated with the view that you are altering. This is because live changes to filters can often cause unintentional automation runs while you are modifying them.
Where are advanced/nested filters currently integrated within the product?
You can currently access advanced filtering within the view filtering menu, record coloring, conditional form fields, and interfaces. This functionality is not available in the Airtable Automations feature.
What if I try adding a condition to a nested condition group and make a mistake? Is there a way to revert to the original?
You can easily rearrange, add, or remove conditions from any of your condition groups. If you are in the process of building a new view and are playing around with filters, we recommend creating a duplicate view. Within your new duplicate view, you can change filtering without affecting any ongoing workflows or other collaborators.
What are the best practices for migrating my current filter configurations to advanced filter options?
Advanced filters will not change any of the filtering conditions you previously had set up in your views. However, you will be able to add new condition groups—the world is now your oyster!
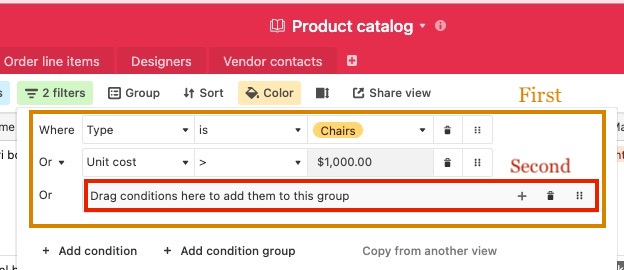
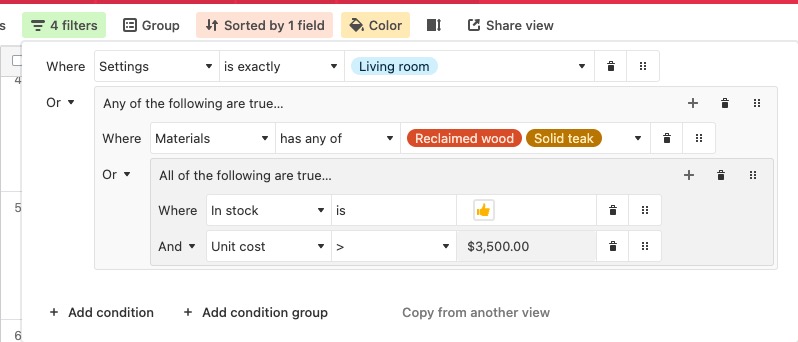
Using our product example above, imagine a customer comes in asking for either a:
A living room piece, OR alternatively,
Something made of wood OR above a price point of $3,500 per unit AND is in stock now.
Advanced filters can help you quickly get to the data you need. Here is a visual for the scenario we just described:
Will I be able to copy view configurations that have advanced filters?
Yes, you can copy a configuration from one view to another within the same table. Either follow the procedure described in this article or click on the “Copy from another view” option at the bottom of the filter menu:
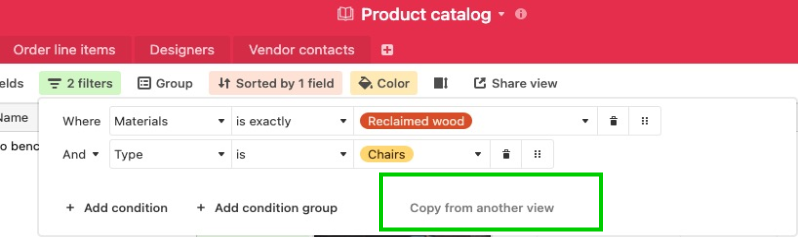
This functionality does not exist across other areas of the product, just views. Additionally, there must be at least one other view in the table you are working from in order to see this option.
What is the maximum number of filter conditions per view?
There is a maximum of 49 filter conditions per view. This total is calculated by adding any standalone filter conditions, plus any filter conditions inside of filter condition groups.
What is the maximum number of nested conditional filter groups per view?
There is a maximum of 2 nested conditional filter groups. This means that there are 3 levels of filters possible:
Standalone filter conditions
A conditional filter group
A conditional filter group inside of another conditional filter group
How might title-casing impact a filter using the “contains” or “is” operator?
The "contains" filter is case insensitive and will match records regardless of case, while the "is" filter is case sensitive and will only match records with an exact case match to the filter condition set. To display all relevant records regardless of case, we recommend using the "contains" filter instead of "is."
How do I prevent default auto-selection when opening an interface form?
To prevent auto-selection when opening a form, open the form from the “Add activation project” button, set the default for the select field to an empty value in the property panel, and re-publish.