Plan availability | All plan types with varying limitations |
Permissions |
|
Platform(s) | Web/Browser, Mac app, and Windows app |
Understanding conditional automation groups
Using conditions gives you the power to incorporate conditional logic into your automation workflows. You will create sequential groups of automation actions where each group has a condition based on the results of a previous trigger or action. Many of the same concepts when filtering records using conditions apply here.
Below we will walk through the concepts to understand how to use these conditional groups in an automation workflow.
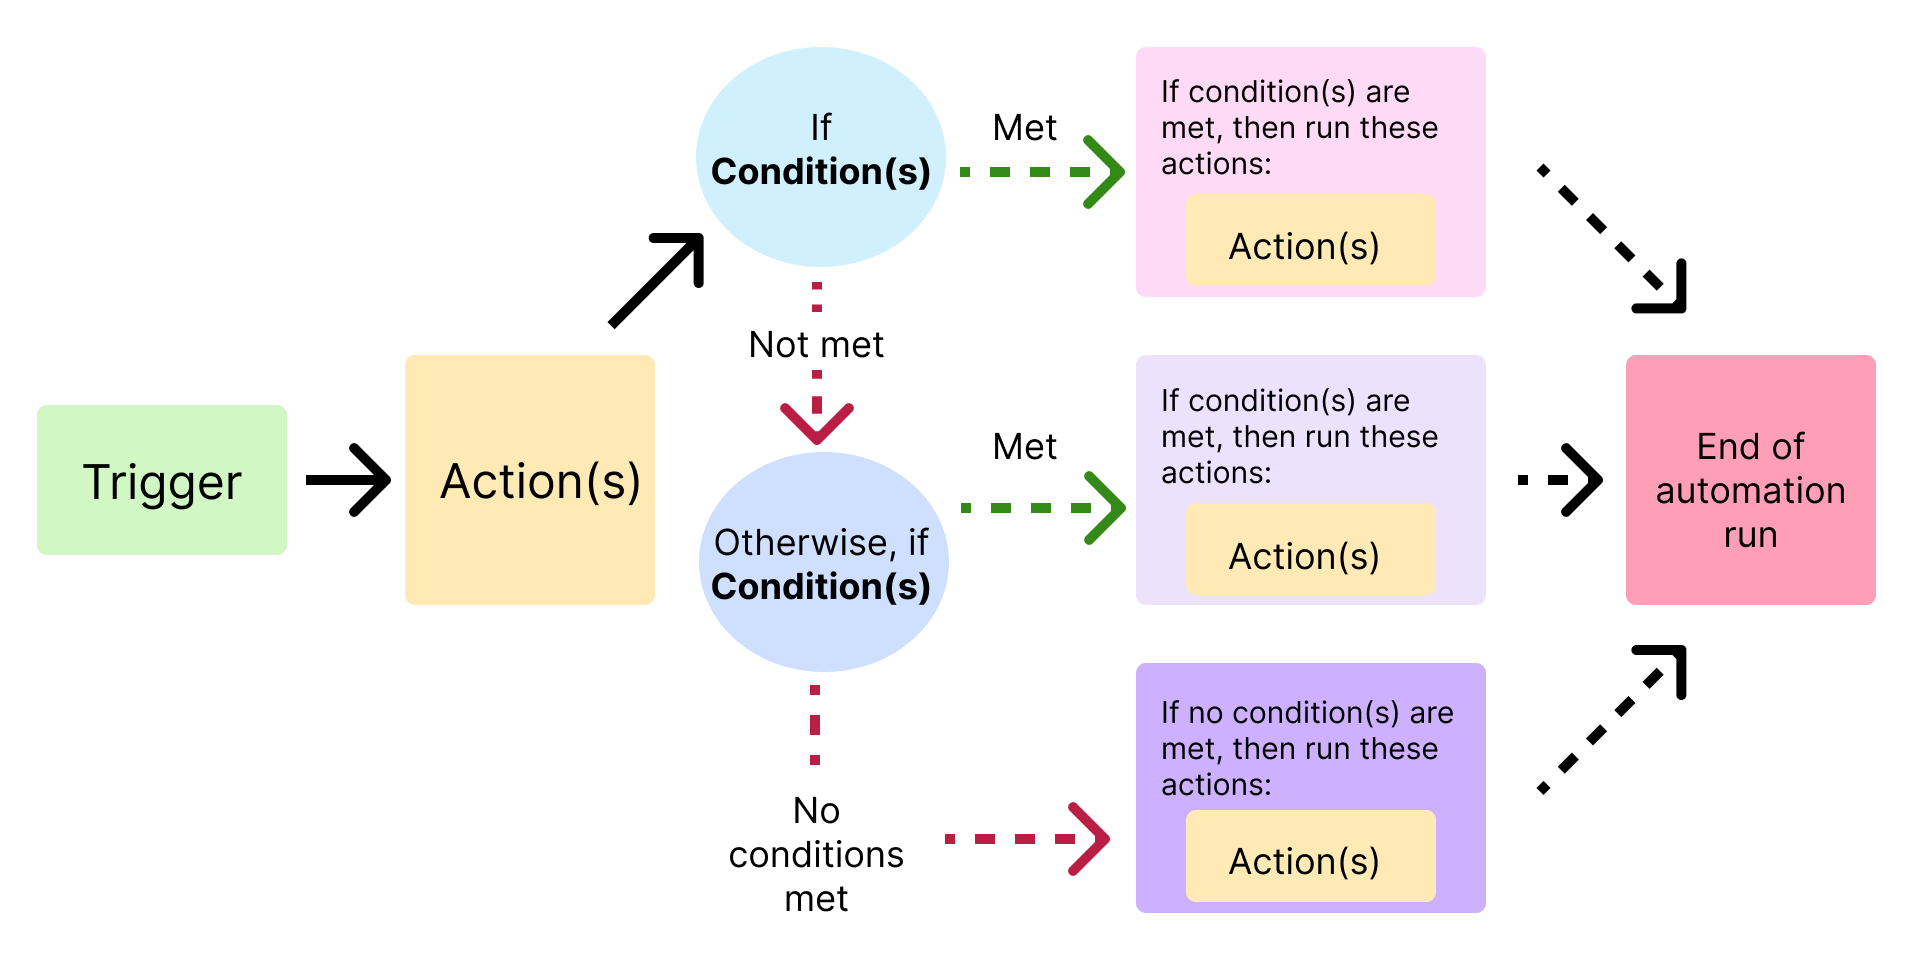
Concept 1: Understanding how the automation will run when conditions are met
On an automation run, your automation will go down the line checking each conditional group—if the conditions for a group are met, the automation will run all of the actions in that group. Only one group of conditions can be met during a single run. Looking at the chart below, if the first set of "if condition(s)" are met, then the actions associated with that will run even if other conditions match in the group of condition(s) below it.
Concept 2: General use case examples
Some examples of where conditional action groups can be helpful (but are not limited to) are:
The Find records action either returns or doesn’t return records
If a record isn’t found in your table, you could choose to create a new one.
Post on different Slack channels depending on each record’s values.
Assign interviewees to different sessions depending on the team they are applying for.
Concept 3: Simplified example
For a simplified example of a conditional workflow, imagine you work at a veterinarian’s office, and you need to make sure the incoming animals are sent to the correct vet. You could build something like:
If: the animal is a cat -> notify the cat vet
Otherwise, if: the animal is a dog -> notify the dog vet
Otherwise: this animal is neither a cat nor dog -> so notify the general vet.
Concept 4: Complex example
For a more work-relevant example workflow: Suppose we needed to create an automation to handle assigning projects to the correct person based on the Category of the project. We have two teams:
Paris leads the team handling “Brand identity” categorized projects
Gal leads the team handling “Industrial design” categorized projects.
Next, we build an automation workflow that assigns all “Brand identity” projects to Paris and all “Industrial design” projects to Gal. If any project doesn’t meet either of those categories, we send a Slack message to the team—letting them know we need a team lead for that project.
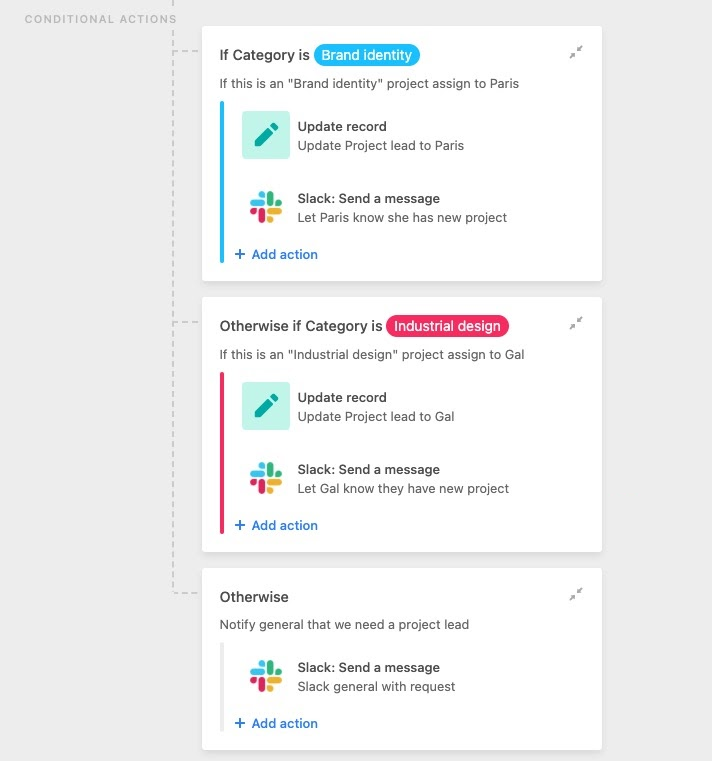
Let’s add one more layer of complexity to our example. Suppose Jeff has a great relationship with the technology team for one of our clients, SwipeSmart. So Jeff will handle all of the “Technology design” categorized projects only if the client is “SwipeSmart.” We can create and combine two conditions to cover this scenario:
If “[Category] [is] [Technology design]”, and
if the “[Client Name] [contains] [SwipeSmart]”.
Now, if a project is submitted from the technology team at SwipeSmart, Jeff will be assigned as the project lead:

Adding groups of conditional actions
Now that we’ve covered a few ideas for building conditional automation workflows let’s dive into how to create and configure conditional groups of actions.
Create an automation - You can also find and modify a previously created automation, but generally, it’s best practice to create a new automation. To start creating an automation, from the open base of your choice click on Automations in the upper left corner of your screen to open the automation configuration window. Click the + Create automation option to begin the setup process. If you would like, you can rename the automation right away to make it easier to understand what it does.
Configure a trigger - Next, you will need to click + Add trigger option. Once clicked, the available triggers will display for you to choose from. Learn more about automation triggers here. Once you have configured and tested the trigger, you can move on to the next step.
Add a conditional group of automation actions - Note that before adding a conditional group of automation actions, you can add singular automation actions before a conditional group of automation actions. All of the actions above your “Conditional actions” will be triggered every time your automation runs.
Click the + Add advanced logic or action option.
Then click the Conditional logic option.
This will automatically open the first set of conditions for you to configure.
Configure one or more conditions - For a more complex breakdown of a condition’s conjunction, field, operator, and value consult this section.
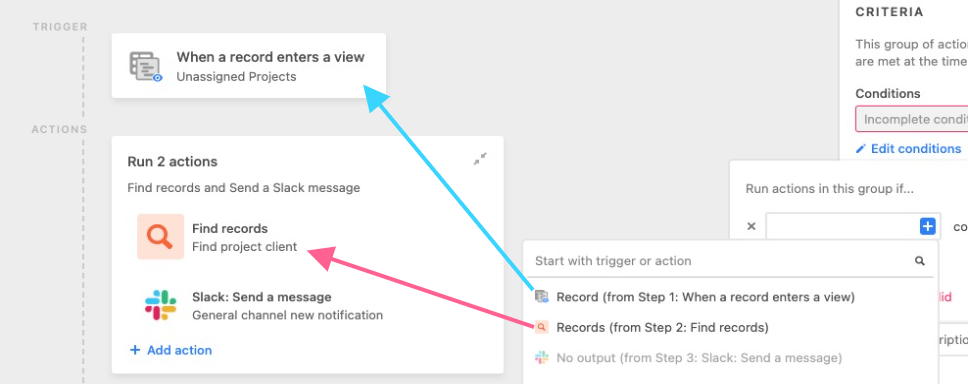
Click the blue and white + button in the first box to attach a token from a previous automation step to the condition.
After choosing a token you can then add either a static condition or a dynamic condition by clicking the cogwheel icon and then choosing a previous step’s token. Keep in mind that the static condition type will change depending on the type of field being referenced in the token.
You can add and edit conditions for this group underneath the “Conditions” header by clicking the + Add condition (or Edit condition) button. You can configure up to 50 total conditions.
In the “Labels” section you can choose to use an Airtable-generated default label or click the “Custom” option to type out your own label for this conditional group of automation actions.
In the “Description” section feel free to add a description of what this set of conditions is validating in plain text so that other users can understand this in the future in case they need to edit the automation.
Add action(s) to this conditional group - At this point, you’ll want to add and configure one or more actions to be performed when the conditions you set up are met. The “Find Records” action is a perfect use case for conditional groups. You can define a condition based on a previous “Find records” action and then do something different depending on how many records were found.
(Optional) Collapsing, adding more, duplicating, or deleting conditional groups - Clicking on the three-dot menu within a conditional group will show a menu to:
Collapse group - This only appears once you’ve added actions to the group. This option is just to help with visibility when editing a complex automation.
Add group above or Add group below - Add a new conditional group of actions above or below the current group
Duplicate a group - This option will duplicate a group below the group you are duplicating.
Delete a group - This option is unavailable in some situations and an explanation will appear when hovering over the greyed-out option.

(Optional) Add an “Otherwise” group of conditional actions - After you’ve created at least one conditional group of actions, you will have the option to add another conditional group (A.K.A an “Otherwise” group). You can add an “Otherwise” group by configuring the criteria to only run the actions in your conditional group:
If the conditions are met - You can think of this type of “Otherwise” group as additive. It’s a way to create even more delineation and complexity to the way that the automation will run.
or If no other conditions are met - This “Otherwise” group is essentially a catch-all for what to do if none of the previous conditions in your conditional action groups were met. Because this type of “Otherwise” group will only run if no previous conditions are met, you cannot add new groups below the “Otherwise” group.
No matter the type of conditional group you’ve added, after you’ve set up the conditions for your group, you have the option to choose a custom “Label” and/or “Description” for that conditional group. Adding a name and description for a group can help you tell at a glance what the whole group is doing and why. Make sure you add actions to your conditional group— otherwise, nothing will happen even if the conditions of that group are met!
Test the automation - Once you’ve set up the configuration for your conditional group of automation actions, it’s time to test your configuration. Automations containing conditional groups have unique considerations when testing. Consult this section for more information about those considerations.
Understanding and setting conditions for your group of actions
We’ll quickly go over the understandings related to conditions below, but for a more thorough explanation, check out this support article.
Within conditional action groups, a condition consists of four parts. The first condition will only consist of 3 parts because no conjunction is necessary for the first condition.
A field or result - A field from the trigger of a previous action step or the result returned from a previous action (e.x. the number of records found).
An operator - After selecting a field, choose an operator from the pre-populated dropdown menu.
A value - This is the value you compare all of your records against—using the field you just specified.
A conjunction - You can logically connect conditions together using conjunctions. The two conjunctions available are "And" & "Or":
You can use "And" when you want all conditions in a group to be met.
Otherwise, you can "Or" when you'd like any condition in a group to be met.
Other helpful things to know about conditions:
The first value in any condition you set on a conditional group will always be a field or result from a previous trigger or action in this automation:
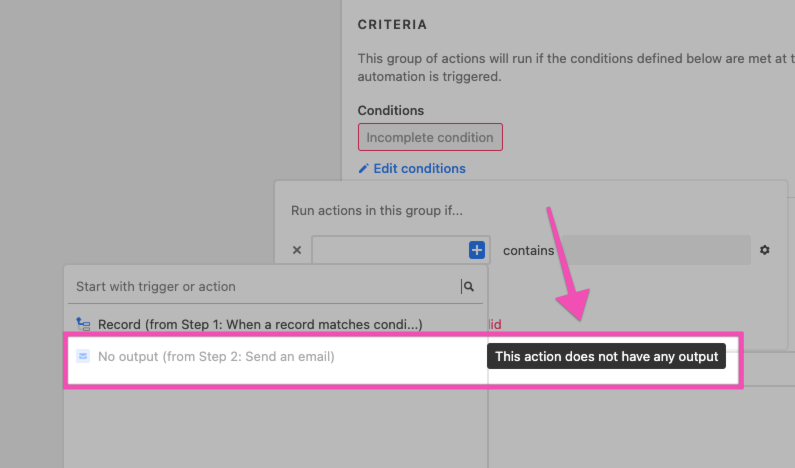
Some actions don’t return any data, so you won’t be able to incorporate those actions into your conditions:
Testing automations with conditional groups
With automations that include conditional groups, there are three things you need to test:
Test the automation’s trigger
Test each individual automation action (above or within your conditional groups)
The conditions of each conditional group
When you have a conditional group selected, you’ll see a button marked “Test condition.” Clicking that button will test the conditions of that group.
There are unique aspects to consider when testing conditional action groups in automations. When you test a conditional group, you check that your group will run when the given input testing information matches the conditions for that group. As a reminder, the testing information in an automation comes from a previous trigger or action step.
So effectively, when you test a conditional group, you are double-checking that your conditional group will run with the given input if:
The condition(s) of that group are met, and
The given input doesn't match a prior condition group first.
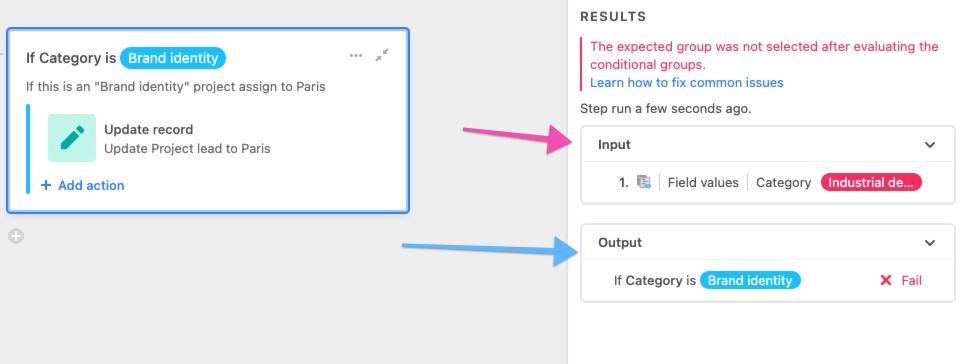
In a successful test, the input record had a category of “Brand Identity,” so the group tested successfully because the actions inside that group would have run.
So, to reiterate, a condition group is testing to see if the group would have run given the input testing information. So, even if your condition is valid— the test may fail if the information that is passed in doesn’t meet the conditions for that group. In the above below, the input record did not have a category of “Brand Identity,” so this group wouldn’t have been triggered— which is why our test failed.
FAQs
Do conditional actions count towards the total number of 25 actions allowed per automation?
Yes, conditional actions do count toward the total number of actions allowed for each automation.
Can I nest conditions in automations?
No, nesting conditional groups in automations is not supported.
Why aren't the date, or time-based, conditions in my conditional logic evaluating correctly?
Automations run on GMT since that is the default timezone that Airtable operates on behind the scenes. When setting up time-based conditions in Automations you may need to adjust times manually or create a formula to auto-adjust times so that the conditions evaluate according to your timezone.
Can multiple automation groups be triggered based on conditions?
No. Only one conditional group's conditions can be met during a run, the first set of actions whose conditions are met.