All plan types | |
| |
Platform(s) | Web/Browser, Mac app, and Windows app only |
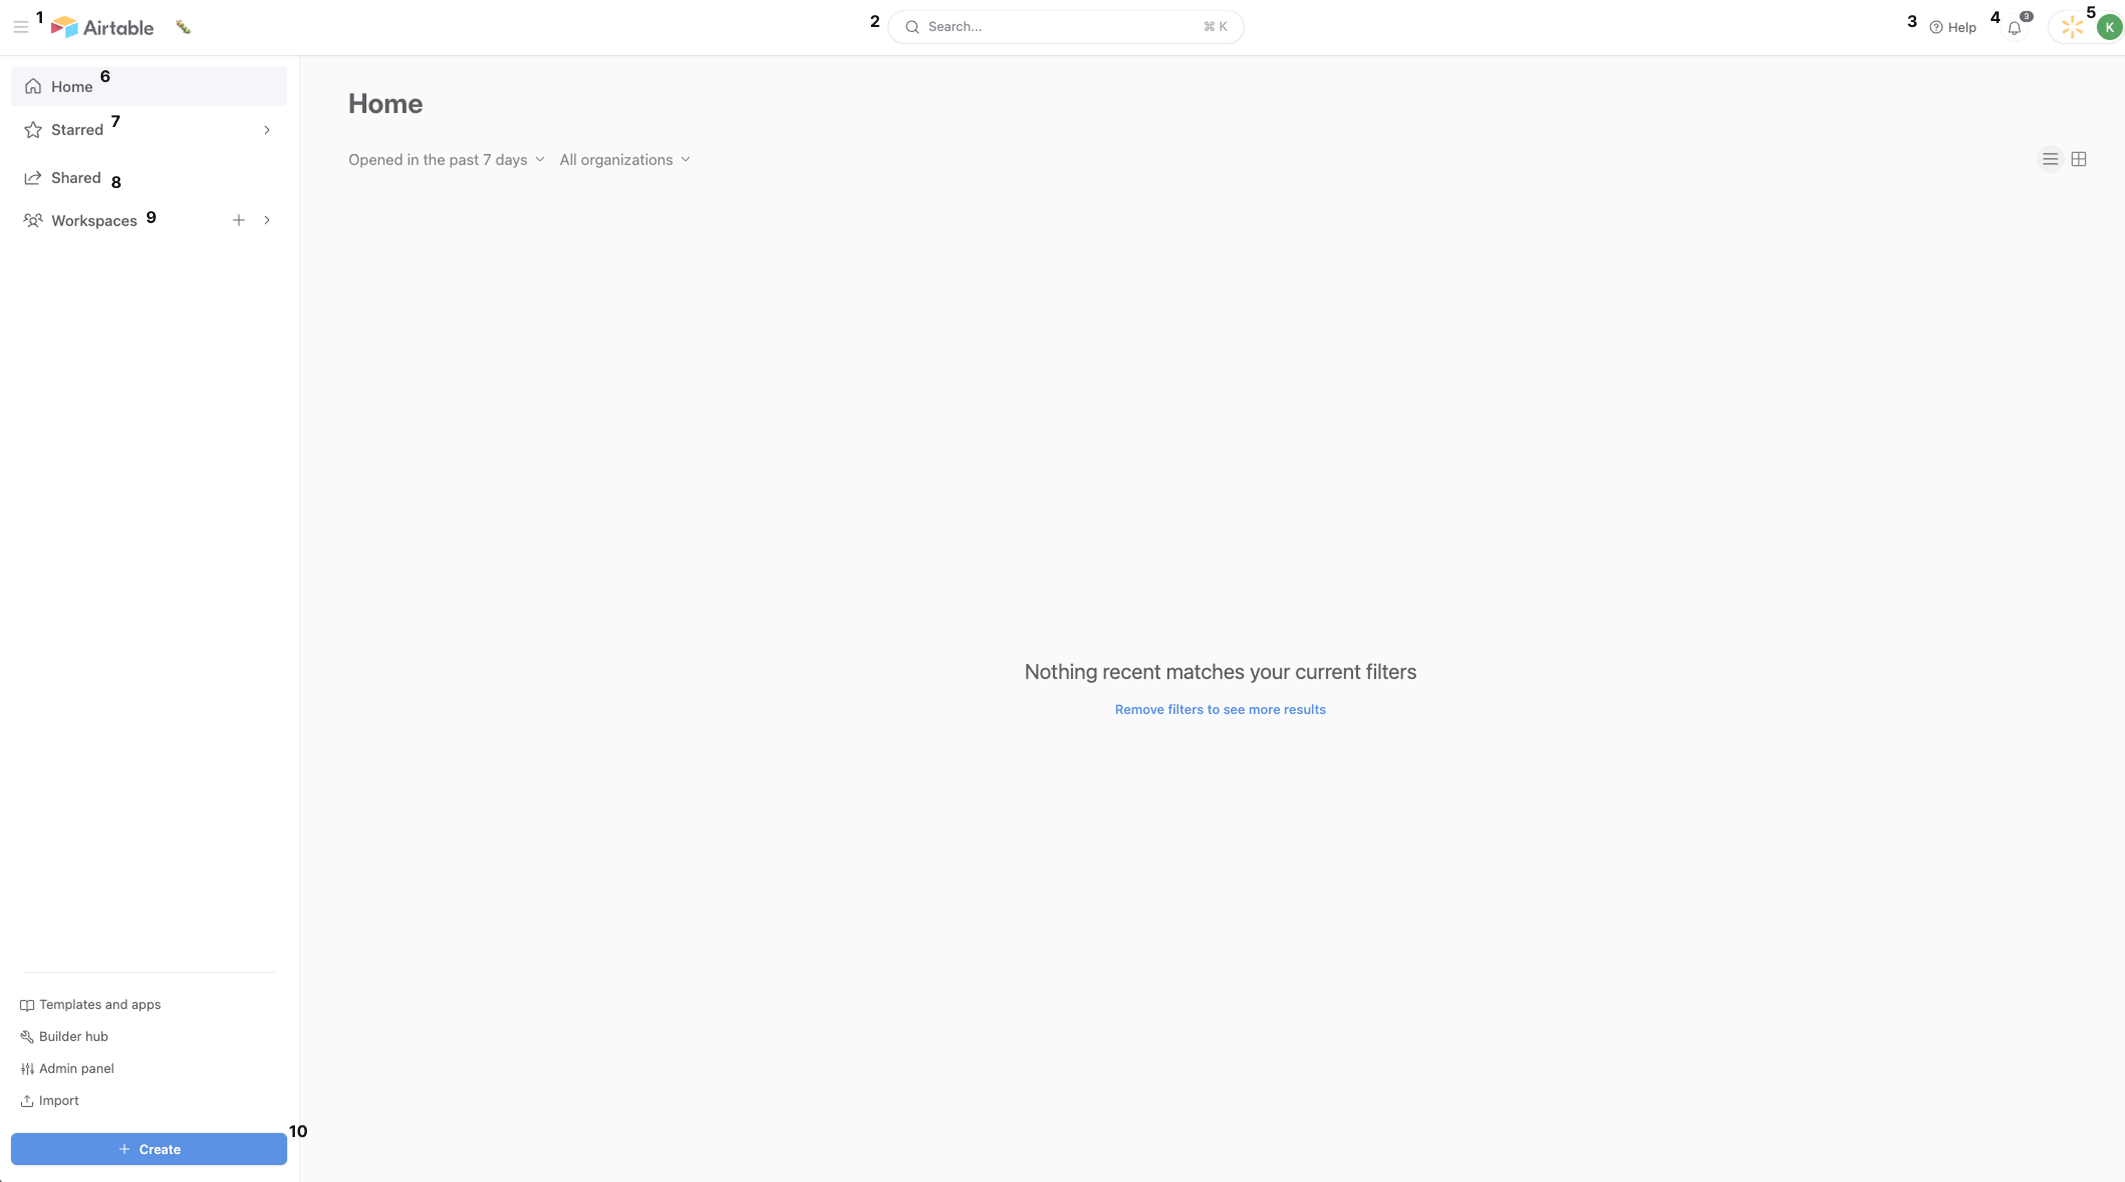
Airtable home screen overview
The Airtable home screen helps you navigate to and discover the work that matters most to you. Below, we'll walk you through the details of where you can find Airtable menus, options, links, workspaces, and apps.
Navigating the Airtable home screen
Sidebar collapse - Allows you to close or reopen the left side sidebar.
Search - Allows you to search for workspaces, bases, and interfaces within an app.
Help menu - allows you to find links to Airtable's Help Center and community, contact our support team and sales team, access developer documentation, upgrade your plan, and more.
Notifications - Allows you to review notifications.
Account menu - Allows you to:
Navigate to your account page.
Manage groups (Permissions dependent).
Set notification and language preferences.
Set your appearance preferences to light, dark or use system settings.
Manage integrations.
Navigate to the creator hub.
Open your workspace trash.
Log out of Airtable.
Home - Allows you to to refresh the home screen and show your recently opened apps.
Starred - Allows you to view starred (favorited) workspaces, apps, and interfaces. Additionally, you can open the drop-down next to Starred to scroll and browse through your starred items and drag-and-drop them in the order you prefer.
Shared - Allows you to view apps that have been shared with you.
Workspaces - Allows you to view shared workspaces. You can also open the drop-down next to "Workspaces" to scroll and browse or click the + icon to add a new workspace.
Create - It allows you to create apps. By clicking + Create, you can choose the workspace location to create your app and provide information and tips on how to get started.
FAQs
How do I change my home screen from a “List” view to a “Grid” view or “Grid” view to a List” view?
Open your Airtable home screen.
Click either the “List” icon (3 horizontal lines) or the “Grid” icon (box).
How do I filter my home screen data based on a timeframe and/or organization?
Business and Enterprise Scale customers can filter to display only items that match a specific filter, such as the date most recently viewed or apps belonging to a particular organization.
Open your Airtable home screen.
Click the ˅ icon next to “Open anytime” or “All organizations” and select your preferred option.

What sort options are available while using the home screen?
The "Shared" and "Workspaces" pages allow you to sort alphabetically and by date shared.
How do Airtable apps function on my home screen?
Each app listed on your home screen page allows you to navigate to it or to perform actions on it.
By click an app, it takes you to your most recently opened page in the app.
When hovering over an app, you have the following options:
Data - Allows you to navigate directly to the app’s “Data” tab (Permissions dependent).
Starring - Allows you to star the apps you work in the most. Click the star to add or remove the app from the “Starred” page or its sidebar.
Options - Hovering over an app displays the "..." spillover menu. You can rename, move, duplicate, or delete the app, customize its icon, and change its color.
Business and Enterprise Scale customers can select the "Open" option to reveal a submenu listing the app's interfaces and sandboxes.
What is “Starring” on the home screen, and what does it do?
You can star workspaces within the workspaces page, as well as apps and interfaces from within an app item on the home screen. These are displayed on the Starred page. In the "Grid view," you can drag and drop starred items in the order you prefer.
Clicking a starred workspace or interface item will navigate you to the item. Hovering over a workspace or interface will allow you to unstar it.
What is “Pinning” on the home screen, and what does it do?
On a workspace page only, you can choose to pin a set of up to 3 apps at the top of the page. Pinned items appear in the order that they were pinned—earliest to most recent.
Is there a way to always open the base layer or interface layer when I click on an app from the home screen?
No. When you click on an app from the home screen it will take you to the either the base layer or the interface layer depending on the last surface you navigated to in your last logged-in Airtable session. Additionally, if you were last in the base layer, then it will open the last view you had open and if you were last in the interface layer, then it will open the last interface page you had open.s