Plan availability | All plan types with varying limitations |
Permissions |
|
Platform(s) | Web/Browser, Mac app, and Windows app |
Overview of repeating groups of automation actions
The repeating group feature was created with repetitive workflows and simplicity in mind. This doesn't necessarily mean that every use case's automation needs will be simple to build. However, the resulting automation will likely save you and your team time, so a little extra work upfront is worth the effort. This article covers the basics to get you started.
Common use cases for this automation feature include:
Batch emails - Send individualized emails to a list of unconfirmed event attendees to remind them to RSVP for an upcoming event.
Compile tasks and notify colleagues - Get a list of your team members and find each person’s assigned tasks for the week, then send each person a custom email with their tasks.
Iterate through and update found records - Automatically update a list of tasks associated with a particular project when all of the sub-tasks related to certain tasks are completed.
Terminology:
Repeating group - This is a set of one or more automation actions that have been configured to run when triggered. Unlike conditional groups that only perform a single round of actions per automation run, repeating groups are "looped through" in order to perform the same group of actions for each item in the input list. Repeating groups offer similar functionality to the forEach loop coding capability in a no-code/low-code, click-and-create package.
Input list - The source of the items, typically an array output of records, that a repeating group of automation actions will loop through before completing an automation run.
Setting up a basic repeating group in an automation
For this walkthrough, we will use the example of sending out a batch of emails, individualized based on each recipient's information.
Open your Airtable home screen and select the base where you want to add the automation.
After you have configured your base in the manner you choose, you can then begin configuring your automation. To start creating an automation, click on Automations in the top-center portion of an open base. Then, click Create an automation to begin the setup process, see this article for more information.
The first step of building any automation is to choose a trigger that will cause the automation to run. In this case, we will use the At scheduled time trigger. Under the Configuration section, you'll fill in the Interval type, Timing, and Starting fields in a manner that makes sense with your workflow. In this case, we'll set our automation to run every 1st day of the month at 6:00 a.m. starting a few days out from the current date.
Next, we'll add a Find records action and configure it to return a list of people who are "Unconfirmed" for an event that we are planning. This step is important as it returns an array of information that we will use in the repeating group step next. It's a good idea to input a Description for this action to describe was it is finding. Under Configuration, you'll need to:
Set the action to find records in a specific Table
Choose to find records based upon a view or conditions
Set the view or configure the conditions that work for your needs.
In our example, we will set the action to look in the "Unconfirmed" view of the "Attendees" table.
Note
It's important to remember that conditions that are modified in a view being referenced by automations can also modify the results of an automation containing a Find records action. In these cases, we recommend either locking the view that the automation refers to or setting the conditions within the automation to prevent erroneous automation runs.
Before moving on to the next step, we recommend clicking the Test Automation button. Once the repeating group step has been added, this button will be disabled for technical reasons.
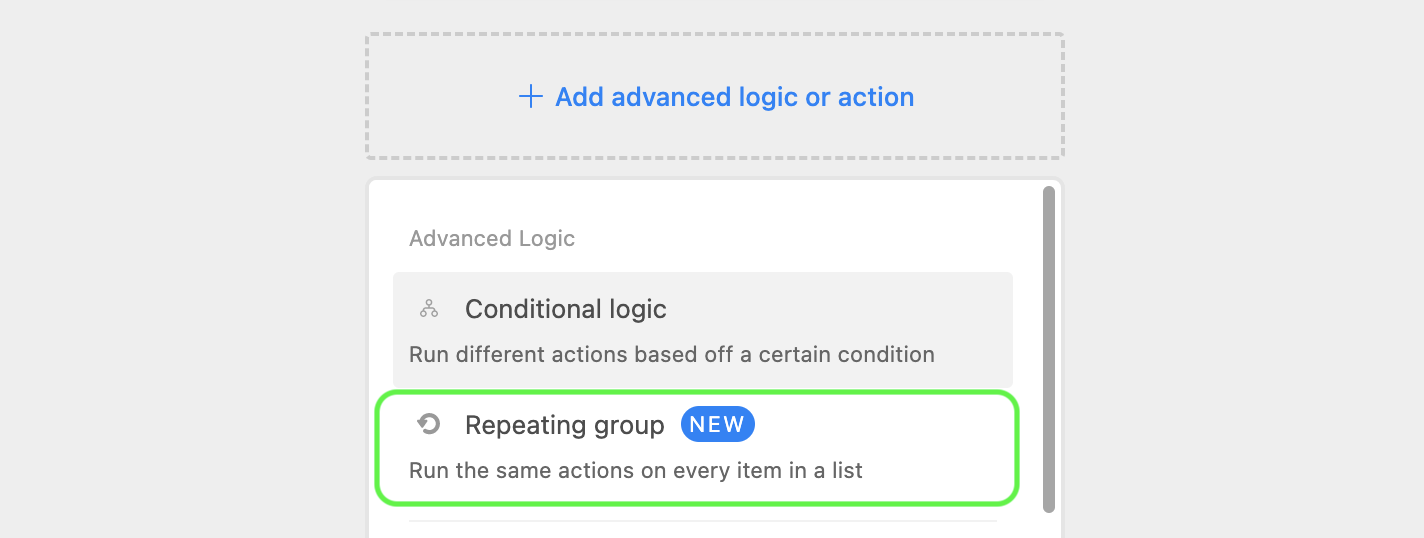
The next part of the setup process can be broken down into four steps:
Add a repeating group - Click + Add advanced logic or action and then click Repeating group to begin configuration.
Select input list - After clicking Select input list, you'll first choose a source of data to use under the Use data from... section. The option you select here will be highly dependent on your workflow needs. In our example, we will be choosing the Find records action from the previous step. Next, under Choose data you'll choose which data will be used as a list. Again, these options may differ depending on the source of data that you are drawing from. In our example, we will click the Use as list option. Find other supported sources for input lists in the dependencies section below.

Name and describe this repeating group - Under the LABELS section, you'll see the option to use a default name that Airtable generates or enter a Custom name yourself. You can also add a Description for the repeating group.
Test - Finally, you'll want to click the Test input list button to make sure that the list looks as expected. Under the Results section you'll see an array (list) of items selected. The action(s) the automation performs next will perform their action(s) on each of the items in the list that is generated when the automation is triggered to run.
Now that you've set the input list, it's time to set up one or more actions to perform for each item in that list. In our example, we will add a Send email action and use tokens from the previous step to dynamically input information that corresponds to each item in the list. For instance, we want one individualized email sent to each person found in the "Unconfirmed" view from the find records step. To ensure that the email is customized to each person:
Click the blue plus sign in the To field of the email action's configuration window.
Then, click the Current item option under the Repeating group sources section. Clicking this will cause options to appear under the Choose data section.
In our case, we'll choose the Email token. The options here will appear differently depending on the name of the field in the underlying base.
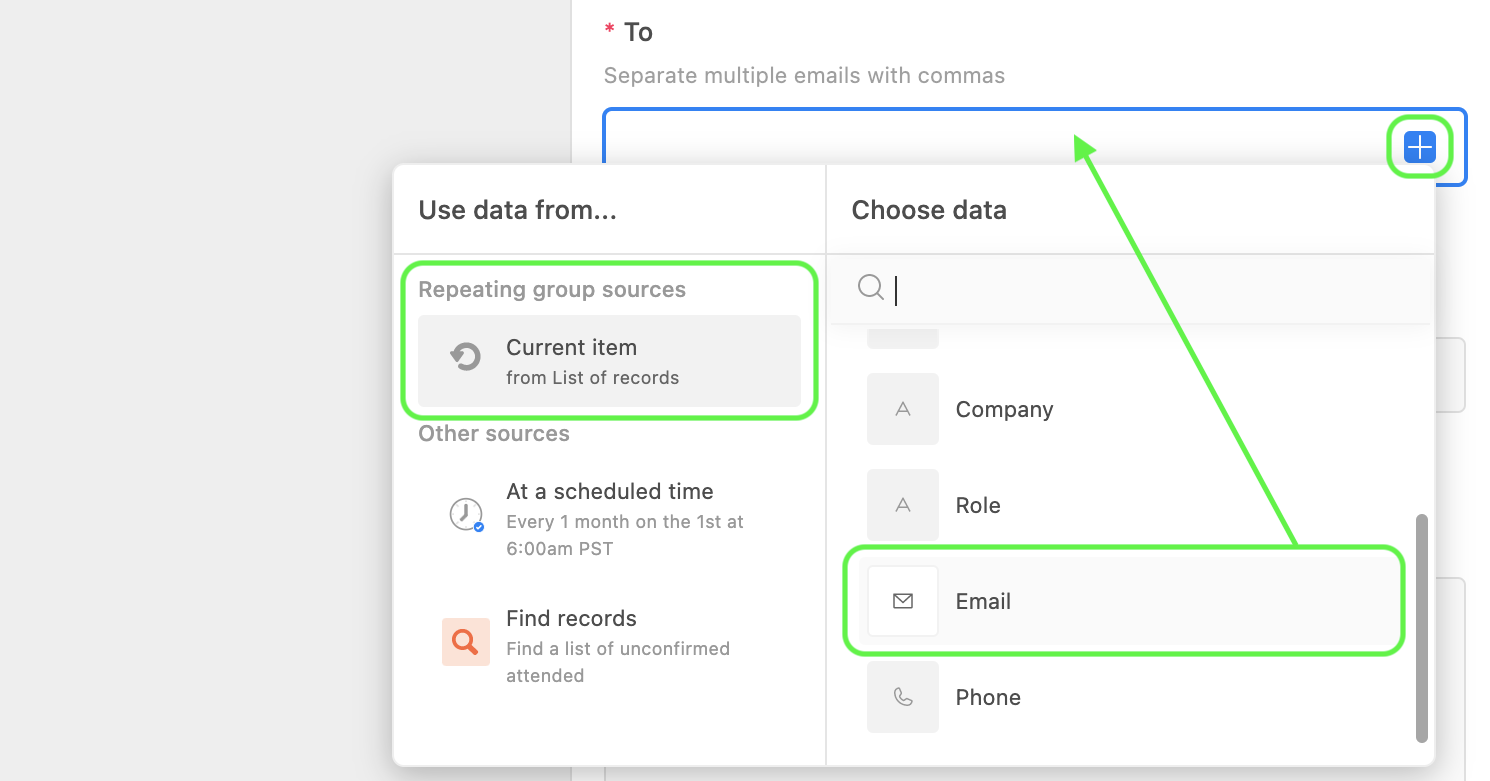
You can continue inserting customized tokens into the Subject, Message, and other fields that are part of the Send email action's configuration window. In our case, we'll also include a Name token in the Message that is sent.
This is just one of the many actions that could be added to the repeating group that you are building. Other common actions to insert here include Update record, Create record, Slack: Send message, Run script, and more. It all depends on your needs and the complexity of the workflow that you are wanting to automate.
As always, you'll need to test your automation before turning it on. Remember that once a repeating group has been added to an automation, the Test automation button will be disabled. This means you'll need to test the repeating group step and any other steps of the automation on a step-by-step basis. Once you are happy with the automation's configuration — and all steps have tested successfully — you can toggle the automation on.
Finding and updating multiple records with a repeating group
A common workflow involves finding all records that match specific criteria and updating a field across all of them. This example shows how to combine the “Find records” action with a repeating group to update multiple records.
Example scenario: Find all records where a project code field equals "1610010FOU" and populate a status field for each matching record.
Open your Airtable home screen and select the base where you want to add the automation.
Click Automations in the top-center portion of the base, then click Create an automation.
Click + Add trigger and select the trigger that makes sense for your workflow. Common triggers for this use case include:
When a record is created - To process new records automatically
When a record matches conditions - To respond when records meet specific criteria
At a scheduled time - To batch process records on a schedule
Click + Add advanced logic or action, then click Find records.
Under Configuration:
Select the Table where you want to find records.
Click on the dropdown below “Find records based on” and select Condition.
Click + Add condition and configure it to find records where your field (e.g., "Project Code") equals your target value (e.g., "1610010FOU")
Click Test step to verify the action finds the expected records.
Click + Add advanced logic or action, then click Repeating group.
Under “Select input list” :
Choose the Find records action from the previous step under “Use data from...”
Click Use as list under “Choose data”
Add a custom name like "Update each found record" and optionally add a description.
Click Test input list to verify the list contains the expected records.
Within the repeating group, click + Add advanced logic or action, then click Update record.
Under “Configuration” :
Select the same Table used in the Find records action.
For Record ID, click the blue plus sign, then select Current item under the “Repeating group sources” section, and choose Airtable record ID
Click + Choose field and select the field you want to update (e.g., "Status")
Enter the value you want to set (e.g., "Processed") or click the blue plus sign to insert dynamic values from the current record
Test each step individually to ensure the automation works as expected. Once all steps test successfully, toggle the automation ON.
Note
The Find records action has a default limit of 1000 records per run. If you need to update more than 1000 records, you'll need to either adjust your conditions to process records in batches or use a Run a script action to fetch additional records.
Additionally, if you are editing an existing automation, then you may notice that older Find records steps may default to a lower limit until you edit the automation, change the limit field of the step, and save the automation/publish the changes.
Dependencies for repeating automation groups
General limitations
The Test automation button will be disabled once a repeating group has been added to the automation. You'll want to use the Test step option next to each step of the automation instead.
Each loop iteration is not guaranteed to run in a certain order. If your automation requires that there be a predefined order to the way that the list of records is looped through, then you'll likely need to explore other options.
Supported input list sources
Find records action
User fields that contain multiple users
Linked record fields that contain multiple linked records
Script outputs that are in an array format
FAQs
Is the 1000 record limit of the "Find records" action still relevant in a repeating group?
Yes, any pre-existing limits from a “Find records” action step will still apply. Remember that automation creators might set a limit lower than 1000 records per run as discussed here. If you need to exceed the find records limit, you will need to fetch the records using a script rather than the “Find records” action.
How are automation runs calculated in repeating groups?
Automation runs are counted each time an automation is triggered. That is to say, if a repeating group of actions is looped through several times, then it will still only count as one automation run. For example, if your automation contains a repeating group that updates 50 found records, then that would only be counted as 1 automation run, even though the repeating group updated 50 total records.
Is there an upper limit related to the number of items that can be looped through in an input list
Yes, there is a limit of 8000 items per input list. This limit might be reached in automations that contain input lists that reference arrays from scripting outputs but can also apply to automations that use a linked record or user field as an input list source. Automations using the “Find records” action as an input list source are already limited to a maximum of 1000 records per action/run, which means that it will not exceed this limit.
Can values be appended in fields updated by multiple forEach loops?
No. While the primary use case for repeating groups of automation actions is to iterate over a list of found records and update each accordingly, some use cases attempt to add values from each iteration to the same field on a single record. When doing so, the updated field does not preserve each previous update in the loop. The output will only display one value.
In other words, the same repeating group of automation actions cannot be used to append values, it can only be used to replace values.
Is it possible for there to be both a repeating group and a conditional group in a single automation?
Yes, there can be both a Repeating group and a Conditional group in a single automation.