Plan Availability | All paid plans |
Permissions |
|
Platform(s) | Web/Browser, Mac app, and Windows app |
Note
For many customers, the newer Jira Cloud or Jira Server / Data Center Sync integration features may be a better fit. Check out either of the articles linked for more information.
As a popular bug-tracking system for engineers, Jira contains a vast amount of project-related data that other teams may need. However, the interface is not always suitable for cross-department workflows. Many teams are overwhelmed by Jira and only need a subset of the information that is relevant to their work. The Jira Cloud extension allows teams to import only what they need and the flexibility to organize the data to suit their process.
Jira Cloud extension prerequisites
Note
To use the integration, you must be using Jira Cloud, not Jira Server/Data Center. Consult Jira’s instructions on how to check which version you’re on here.
Confirm you have implemented Jira Cloud
If your access URL is
.jira.comor.atlassian.net, you have a Jira Cloud implementation ✅If your access URL is
jira..com, you have a locally hosted Jira Server implementation 🚫
Create an API Key within your Jira Cloud Implementation
IMPORTANT
Store the API Key value securely in a password vault. Anyone with access to this key could gain access to your Jira Cloud information.
If this value is lost, a new key must be generated. It cannot be viewed again
The account tied to the Jira Cloud API Key must have an appropriate level of access to read each mapped value
Adding a Jira Cloud extension
Open your Airtable home screen.
Create or open the base where you want to install the Jira Cloud extension.
Click Tools in the upper-right corner.
Click the Extensions option.
Click Add an extension.
Search for and locate the Jira Cloud extension.
Click Add, then Add extension.
Enabling Assignee Fields
To fully utilize the Assignee field, additional configuration in Jira Cloud is needed.
Due to privacy limitations of the Jira API, users can only import assignee information after they enable user email visibility in Jira. This change only alters who within your project can view the user email on the user profile page. It does not change any project-specific privacy settings, like who can view or access your project.
You can either have an admin change these settings globally or ask each of your project members to change their personal settings. It should take less than a minute to adjust these settings.
Admin option
If you’re an admin, you can click on “Jira System settings” and enable the ability to pull in assignees by changing the user email visibility from “Hidden” to “Public” inside your organization. NOTE: “Public" is the only supported option.
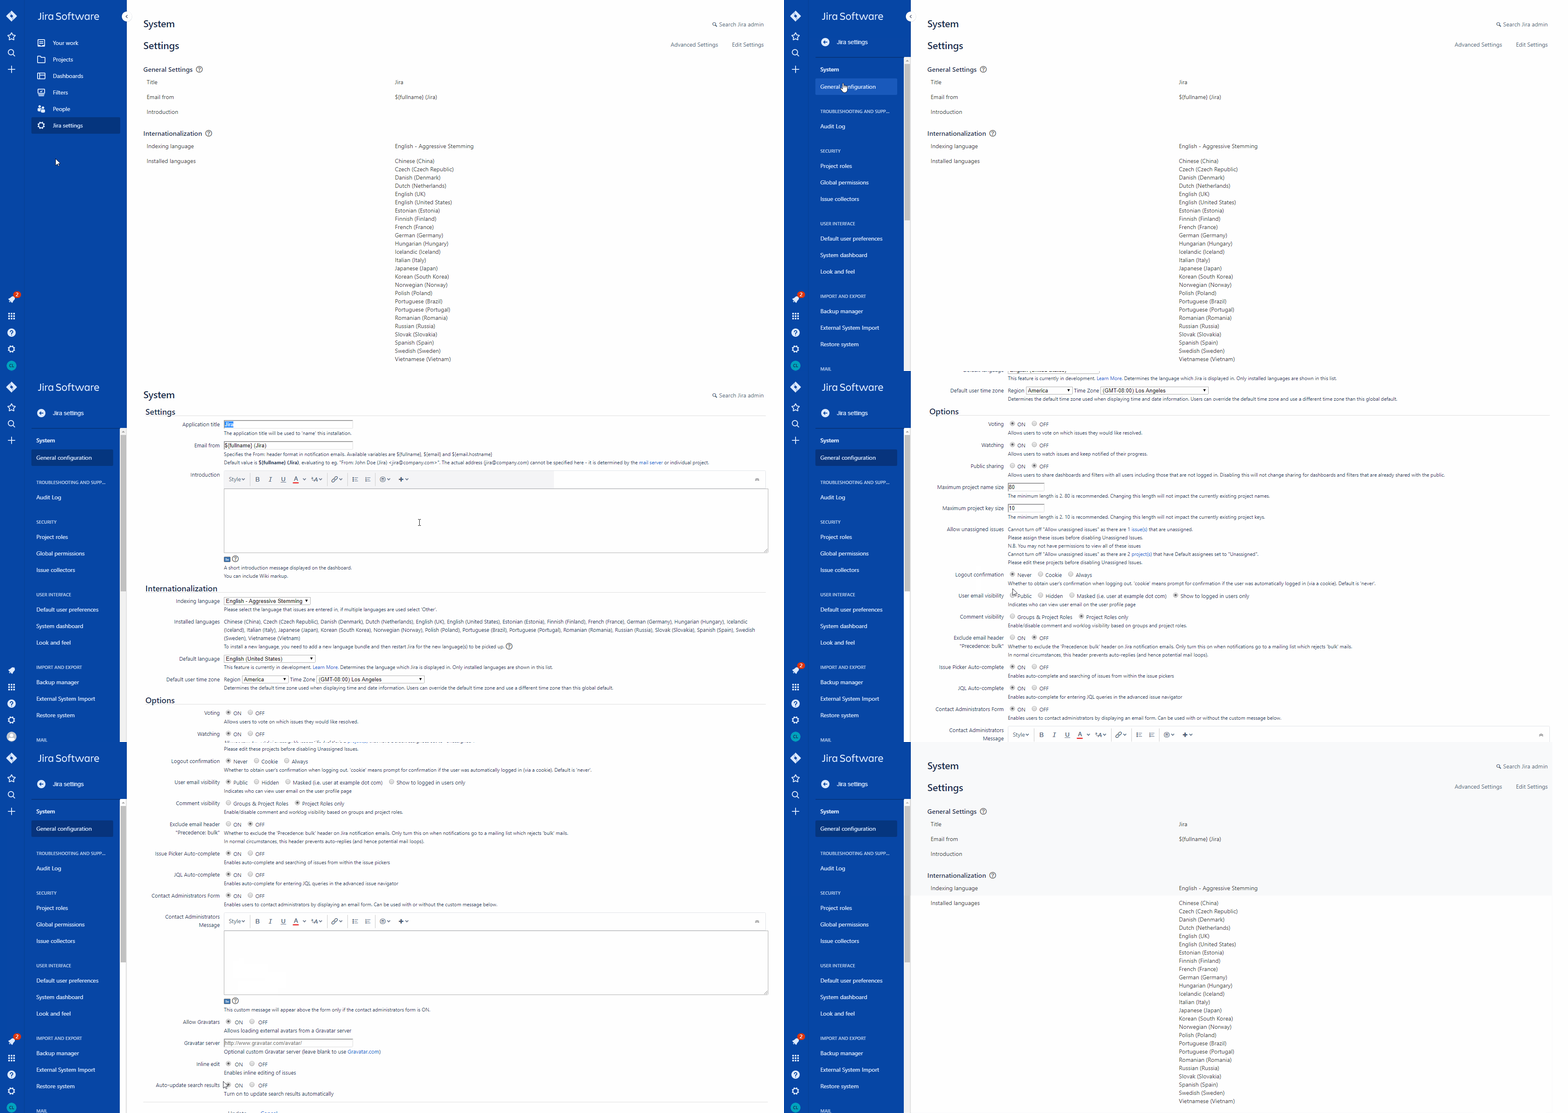
Individual option
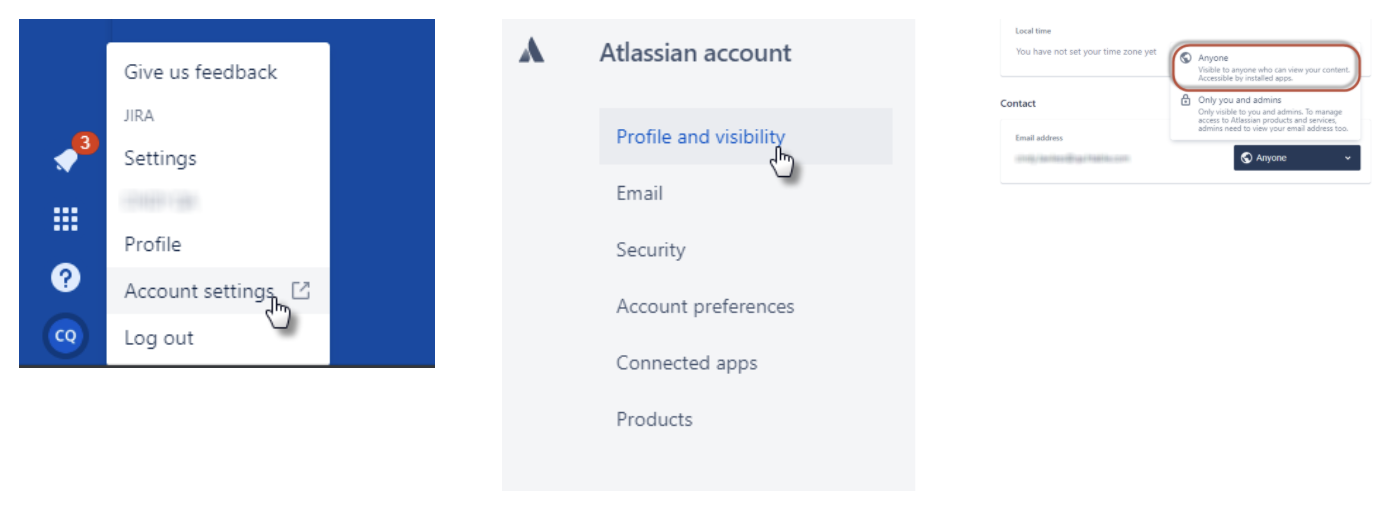
Individual users need to manually change their settings by going to the Profile and visibility page and changing the email visibility option (see image below). You can follow the instructions here.
Have each member of your project click on their Profile Icon → Account Settings
On the Profile and Visibility page → Scroll to the bottom Contact section
Change “Only you and admins” to “Anyone”
Configuring the Jira Cloud extension
When you first add the extension to your dashboard, the extension prompts you to connect to a Jira account. Follow the on-screen instructions to allow Airtable connect to Jira Cloud.
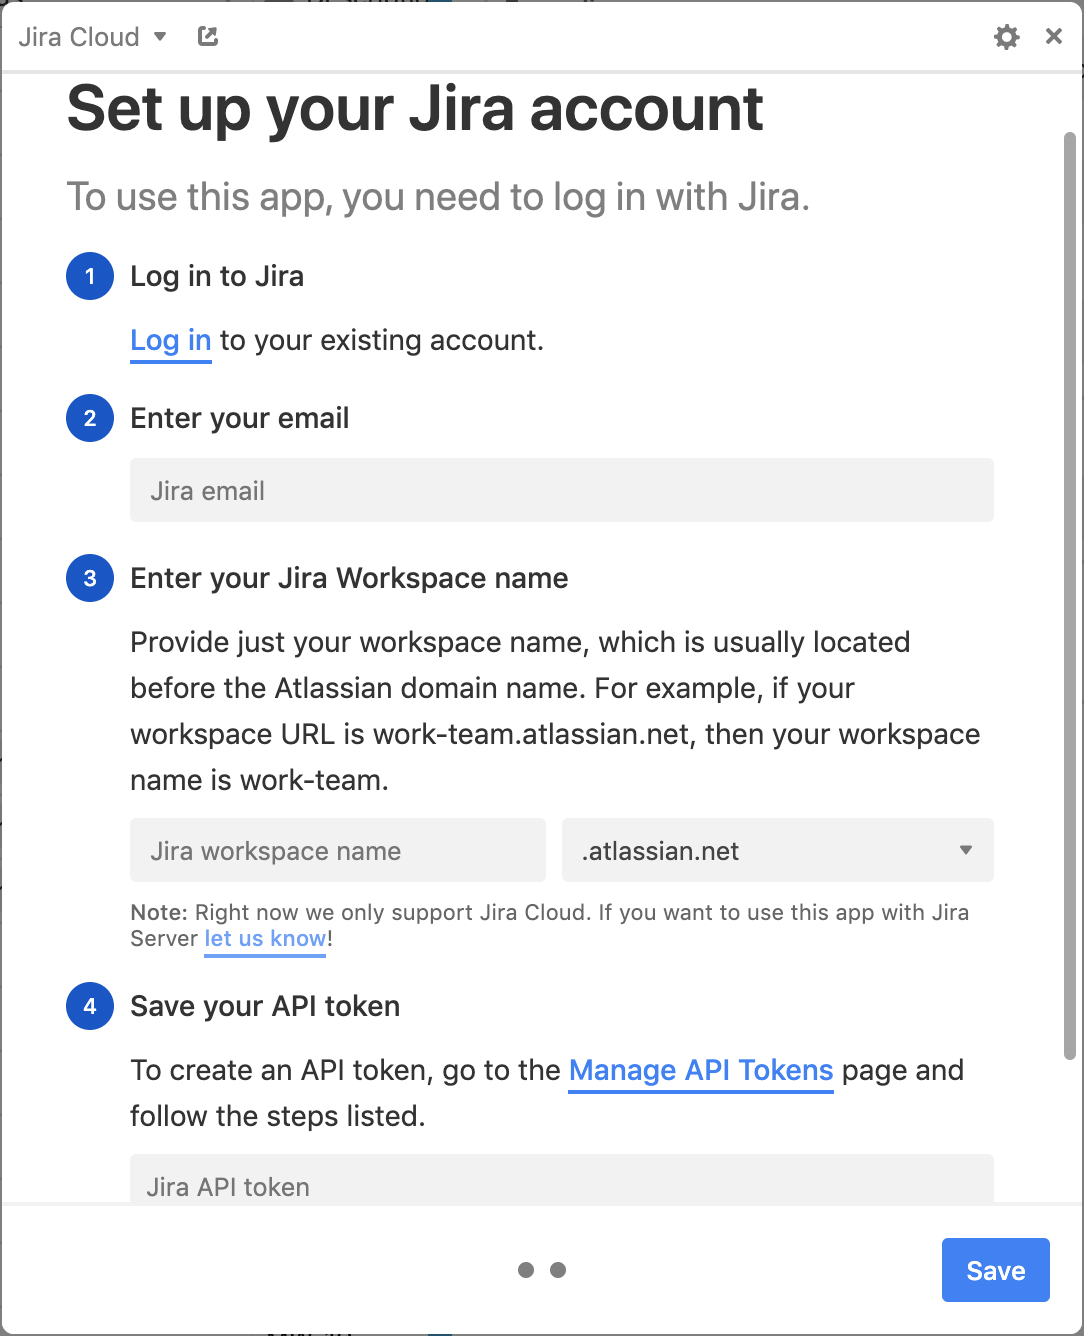
Enter your email: Use the email address linked to the API Key created under the Getting Started Section
Enter your Jira Workspace name: This is the name of your Jira implementation. Then select either .atlassion.net or .jira.com from the drop next to the workspace name.
Save your API token: This is the code saved when creating the API Key under the Getting Started Section
Importing issue types
To import issues of any type (tasks, sub-tasks, new features, bugs, epics, and improvements) from a project, you can either configure the options in the Issues tab or use custom JQL (Jira Query Language) for more complex selections.
Select Issues tab
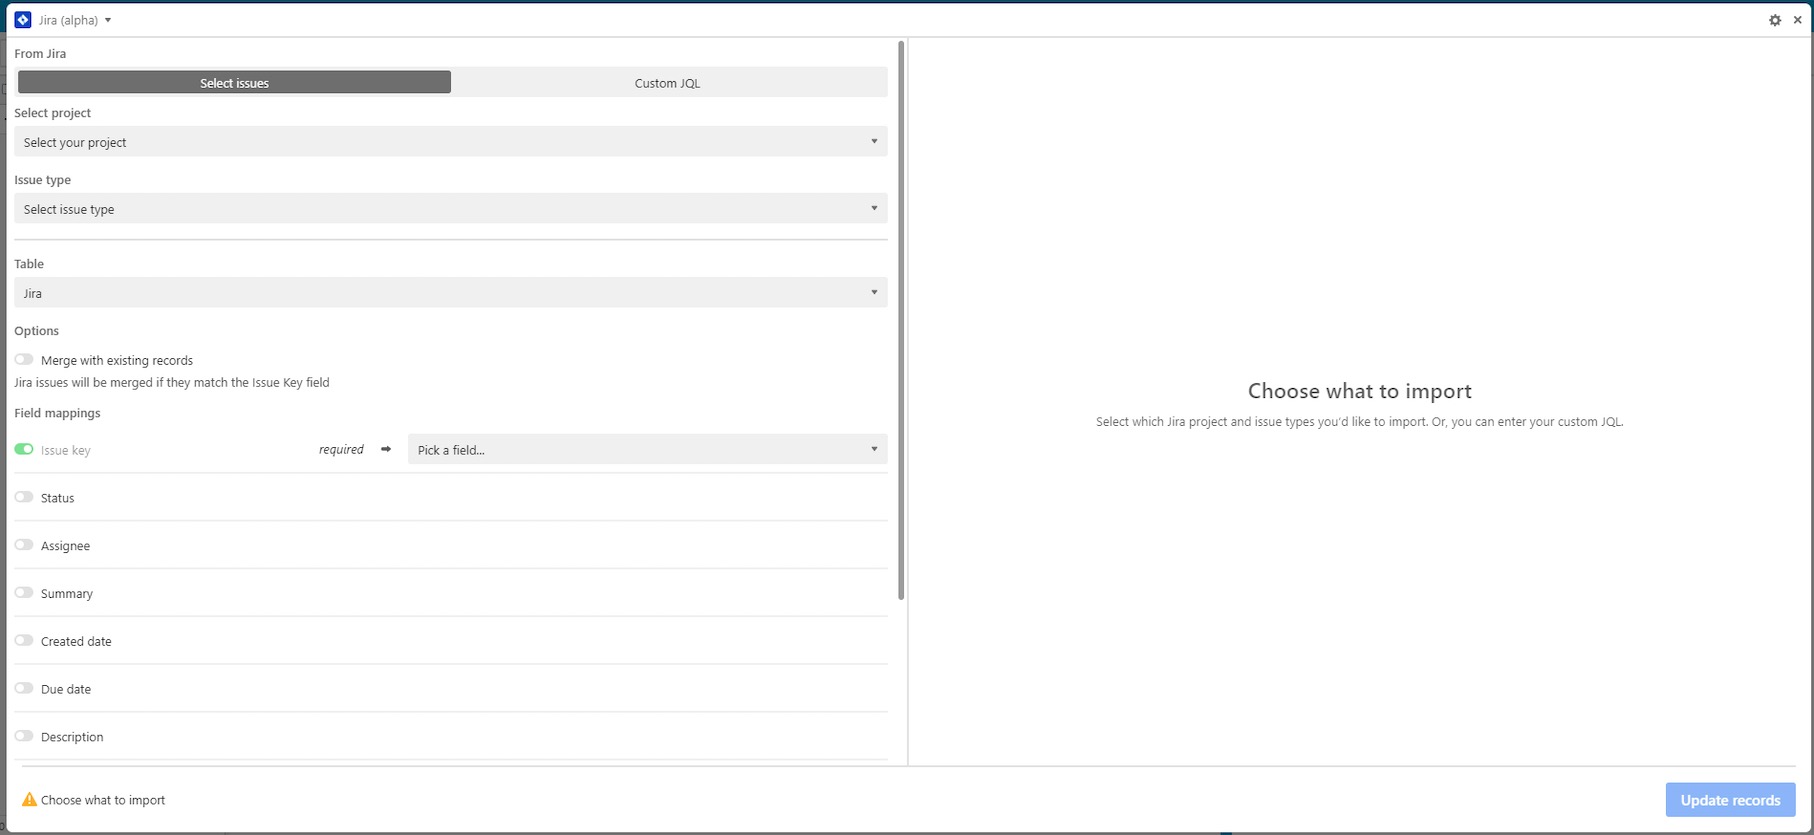
Select Project: Select the Project from Jira Cloud that you would like to import into Airtable. (All Projects or a specific project)
Issue Type: Select issue type to import. All available issue types can be selected.
Select Table: Table will default to the active Table. This can be changed to any available table in the base.
Merge with existing records:
If you choose to merge records, each time the import is executed, only new records will be added to the table.
If you choose not to merge records, each time the import is executed, a new record will be added to the table.
Note
If a Jira record no longer meets the criteria configured in the import extension, it will not be removed or updated from the table.
Example:
The configuration is set to import only issues with the type “Bug”. Upon execution, the Jira record is added to the table. In Jira Cloud, the Jira issue type is changed from "Bug" to "Improvement". However, your settings of the Jira extension mean that it only imports "bug" issue types from Jira and does not sync this new information. Since the extension is only returning Jiras tagged as "Bug", this record will remain unchanged in your Airtable base.
Custom JQL tab
The Jira Cloud extension supports JQL (Jira Query Language). Therefore, if you have any custom searches in Jira, you can copy these advanced queries from Jira and add them to this tab.

Note
If you choose to use JQL, be aware that if a Jira no longer falls within the JQL results, the extension does not remove or update the record.
Example:issuetype = Bug AND project = MW AND resolution = Unresolved AND status = "In Progress" AND assignee in (currentUser()) ORDER BY priority DESC
The query shown says to only return all “Bugs” in the “MW” Project that are “Unresolved” and “In Progress” and assigned to the “Current User”**. In Jira, the status changes to “In Review” and assigned to another user, upon the next extension execution this record will no longer be returned as part of the JQL query. Since the Jira Cloud extension only imports information from Jira and does not sync information this record will remain untouched in the Airtable Table.
**JQL currentUser refers to the account tied to the API Key and not the user executing the import
When a Jira ticket is deleted (but has already been pulled into Airtable), the Airtable record will not be deleted and will no longer be updated.
Considerations when mapping fields
Field mappings
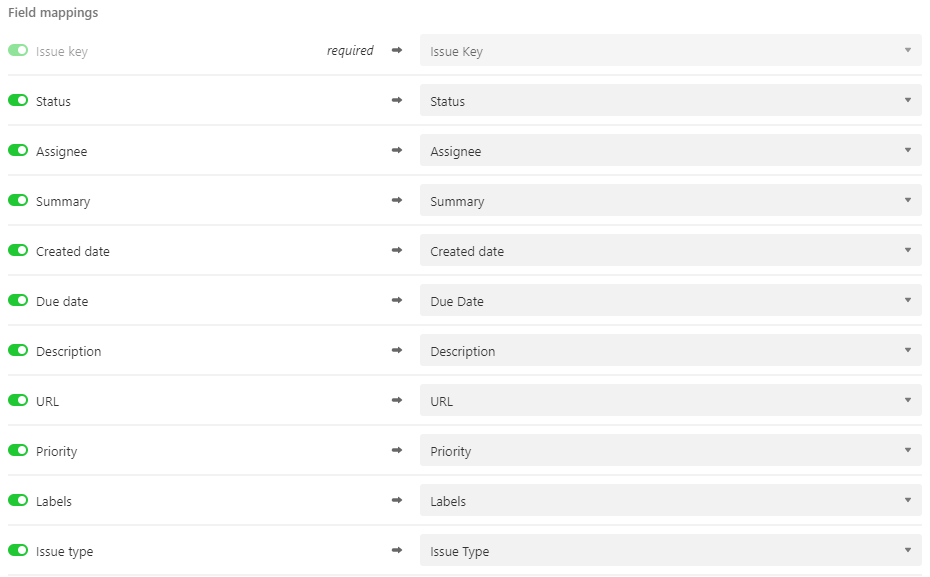
The list below outlines Jira to Airtable supported field type configuration. Field types in BLUE are configured based on Airtable's recommended best practice.
Issue Key - Single Line, Long Text
Status - Single Line, Long Text, Single Select
Assignee - Single Line, Long Text, Collaborator
Summary - Single Line, Long Text
Created Date - Single Line, Long Text, Date
Due Date - Single Line, Long Text, Date
Labels - Single Line, Long Text, Multiple Select
Description - Single Line, Long Text
URL - Single Line, Long Text, URL, Link to another record
Priority - Single Line, Long Text, Single Select
Issue Type - Single Line, Long Text, Single Select
Note
Formatted text, code, emojis, embedded attachments and tagged users will appear as unformatted plain text
If you’re importing Jira fields into Airtable Multiple Select and Single Select fields, the options need to be declared within Airtable prior to the initial import
Airtable is case sensitive, so make sure Multiple Select and Single Select values match Jira exactly (i.e. Sub-Task is not the same as Sub-task)
Assignees will appear blank if User Email Visibility is not set to Public within Jira Cloud settings
Updating your project
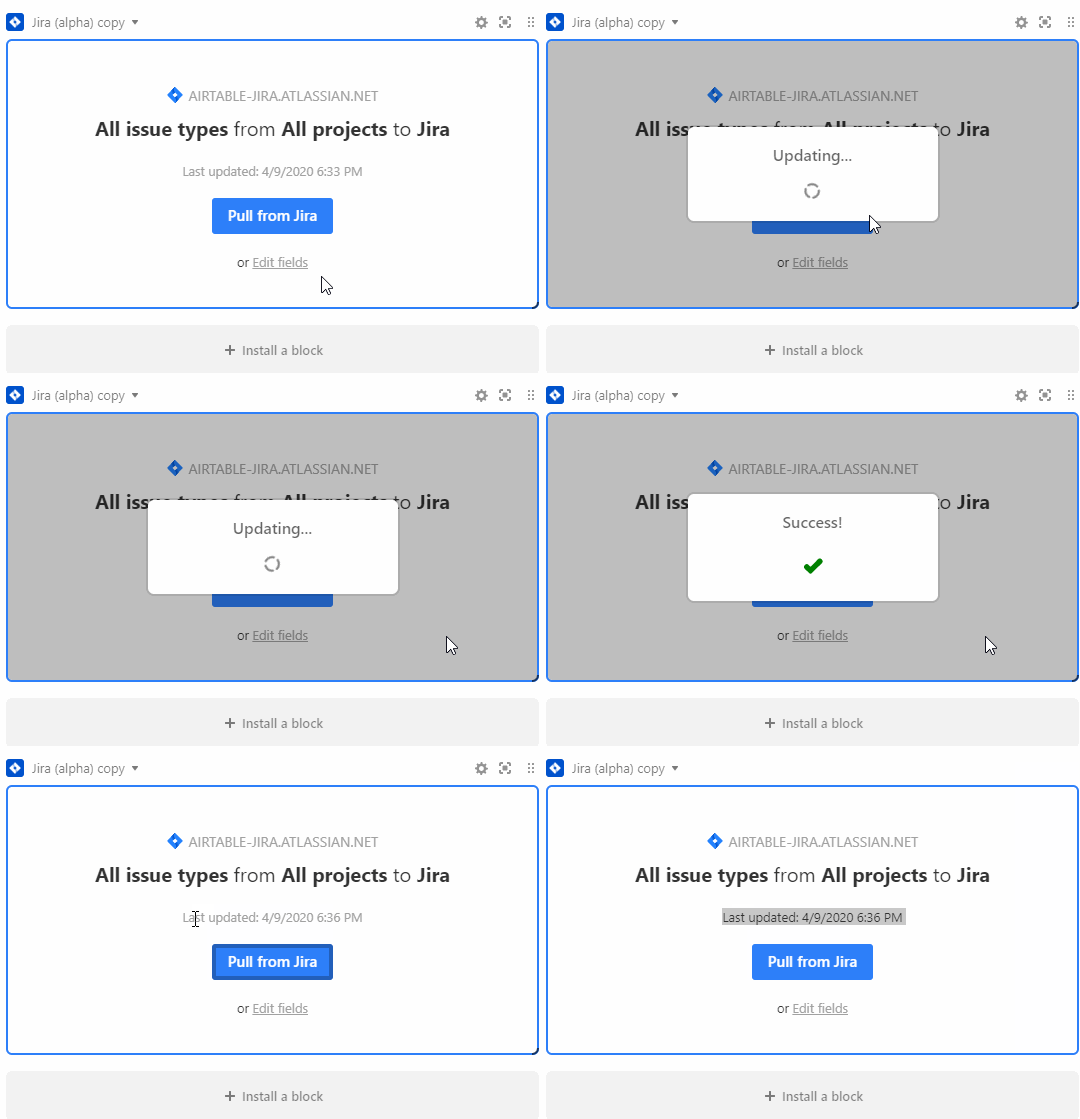
Records can be updated within Airtable by manually running the Jira Cloud extension from the extensions dashboard. In addition to updating records, you are able to clearly see the last time records were imported from Jira. It’s important to note that Multiple Select and Single Select fields need to be manually updated to add any new selections to match Jira prior to any subsequent imports.
Recommended best practices
Configure a separate table for each project using the Select Issues Tab
Create a separate Jira Cloud extension for each Jira project. You can add more extension dashboards and re-name them to stay organized. Just refer to the dropdown below the extensions icon, which is named "Dashboard 1" by default.
Select All Issue Types and Merge Records so imported records update successfully
Configure all Multi-Select, Single Select and Collaborators within Airtable prior to import
Update choices to any Multi-Select or Single Select Field in the table prior to making changes in Jira Cloud
Confirm Date Field formatting matches Jira Cloud date formatting to avoid
Include a Last Modified Time field to the table to identify the last time the record was updated
Updating your Jira API credentials
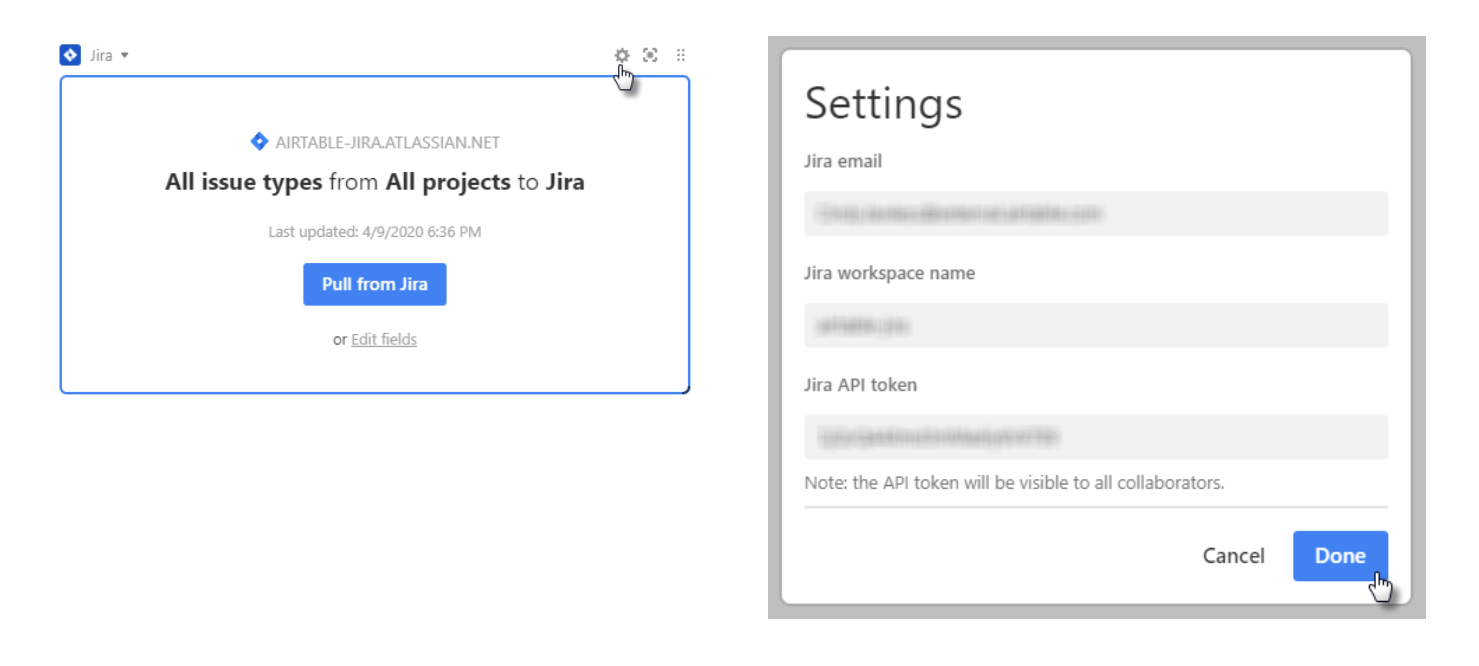
If you need to change your Jira API credentials, click the settings wheel in the top right hand corner of your extension to insert new credentials.
FAQs
Why are my date fields blank?
This can occur for different reasons, but most commonly you should confirm the date configuration within Airtable matches the Jira Cloud date configuration.
Why are my Assignees all blank? Why are only some of my Assignees blank?
This will happen if the User Email Visibility on the Jira Cloud Implementation has not been set to Public or if an individual has concealed their individual setting to Hidden.
Why are my Statuses / Priorities / Labels blank?
If you’re importing to a Multi-Select or Single Select field and the selections being imported from Jira are not available as configured selections, the field will not update. Make sure all selections are configured correctly and matches text formatting exactly.
Can custom fields in Jira be used in the Jira Cloud extension?
Custom fields that are based on Jira's built-in field types are supported, but other types of custom fields may not be supported.