Plan availability | Business and Enterprise Scale plans only |
Permissions |
|
Platform(s) | Web/browser, Mac app, and Windows app |
Learn how to use the Airtable Sync integration feature to bring information from an external application into Airtable as a new table in your base. Sync integrations are always a one way sync from the external application into an Airtable base, so changes made in Airtable cannot be synced back to the external application that you are syncing with.
Many external systems have features that can send a CSV or .xlsx file attachment via email on a regular basis. This sync feature allows you to leverage that functionality to sync external data from a system without a specific native Airtable integration into an Airtable base.

Setting up emailed data syncs in Airtable
Below, we'll walk you through the general setup process for emailing data to Airtable. It's important to note that this sync is intended for workflows that involve sending an email containing a CSV attachment to Airtable. If you are wondering about best practices for CSV formatting, then hop below before proceeding. Otherwise, if you are familiar with our CSV guidelines, then feel free to start setting things up!
Note
You can also follow the same steps when emailing a .xlsx file, but you may find that results are best when using the CSV file option. For that reason, if you can obtain a CSV file of the data you wish to sync via email, then we recommend using that first.
Navigate to a base where you want to sync data into Airtable.
Add a new synced table by clicking the + Add or import button.
Scroll down to the bottom of the list and click the XX more sources… option.
Browse or search for “Emailed data” and then click Emailed data.
After clicking the Emailed data option, a pop-up window will appear. Press the Get started button. This will generate a unique email address. Airtable will monitor this email’s inbox for this sync.
You will need to input this email address in the To field of an email or an external service that sends out automatic emails with attachments.
This prefix will become the table name of the synced table created at the end of your initial sync setup.
If needed, you can click Edit to edit the prefix of the email address to something else. You can use this to add a word or phrase that’ll help you identify this email address (in your email contacts suggestions, for example).
If you choose to change the prefix of the email address we generate, know that only lowercase, alphanumeric, and the special characters
+,-,\,.are allowed.
Whether you altered the prefix of the email or not, click the Copy email button and move on to the next step.
To continue the setup process, you will need to send an email with a CSV or .xlsx attachment to the email address generated in the previous step. For the setup process, you can use the email service provider of your choice or the automated external attachment delivery service.
Files must be below 5MB and have a limit of 10,000 rows that can be synced. See more about CSV formatting guidelines here.
As a best practice tip, choose a file that contains all of the information that you would like to see in Airtable and excludes any other extraneous information. It’s also necessary to ensure that at least one column holds unique information in its cell values. Airtable requires this unique identifier to make sure that your data is updated properly -- without it, Airtable would not be able to know which record in Airtable each row in your CSV should correspond to. If your attachment does not contain a column of unique identifiers, then the Emailed CSV sync will not work.
During this step, if we do not receive an email with a supported file attached, or if the file is running up against our limitations, then you will see an error message pop up. The screenshot below shows the example of sending out an initial email without a file attachment. To rectify this, you’ll need to click Ignore this email and wait for a different one. Then, send out a new email with a CSV file attached.
Once the first attachment has been sent, there may be a slight delay, usually a minute or less, before the setup screen in Airtable updates to allow you to move along in the setup process. The message will change to Email with attachment received and the Next button will become clickable.
After clicking next, you’ll see a few configuration options appear in the setup window. First, you’ll want to customize how your data will be imported into Airtable. This includes choosing:
Which columns (fields) should be imported
By default, all fields from the attachment will be imported. If you want to adjust the sync to only import specific fields, click the All Fields dropdown button.
This will open up a picker window. Here, you can toggle each individual field that you want to sync from the source attachment.
Note
Selecting specific fields means that Airtable will only import those fields, whether or not new fields are added in the future. If your CSV may contain additional columns (fields) in the future and you would like those fields to be imported into Airtable, then make sure to set up the sync to import All fields.
Which field will be a primary field
You’ll notice that the column furthest to the left on your imported file will act as the default primary field in Airtable. To change the primary field, you’ll want to click on the dropdown of the field of your choice, ensure that the field type is supported as a primary field (formula fields are not able to be primary fields in Emailed CSV syncs), then click the Use as primary field button.
The column designated as the primary field should hold unique information if possible. We will cover more about unique identifiers in the next section.
What type of field the data should be formatted as.
We will do our best to automatically match field types based on the data with the attachment that you emailed us. However, you may want to customize the type of field that each column of your file will be formatted as in Airtable. In the picture below we want to change the name field from a Long text field to a Single line text field type. Click the dropdown for the field that you want to modify and then click the field type of your choice.
There are 10 field types that we support in the field customization step: Single Line Text, Email, Long text field, Number, Date, Duration, Phone number, Currency, URL, Percent.
The name of the field (If you prefer it to be different than the CSV header)
The name of each column is dependent on the header row (first row) of the attachment you are using for this setup. Changing a field’s name can be done by clicking on the field’s dropdown and typing it into the name box.
Next, choose a unique identifier. This may or may not match the primary field you just set up. In this step of the setup process, we will have you create some logic concerning the way your attachments will sync to Airtable. This step is important to consider in order to ensure that the correct records in Airtable are updated, created, or prevented from being duplicated. Just like the primary field mentioned earlier, the identifier you choose should be unique and unchanging.
The last step of the setup process is to confirm two global settings related to the way that your sync will import attachments in the future. These two settings cover sync frequency and attachment processing. Either of these options can be modified by clicking the Change button.
To change the sync frequency click the Change button next to The table will update automatically when an email is received setting. This will open a page where you can decide to sync automatically (periodically “check” the inbox for new emails containing an attachment) or manually (only when you choose to sync manually from the Airtable UI). When syncing manually, Airtable will only check the inbox when an editor or creator clicks the Sync now option.
The other option has to do with attachment processing. In some cases, your CSV file might contain the entire dataset or it may only contain data from a weekly report, for example. Learn more about this setting here.
Now that you’ve configured all of the settings, it’s time to create the synced table. Click Create table.
Once the synced table has been created, you can now change the name of the synced table, start adding views, add another sync source, and much more. Of course, you can always Update sync configuration as well, if sync settings need to be modified in the future.
Understanding attachment processing in emailed data syncs
Entire dataset- In this example, the CSV file being imported contains all of the employees and their information.
If an employee is deleted from the CSV file and the Each attachment contains the entire dataset option has been chosen in Airtable, then the employee’s record in Airtable will also be deleted.
If the Each attachment only includes updates option is chosen, then the employee’s record would remain in Airtable, even though it was deleted in the CSV source file.
Data subset- In this example, the CSV file being imported contains a weekly report of newly onboarded employees.
Each attachment contains the entire dataset - The resulting table in Airtable will only contain the information from the latest CSV (only this week’s onboarded employees).
Each attachment only includes updates- The onboarded employee list would compound over time in Airtable, resulting in a more holistic employee list.
This option includes the ability to Delete unavailable records. Clicking this button allows you to "reset" the target to the most recently emailed data set. Another way of saying it is that clicking this will remove any records from the table that correspond to removed records (records no longer present) in the most recent sync.
The Delete unavailable records option will appear after creating the initial sync and clicking Update sync configuration from the dropdown menu located next to the name of the table and then clicking Change next to the Each attachment only includes updates setting.
CSV formatting guidelines
File size
Files must be 5MB or less
A maximum of 10,000 records (rows) can be synced at this time. Your file(s) per sync run can contain more than 10,000 rows, but only 10,000 will be synced.
File format
The first row of the CSV file will be parsed as a header row which will appear as field names in your synced table. No other rows can perform this function.
All column names in the header row must be case-insensitive and unique.
All column names in the header row must be non-empty strings.
The header row cannot contain more than 500 columns.
The primary field and unique ID must be present in the header row.
Security and OAuth scopes
There are no OAuth scopes needed for this external source sync. We’ve deliberately made the email address for the inbox used in this sync a unique, long, and random address to prevent any potential accidental CSV syncs.
Note
There is no separate plugin or app that needs to be installed for this sync to function. The data that we retrieve from the email inbox we create for this sync is transmitted securely via HTTPS and will not be used for any purpose other than the synced table.
FAQs
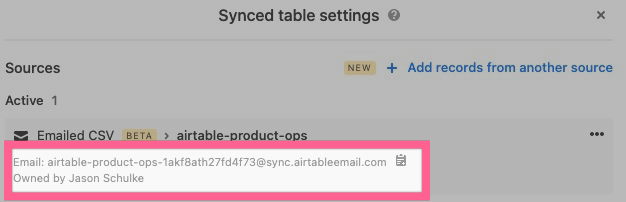
Who can view the email address generated for the sync?
Only the owner/creator of the sync can view the email address that Airtable generates for the sync. Owners can view the email address by navigating to the “Update sync configuration” option from the dropdown menu located next to the name of the synced table.
My CSV contains commas within the cell. Is there a way to work around that to ensure proper formatting during the sync process?
If a cell value contains a comma, the entire cell value should be surrounded by quotes. Otherwise, it will be split into multiple cells based on the comma.
I’m receiving the “Header column can not be an empty string value” error message. What can I do to fix the error?
Certain CSV exports may contain an index column by default. These columns often act as header columns in the sync process and cause the error. In these cases, you’ll need to adjust the query you are running or change the way your CSV report is being generated. The process will differ depending upon the external service you are using, but here is one fix if your organization uses Looker that allows you to remove the index column by adjusting the query.
What will happen if I duplicate a workspace/base containing an emailed CSV sync?
When an Emailed CSV base or a workspace containing an Emailed CSV base is duplicated, a new Emailed CSV base will be created with a new email address. The new email address will share the same custom prefix but have a unique hash (the part after the dash, but before the domain @sync.airtable.com). This new Emailed CSV base should automatically work when using the new email address.
Why am I unable to use this integration?
It may be the case that your Airtable Admin needs to enable this integration in the Admin Panel.
Is the Unique ID one column or can it be the compound key of two columns?
Right now we are not supporting compound keys, although we hope to support this down the road.
Is there a way to populate attachment fields with an Emailed Data Sync?
Not directly. The emailed data sync integration supports the following field types:
Single line text, Email, Long text field, Number, Date, Duration, Phone number, Currency, URL, and Percent.
Right now, likely the best workaround is to sync publicly accessible image URLs to a single text field and then configure an automation to append attachment URLs to an additional attachment field. There is a community thread where you can find more information about this workaround here.
Is the primary field always the same as the unique identifier?
Currently, these are treated separately and they do not need to be the same. Often, there are different goals for each. As a best practice tip, the primary field should be human legible, easy to reference, etc., whereas the Unique ID doesn’t need to be legible, it just needs to be unique and unchanging so that your CSV sync performs as expected.
Does each new CSV sync have to include all of the same data that was sent over previously?
By default, the assumption is that when you send something in, it will update existing items and delete items that don’t appear in the CSV. So you are essentially sending out the entire state of the system over in each sync. On the other hand, you can adjust the attachment processing setting so it will leave items in the table if there are no updates to them.
Do we support formula fields as primary fields?
No, we do not support formula fields as primary fields with CSV sync.
Is this a solution for customers who regularly upload from Excel with CSV Import Extension?
In theory, yes. We do support .xlsx files. One caveat to be aware of is that if there are multiple worksheets in one file, we will only sync in the first worksheet.
Are there size limitations?
10,000 records/rows per sync.
Can you edit the data?
You cannot edit the data from a sync. However, you can add new fields into the same table to “enrich” the data, such as linked record and formula fields.
Where can we see the sync history?
Our product team is aware of the need and we are actively researching how to visualize sync history.
Which popular systems have we connected via the Emailed CSV sync?
Popular systems that work well with this sync include AEM, Mode, Marketo, Smartsheets, Google Ads, and Looker.
Which systems are not able to be connected via this sync?
Currently, Facebook Ads will not work with this sync.
If the user who creates an an email sync is later removed from the base or deprovisioned, will the existing email address continue to function?
Yes, the email address that is generated to leverage this feature will continue to function whether the user still has base access or has been removed from your organization.
Why did my newly added field convert into a long text field?
Users can configure field types during the initial setup of Emailed data integration, but any fields added to the CSV or file in the future default to a long text field.
Converting the field type post-sync disconnects the sync for the corresponding field until it is reconnected. After initiating a reconnection, the field reverts to the defaulted long text field at the next sync interval.