All plan types/levels | |
Platform(s) | Web/Browser, Mac app, and Windows app (Add mobile apps if relevant) |
Airtable terminology |
|
In Airtable, there are many IDs that can be helpful to know when looking to share information, automate processes, troubleshoot issues, and more. The article below covers instructions on how to determine the various Airtable IDs that you will come across in the product.
Creating record ID fields
To create a formula field to display record IDs:
Open your Airtable home screen.
Open the base where you want to add a record ID formula field.
Click the + icon to the right of the last column.
Search for and select the “Formula” field type.
Enter
RECORD_ID()into the provided "Formula" window.Click Create field.
Finding record IDs
To find a record ID:
Open your Airtable home screen.
Open the base with the record ID you want to find.
Expand the record with the ID you want to find.
After expanding your record, the URL in your browser's address bar will display your record ID, which looks similar to: https://airtable.com/appSHwtnmVD5TiqSy/tblEzvkZks1VI3uyS/viwE3o43HKcqz6hFE/recbtRHd9o7vKZAQr?
Your record ID starts with "Rec" and ends before the question mark "?” icon."
Finding field IDs
To find a field ID from a field’s URL:
Open your Airtable home screen.
Open the base with the field ID you want to find.
Click the arrow icon ⌄ next to the field name with the ID you want to find.
Click Copy field URL and paste your field URL.
After copying and pasting your field URL, the URL will display your field ID, which looks similar to: https://airtable.com/appSHwtnmVD5TiqSy/tblEzvkZks1VI3uyS/viwE3o43HKcqz6hFE/fldh1CQ7PXBJtLWUU
Your field ID starts with "Fld.”
To find multiple field IDs:
Open your Airtable home screen.
Open the base with the field IDs you want to find.
Click Tools in the upper-right corner.
Click Manage fields.
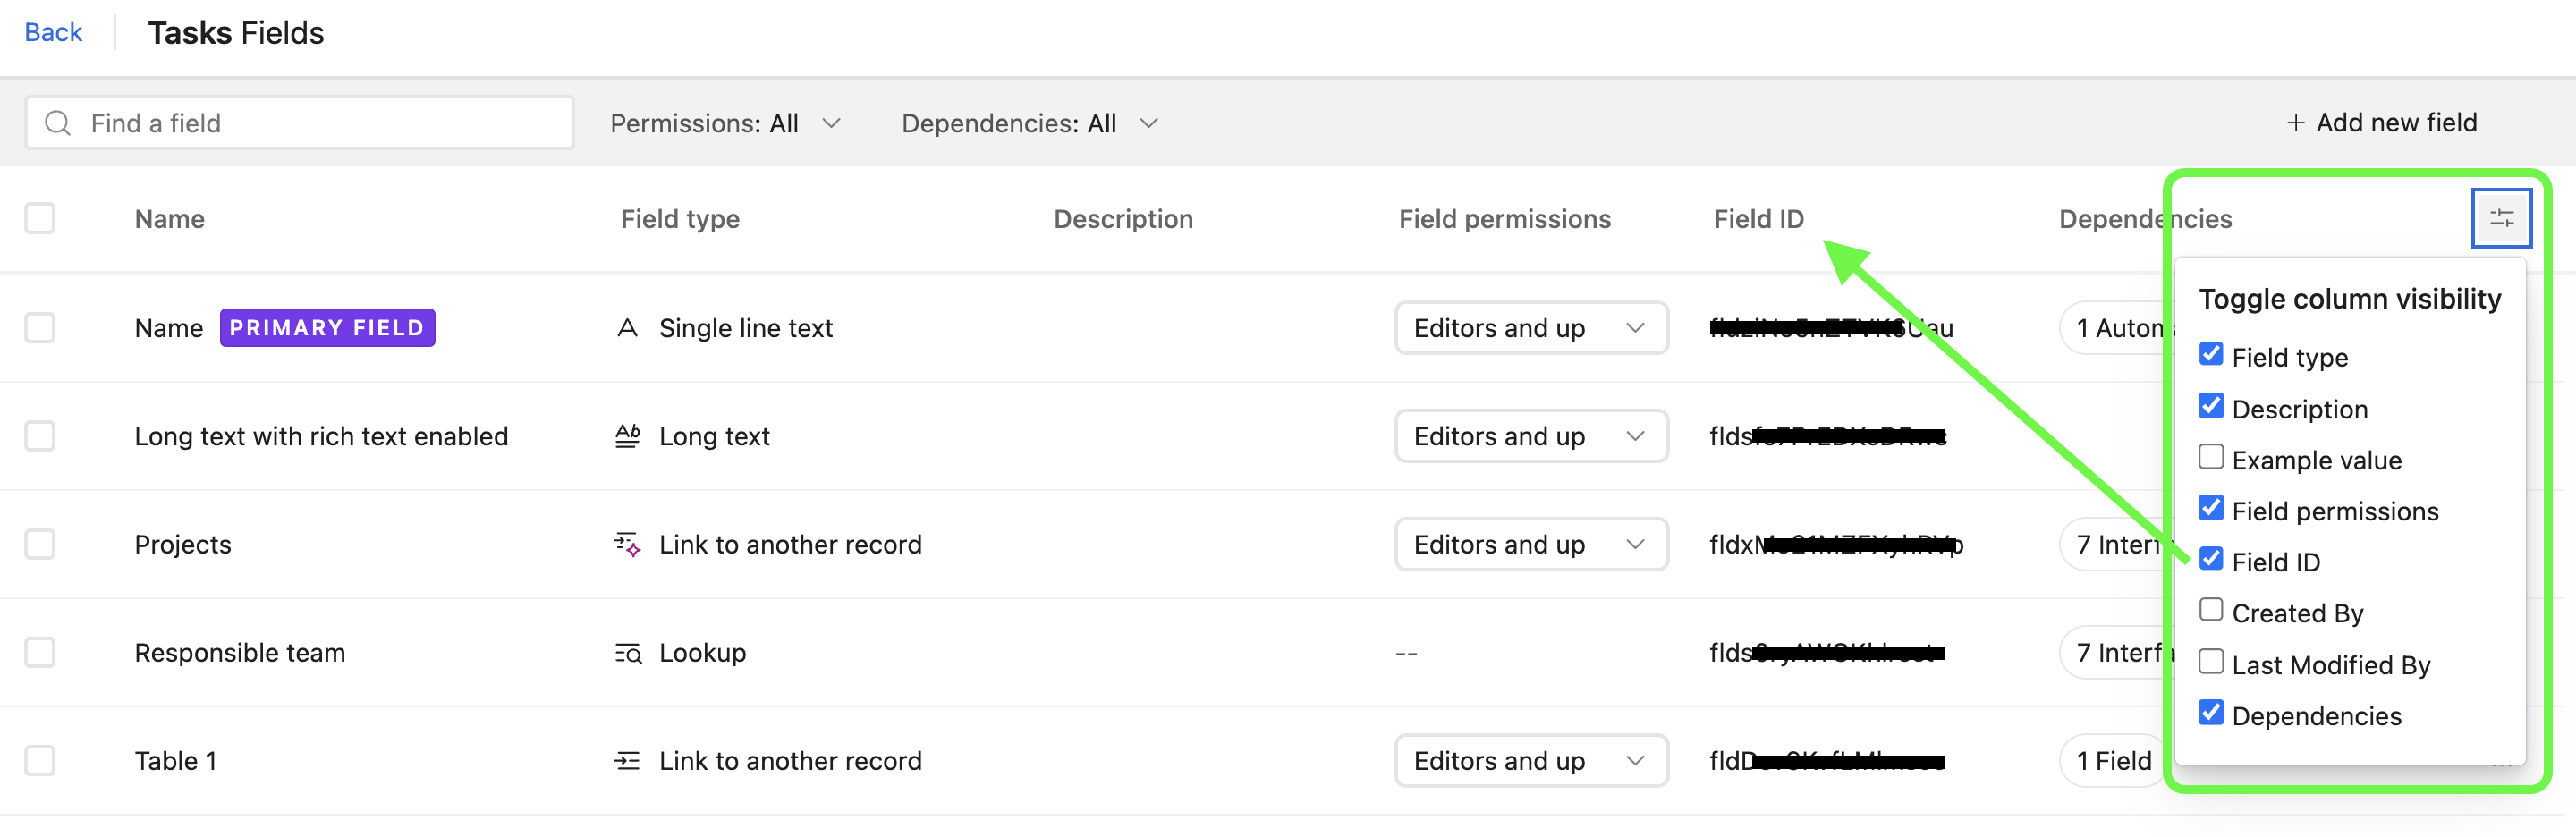
You’ll now see a list of the the fields and a column for the “Field ID.” If you do not see the “Field ID” column, then click on the column visibility toggle to show the “Field ID” column:
Finding table IDs
To find table IDs:
Open your Airtable home screen.
Open the base hosting the table with the table ID you want to find.
After opening your table, the URL in your browser's address bar will display a URL, which looks similar to: https://airtable.com/appeqX9XTkHZNfSbn/tbl99vKzVh7NwLwm8/
Your table ID starts with "tbl" and ends before the forward slash "/” icon."
Finding interface IDs
To find an interface ID:
Open your Airtable home screen.
Open the base with the interface ID you want to find.
Click Interfaces in the upper-middle of the screen.
After opening your interface, the URL in your browser's address bar will display your interface ID, which looks similar to: https://airtable.com/appeqX9XTkHZNfSbn/pagIk60ZUF9P5UP72/
Your interface ID starts with "Pag" and ends before the forward slash "/” icon."
To find an interface record detail ID:
Open your Airtable home screen.
Click Interfaces.
Open the base with the interface ID you want to find.
Open the record you want to review in a record review interface page or open a record’s detail page.
Copy the URL from the browser bar up until the
=character before the record ID:Record review URLs will be structured like this:
https://airtable.com/appxxxxxxxxxxxx/pagxxxxxxxxxxxx=recxxxxxxxxxxxxRecord detail URLs will be structured like this:
https://airtable.com/appxxxxxxxxxxxx/pagxxxxxxxxxxxxdetail=xxxxxxxxxxxx
In the interface page’s source table, add a formula field that concatenates the link from step 2 and each record’s ID.
The formula will be structured like this:
CONCATENATE("URL link", RECORDID())Please note you'll need to insert the actual interface page link in the formula where you see "URL link" above.
The output is a unique link for each record in the interface being referenced.
Finding base IDs
To find a base ID:
Open your Airtable home screen.
Open the base with the base ID you want to find.
After opening your base, the URL in your browser's address bar will display your base ID, which looks similar to: https://airtable.com/appeqX9XTkHZNfSbn/pagIk60ZUF9P5UP72/
Your base ID starts with "App" and ends before the forward slash "/” icon."
Finding workspace IDs
To find a workspace ID :
Open your Airtable workspace section.
Select the workspace with the ID you want to find.
After selecting your workspace, the URL in your browser's address bar will display your workspace ID, which looks similar to: https://airtable.com/workspaces/wspqrdtEQXErvBMXXU?
Your workspace ID starts with "Wsp" and ends before the question mark "?” icon."
Finding IDs in the admin panel
Note
Accessing these pages in the admin panel is only available to Enterprise Scale and Business plans.
To find a group ID in admin panel:
Open your admin panel.
Click Groups.
Locate the group with the ID you want to find under the “Group name” column.
The group ID is visible directly below the group name.
Your group ID starts with "Ugp" and looks similar to: ugpDUHUnftA7H9bG8
To find a workspace ID in admin panel:
Open your admin panel.
Click Workspaces.
Locate the workspace with the ID you want to find under the “Workspace name” column.
The workspace ID is visible directly below the workspace name.
Your workspace ID starts with "Wsp" and looks similar to: wsprEhWuZ2PePS6aK
To find a base ID in admin panel:
Open your admin panel.
Click Bases.
Locate the base with the ID you want to find under the “Base name” column.
The base ID is visible directly below the base name.
Your base ID starts with "App" and looks similar to: appogqUnF7gZJmeOv
To find an interface ID in admin panel:
Open your admin panel.
Click Interfaces.
Locate the interface with the ID you want to find under the “Interface name” column.
The interface ID is visible directly below the interface name.
Your interface ID starts with "Pbd" and looks similar to: pbdxBwNfbZXGVkoK
To find an data set ID in admin panel:
Open your admin panel.
Click Data sets.
Locate the data set with the ID you want to find under the “Data set” column.
The data set ID is visible directly below the data set name.
Your base ID starts with "Pds" and looks similar to: pdsJhMGPUJgBNKc
To find an account ID in admin panel:
Open the admin panel.
Scroll to the section below “Settings” to locate your account ID.
Note
Enterprise hub and super admin permissions are required to access this part of admin panel.
To find an org unit ID in admin panel:
Open the admin panel.
Click Organization.
Locate the organization with the ID you want to find under the “Organizational unit” column.
The org unit ID is visible directly below the org unit name.
Your org unit ID starts with "Ent" and looks similar to: entSyVgzzNKssX72X
Finding IDs in the Airtable API
Base IDs
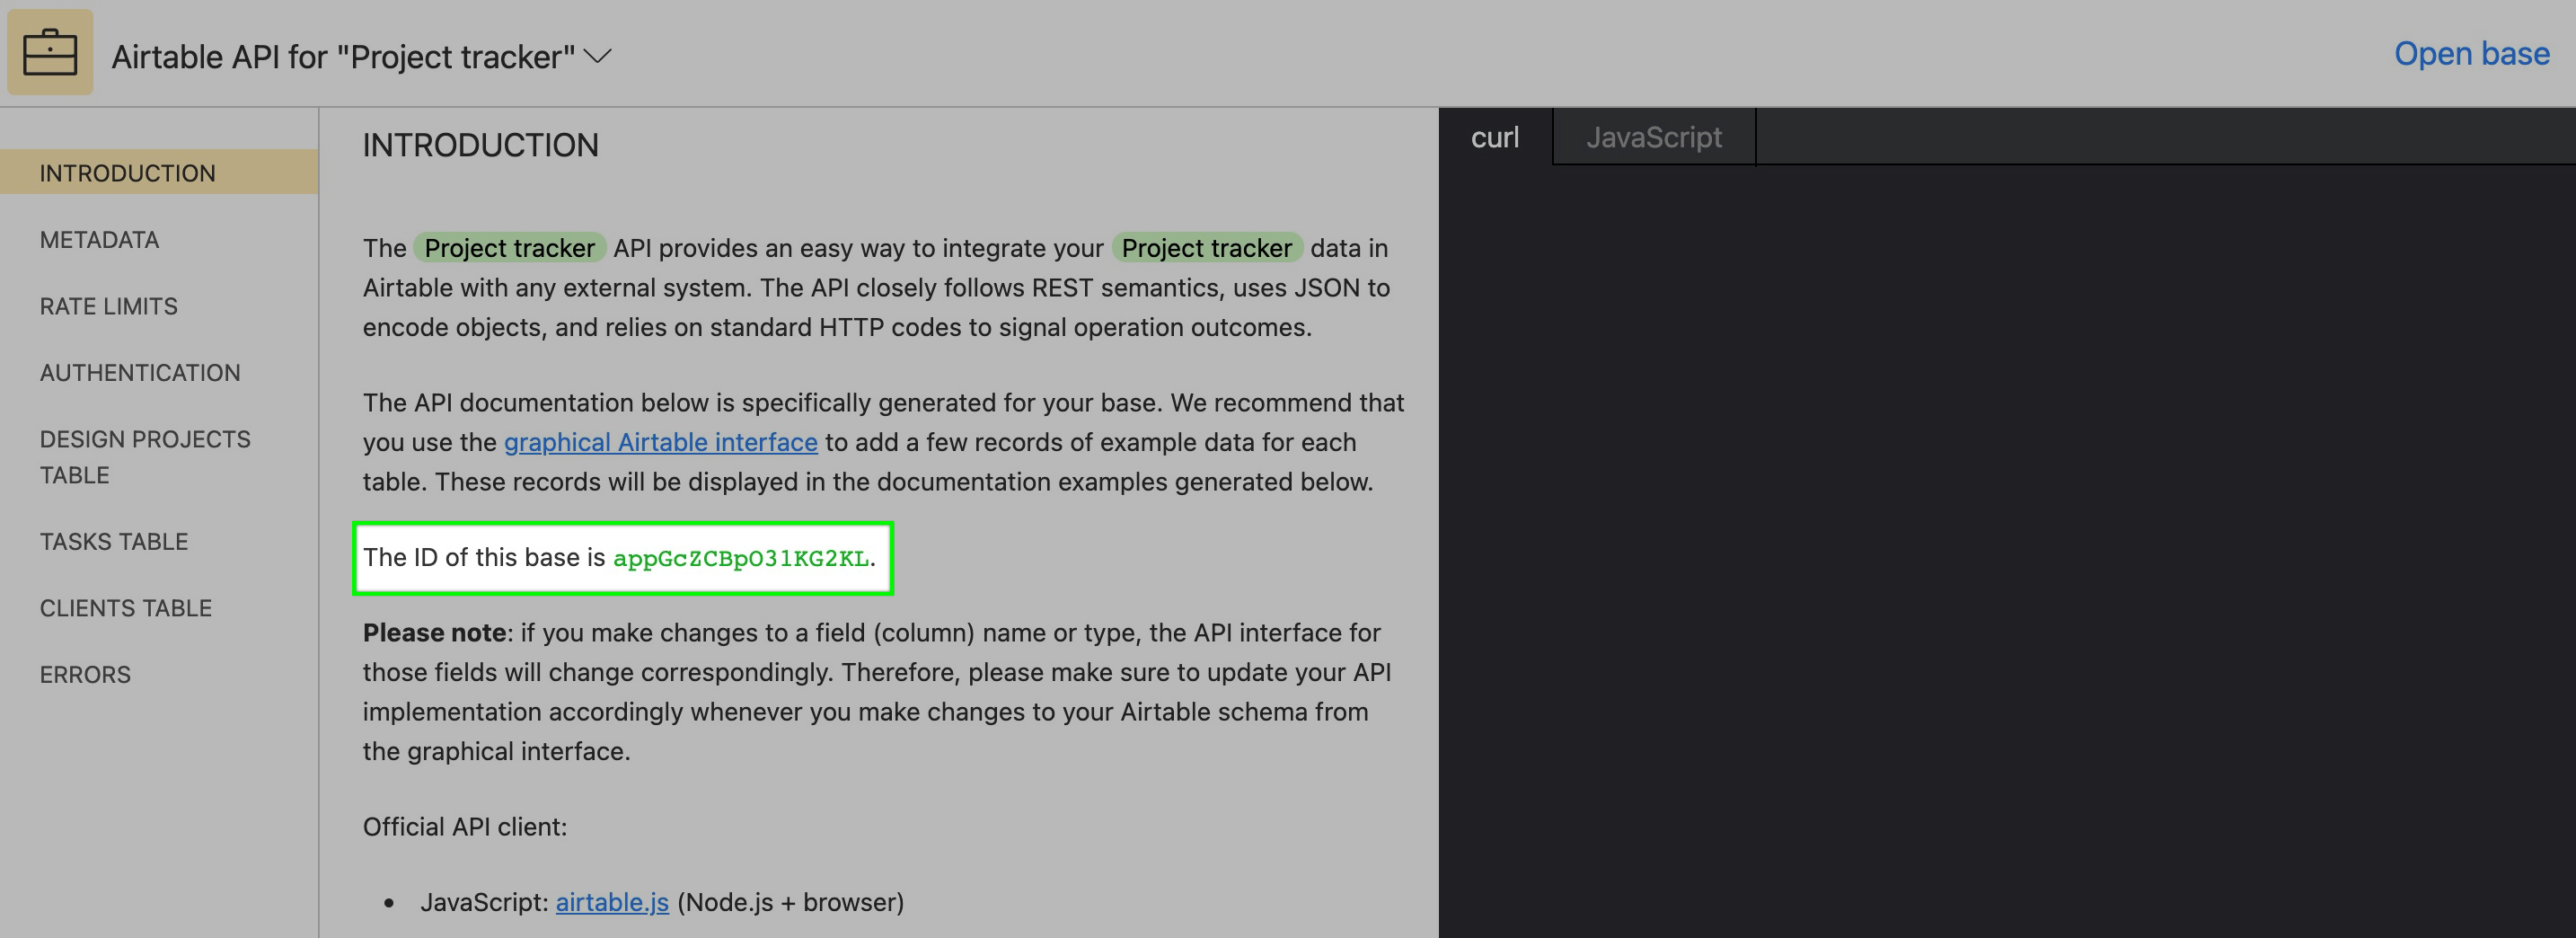
To find a Base ID in the Airtable API, click on the help button near the top-right of your screen. This will open a menu where you will see the "<> API documentation" option.

After clicking the button, you will be brought to our API documentation page that will dynamically surface which base you are working in currently. Both the base name and Base ID will appear.
Field IDs
In our Web API documentation, there is a section called Get base schema where you will find more information about how to identify Field IDs programatically from a specific table. It's worth noting that field IDs can also be gathered manually from the field manager. With the corresponding table open, click Manage fields in the upper right corner. This will open a window where you can find the appropriate field by name and then match that to the ID under Field ID.
FAQs
How do I find multiple field IDs simultaneously:
Open your Airtable home screen.
Open the base hosting the record IDs you want to review.
Click Tools in the upper-right corner.
Click Manage fields.
You’ll now see a list of the the fields and a column for the “Field ID.” If you do not see the “Field ID” column, then click on the column visibility toggle to show the “Field ID” column: