Plan availability | Business and Enterprise Scale plans only |
Platform(s) | Web/Browser, Mac app, and Windows app |
Related reading |
Airtable supports SSO for a variety of identity providers (IdPs).
This article is intended for administrators who are looking to provision/de-provision users and sync user groups with their IdP in admin panel. We are starting with Okta and Microsoft’s Entra ID, which are two of the more common identity management services. We have created SCIM-capable integrations with Okta and Entra ID IdPs.
Managing users via IdP sync prerequisites
Notes
Provisioning user groups is unavailable for Business plans. If you have a Business plan, you can still use the Entra ID gallery app, but must disable group mappings after provisioning the standard Entra ID gallery app.
Customers on legacy Enterprise, Business, and Enterprise-scale plans can use the SCIM API to achieve the same functionality in their IdP.
Okta and Entra ID provide their own setup documentation related to managing users and user groups. If you are unfamiliar with how these functions work in Okta, then please check out their documentation:
More information about our Okta app can be found here. Additionally, any existing users you have already provisioned to use the Airtable app in Okta will need to be re-provisioned after setup to fully take advantage of the Okta push features. To do this in bulk, you can run an Okta import for Airtable.
Additionally, if you are unfamiliar with how these functions work in Entra ID, please check out their documentation:
Okta Features via IdP sync
Push users
There are 2 important Okta features to consider related to the way that users will sync in Airtable:
Push new users - When you create a new user in Okta, Okta will automatically create an account for that user in Airtable. When pushing large number of users at once, we recommend pushing in batches of 10,000 or less at a time.
Push user updates - When you update a user’s supported attributes in Okta, it also updates the user’s values in Airtable. Supported attributes include first and last names and fields that only appear in reports, like cost center, department, and division.
Push user deactivation - When you deactivate or disable the user's access to Airtable in Okta, this will also deactivate the user in Airtable.
Deactivating a user in Airtable means the user is no longer associated with your Enterprise's Airtable plan. This action will log out all of the user's logged-in sessions. It also means that the user will be greyed-out in any of Airtable's sharing dialogs. To permanently remove the user's account, the admin must either log into the user’s account and delete it through Airtable's interface (in order to transfer out any bases or workspaces owned by that user), or delete the user through the Enterprise API.
Note
We do not charge for deactivated users. So, if there is a chance the user may need to be re-activated (provisioned) in the future, then leaving them in a deactivated state is likely a good practice to follow.
Push groups
This will create an Airtable user group with the same name and membership as the source group from Okta (note that Airtable does not currently support nested groups). Once the groups have been pushed from Okta to Airtable, the Admin Panel supports further changes—it's best to avoid making changes to fields pushed from the IdP (e.g., Group name) as a future sync can overwrite this.
Configuration steps: Push from Okta to Airtable
In the following scenario, we will be adding a new group in Okta that will push to Airtable causing a new user group to be created in Airtable that matches the group coming from your organization's Okta instance.
Step 1: Check user settings
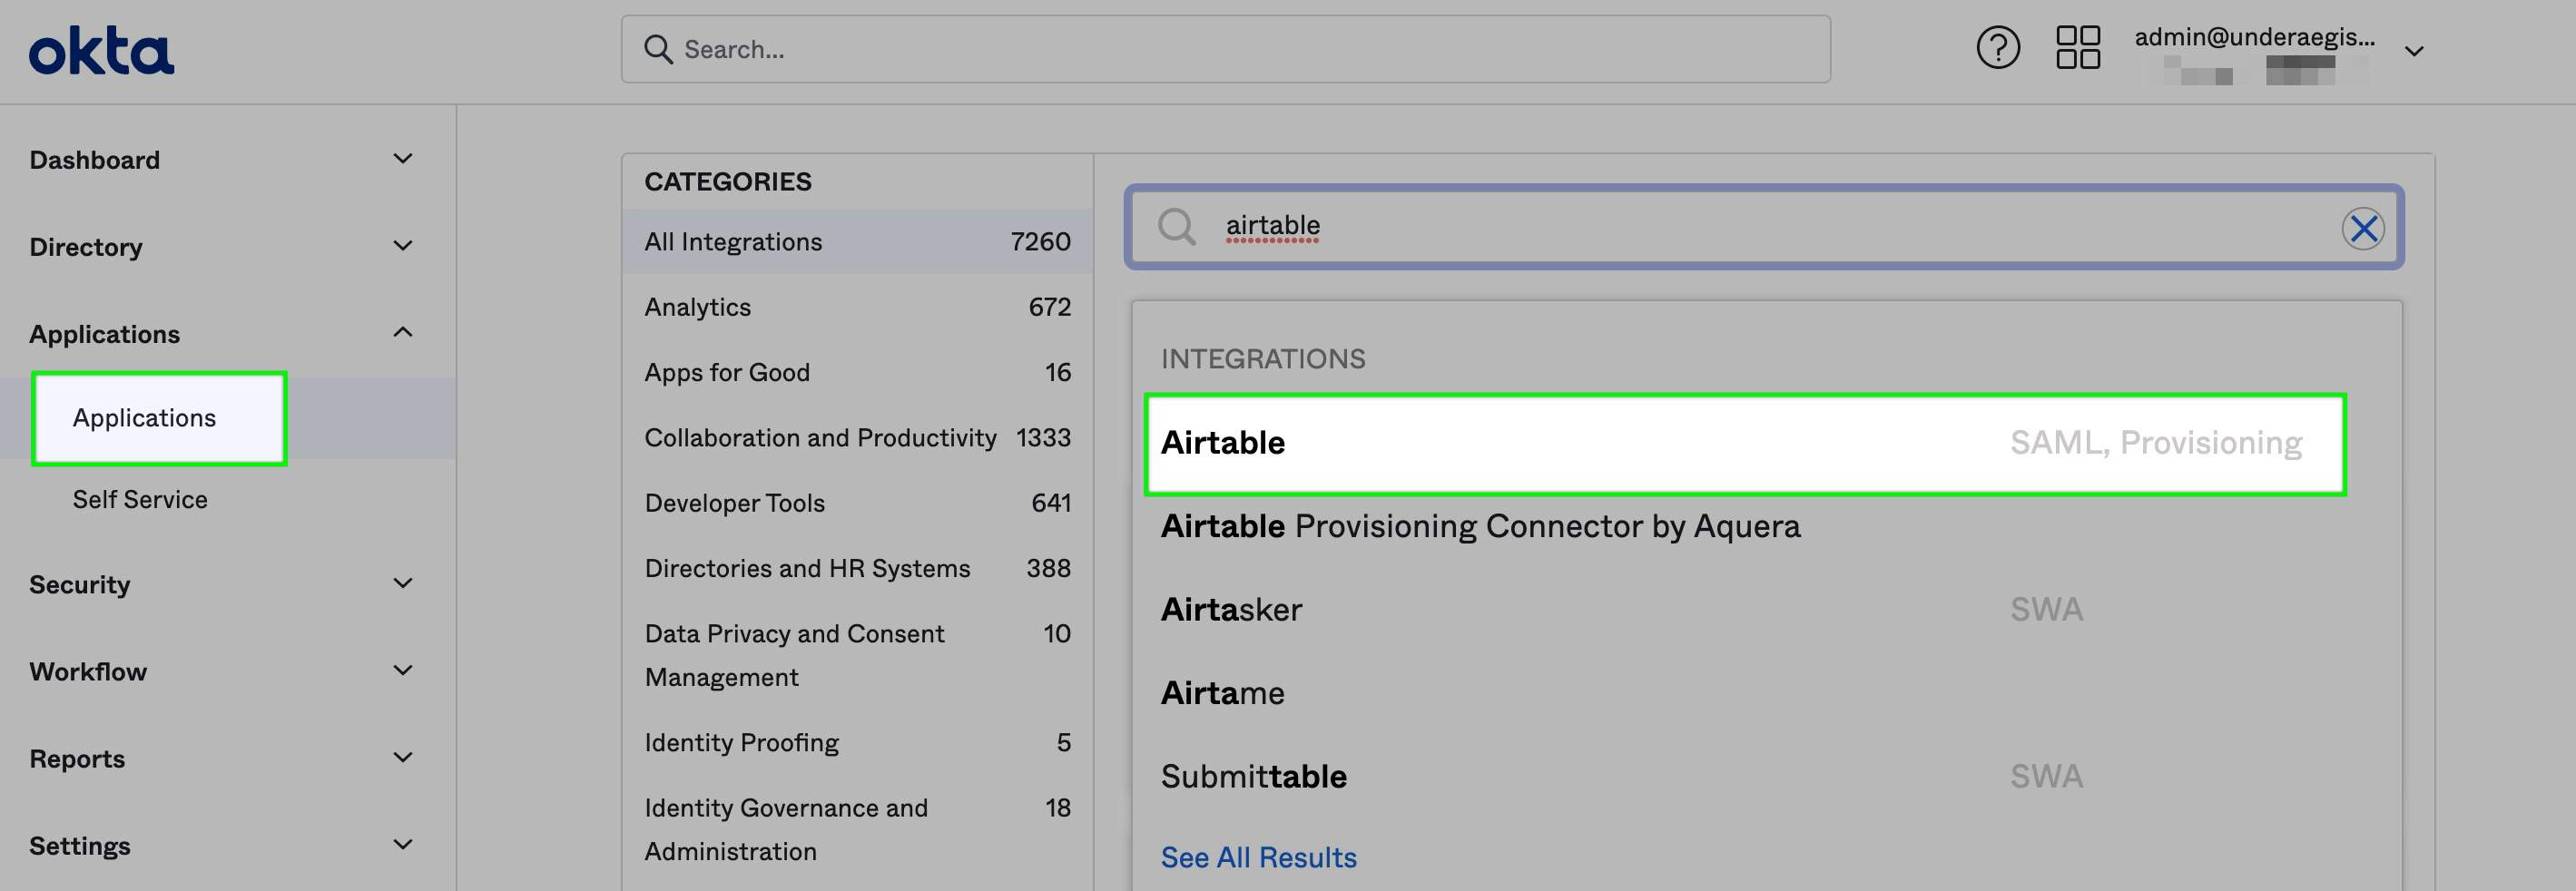
Your organization may have already set up an integration with the Airtable app in Okta. If this has not been set up yet, then Okta provides a native Airtable integration that can be set up by searching for "Airtable" in their app integration catalog. Look for the app with the "SAML, Provisioning" tag. We will not run you through the full step process of adding this integration as it is covered in Okta's documentation here.
Step 2: Check app settings
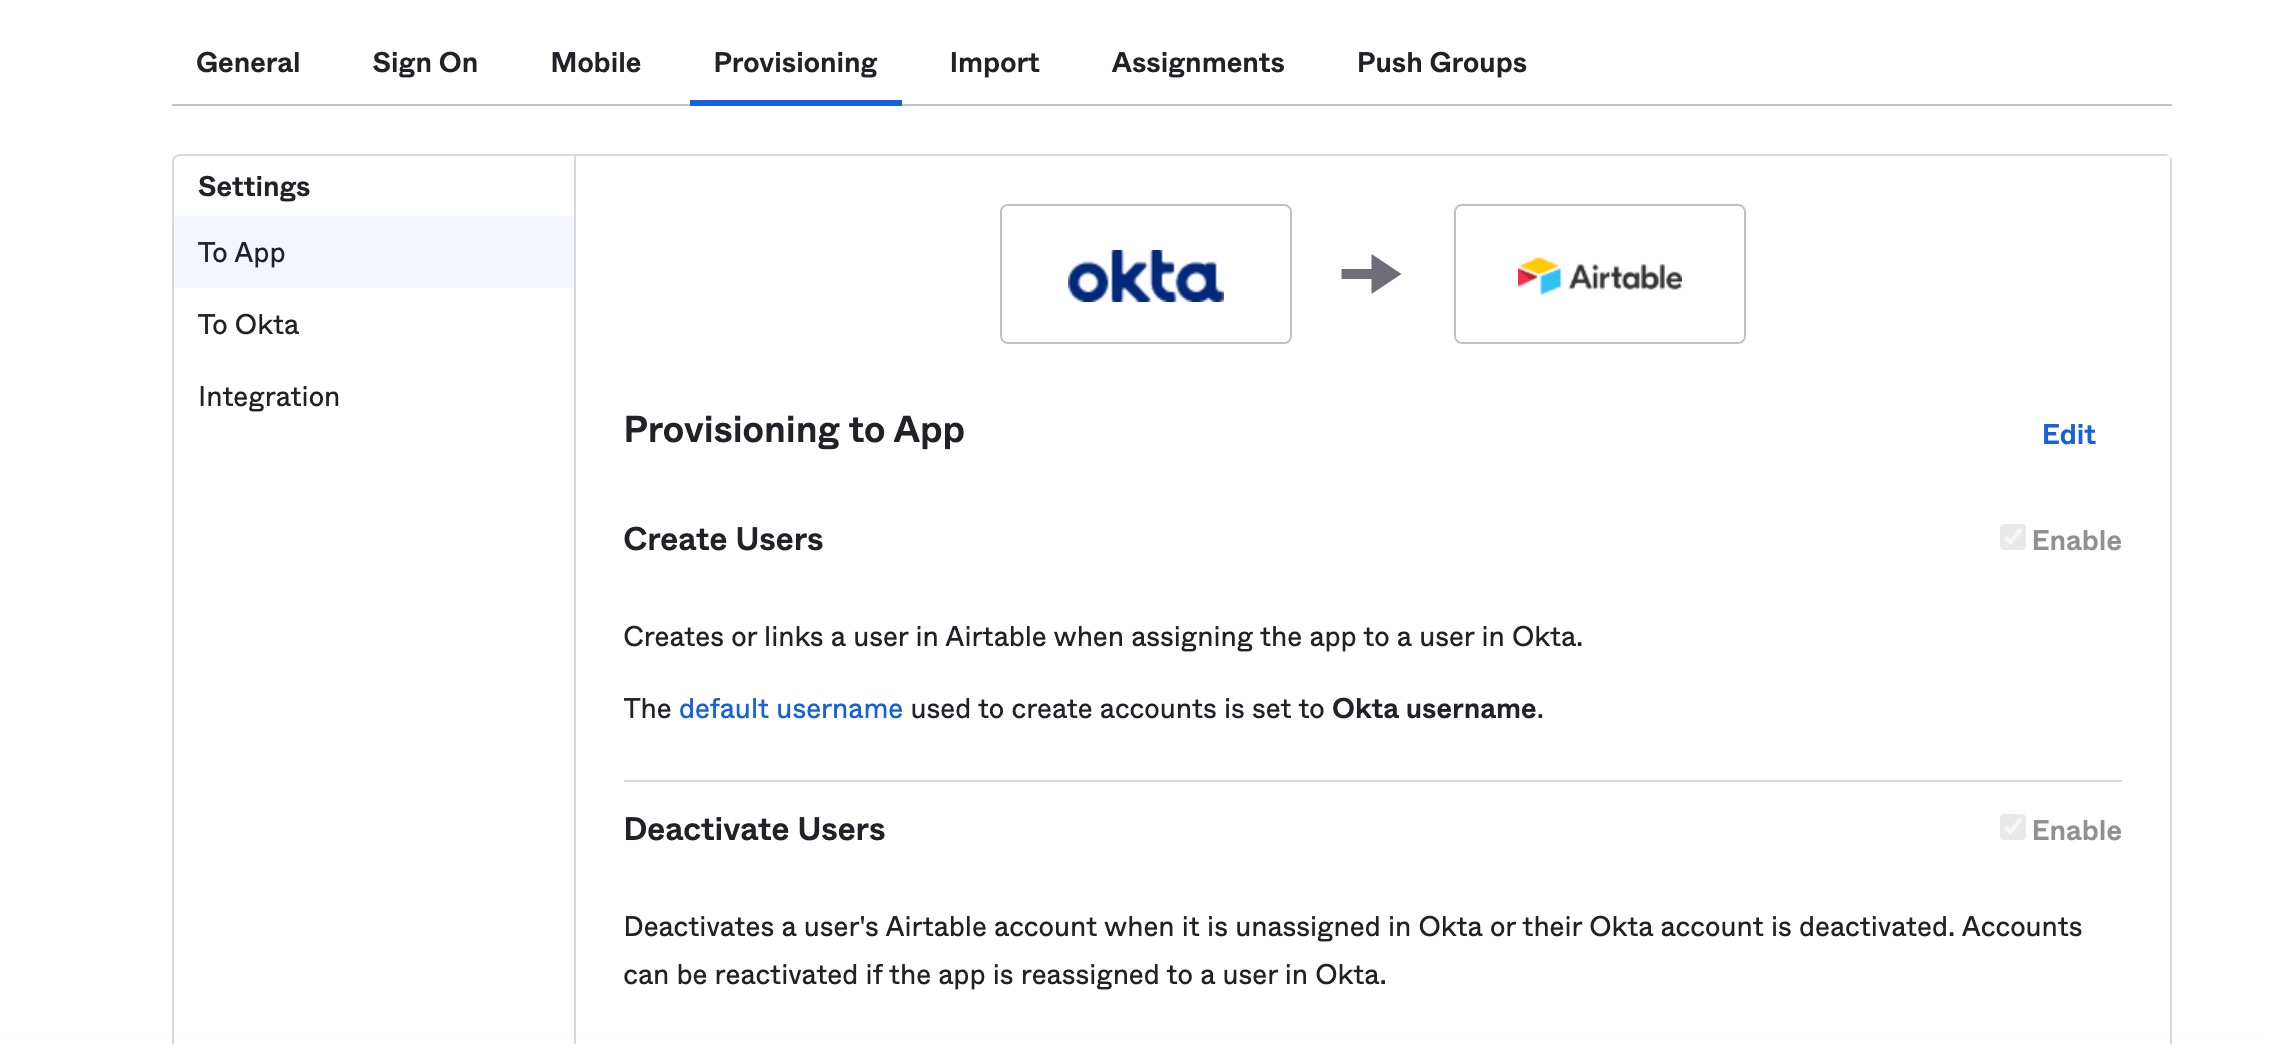
After connecting Okta and Airtable, you'll want to check the Airtable app integration's settings. From the app's page click Airtable. This will bring you to a window with several tabs. It's worth investigating all of these tabs, but for our purposes, we'll just be looking at the "Provisioning" tab, which allows us to decide whether to enable the "push" toggles discussed above. In our case, we will have these enabled in order to automatically push new users and also sync user activation and deactivation changes made in Okta over to match in Airtable.
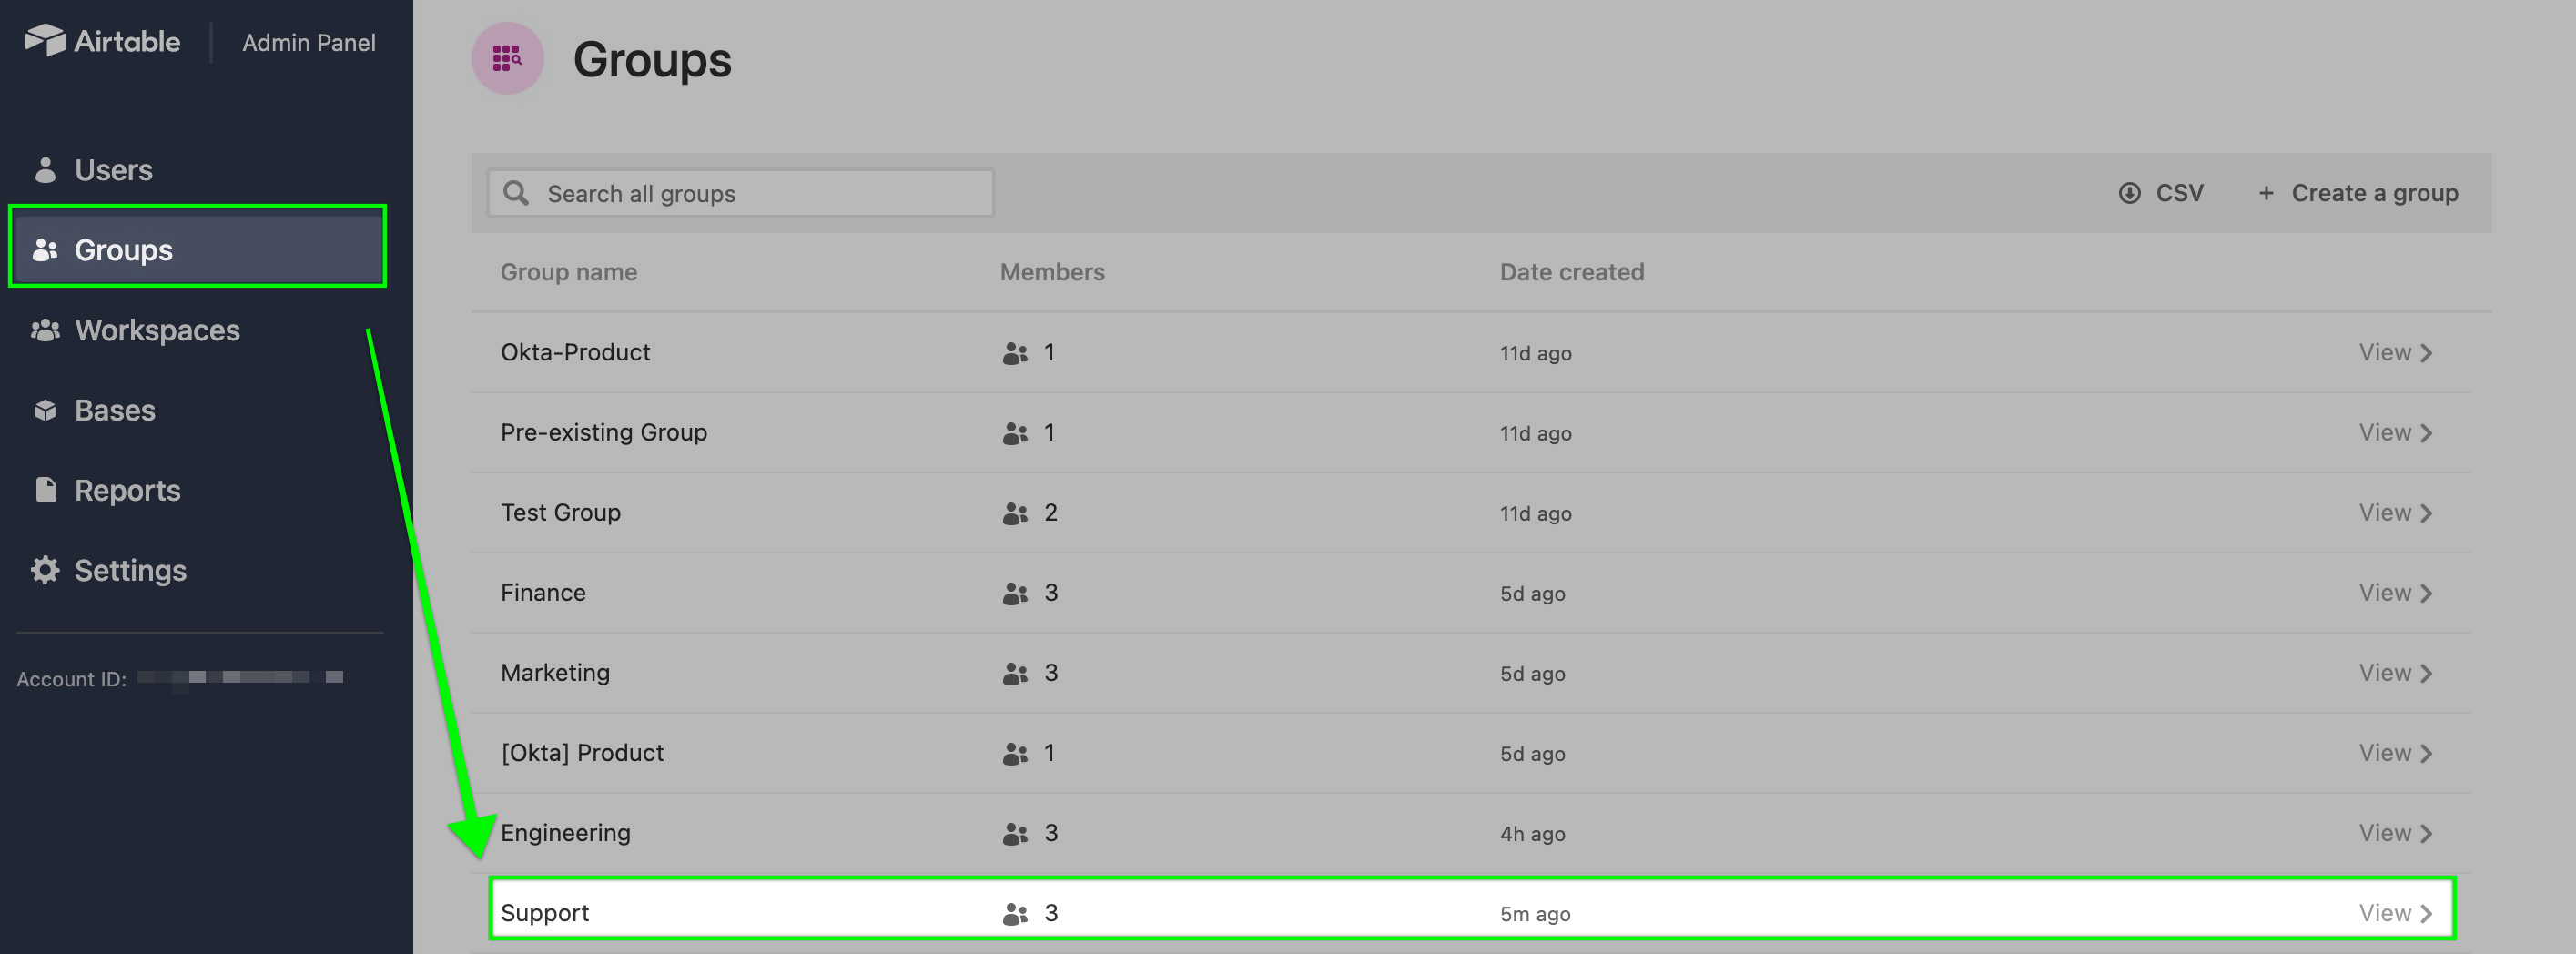
Step 3: Create a new group in OKTA
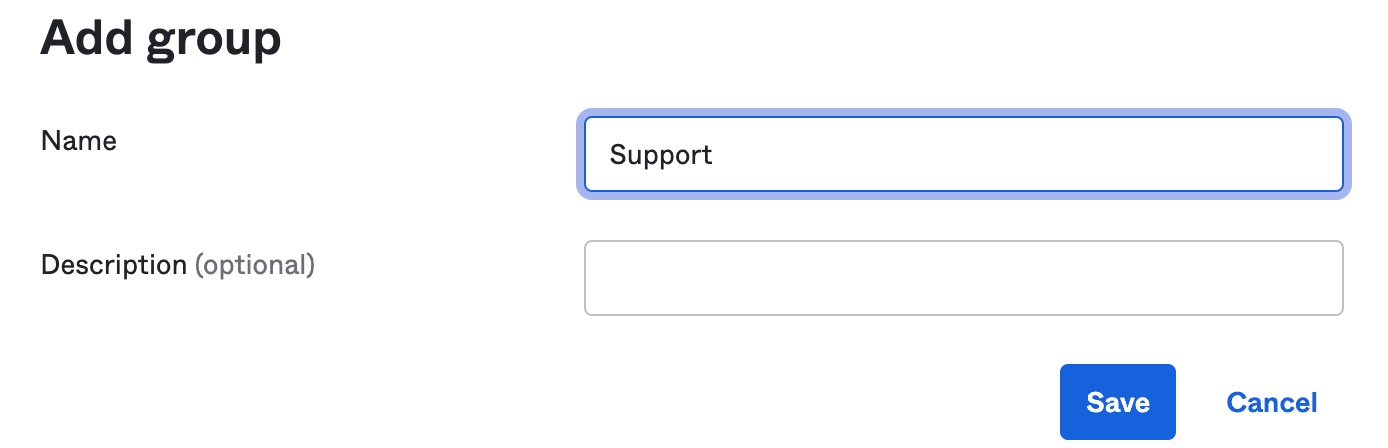
If you are unfamiliar with user group creation in Okta, then please refer to their documentation. The simplified version of group creation involves navigating to the "Groups" option under "Directory" and clicking "Add group."

This will bring up a window to add a group name and optional description. The group name chosen here will sync over to Airtable as that same group name. In this case, we are creating a new group for a "Support" team.
Step 4: Assign group members
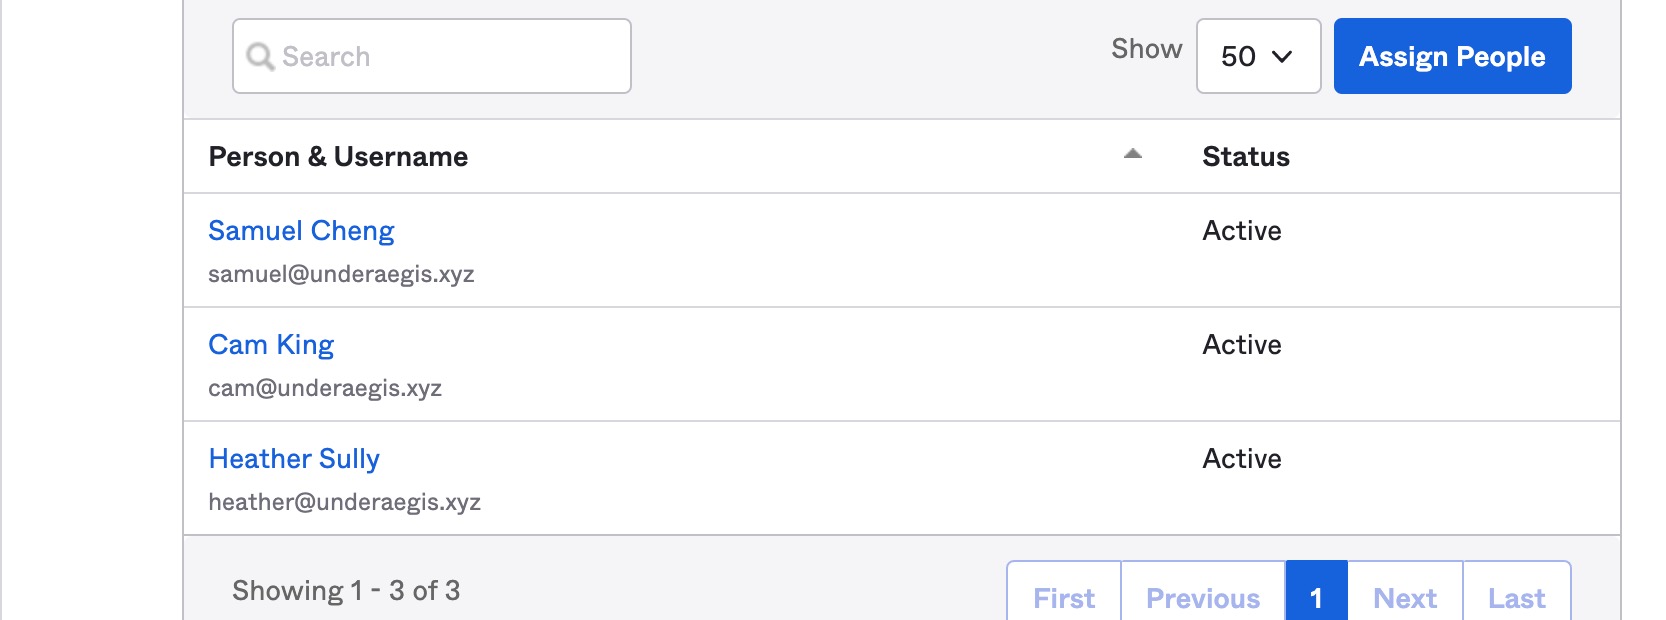
After saving the newly created "Support" group, find the group name and click it to open that group's page in Okta. Here you can "Assign People" to the group.
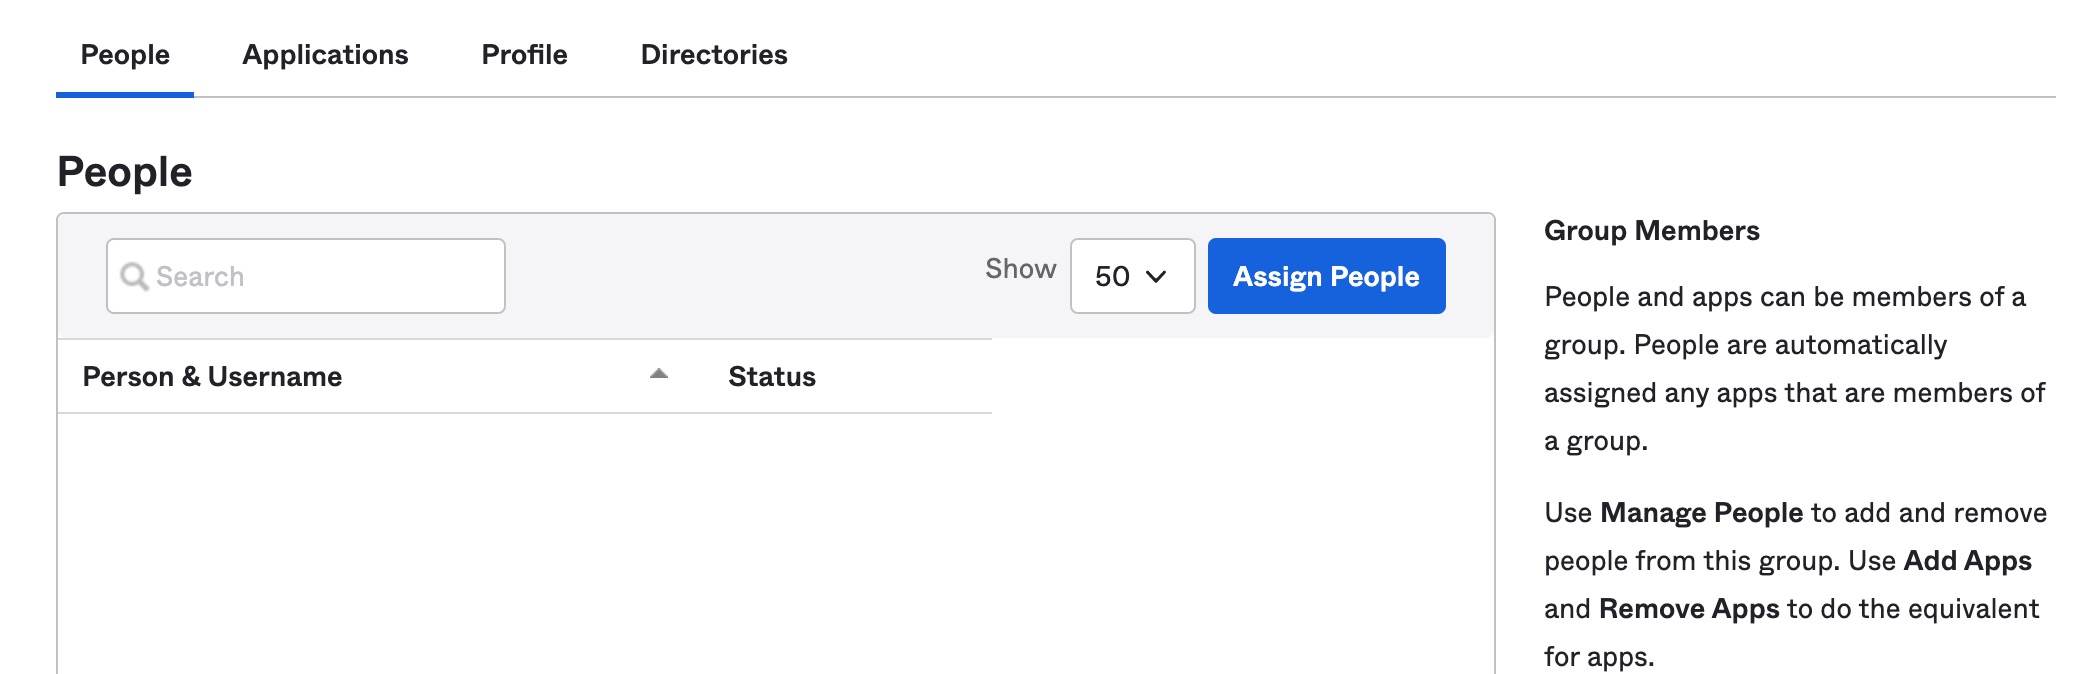
We are assigning Heather, Cam, and Samuel to this group since they are support team members in our example.
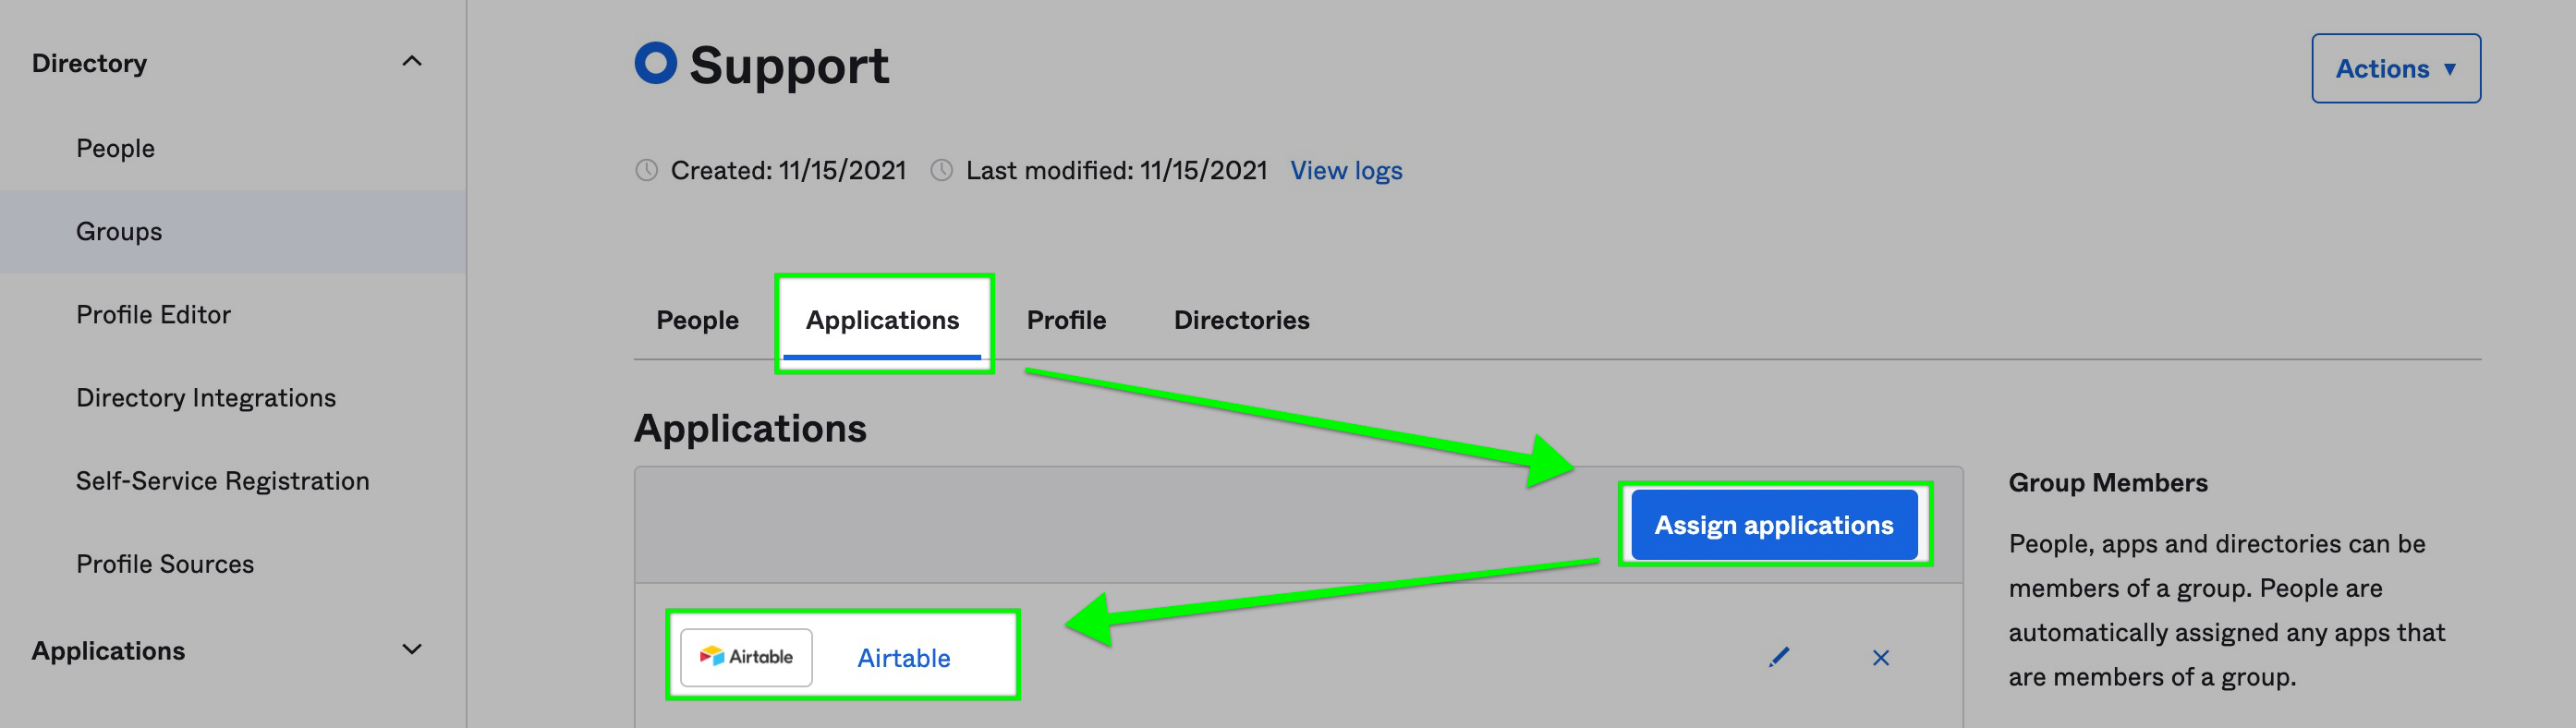
Step 5: Assign Airtable app in OKTA
Now, you'll want to assign the Airtable app from earlier steps to this group. From the "Support" group's page in Okta click the "Applications" tab and then "Assign applications." Once the Airtable app has been assigned, the page should refresh and you should see the Airtable app appear in the list.
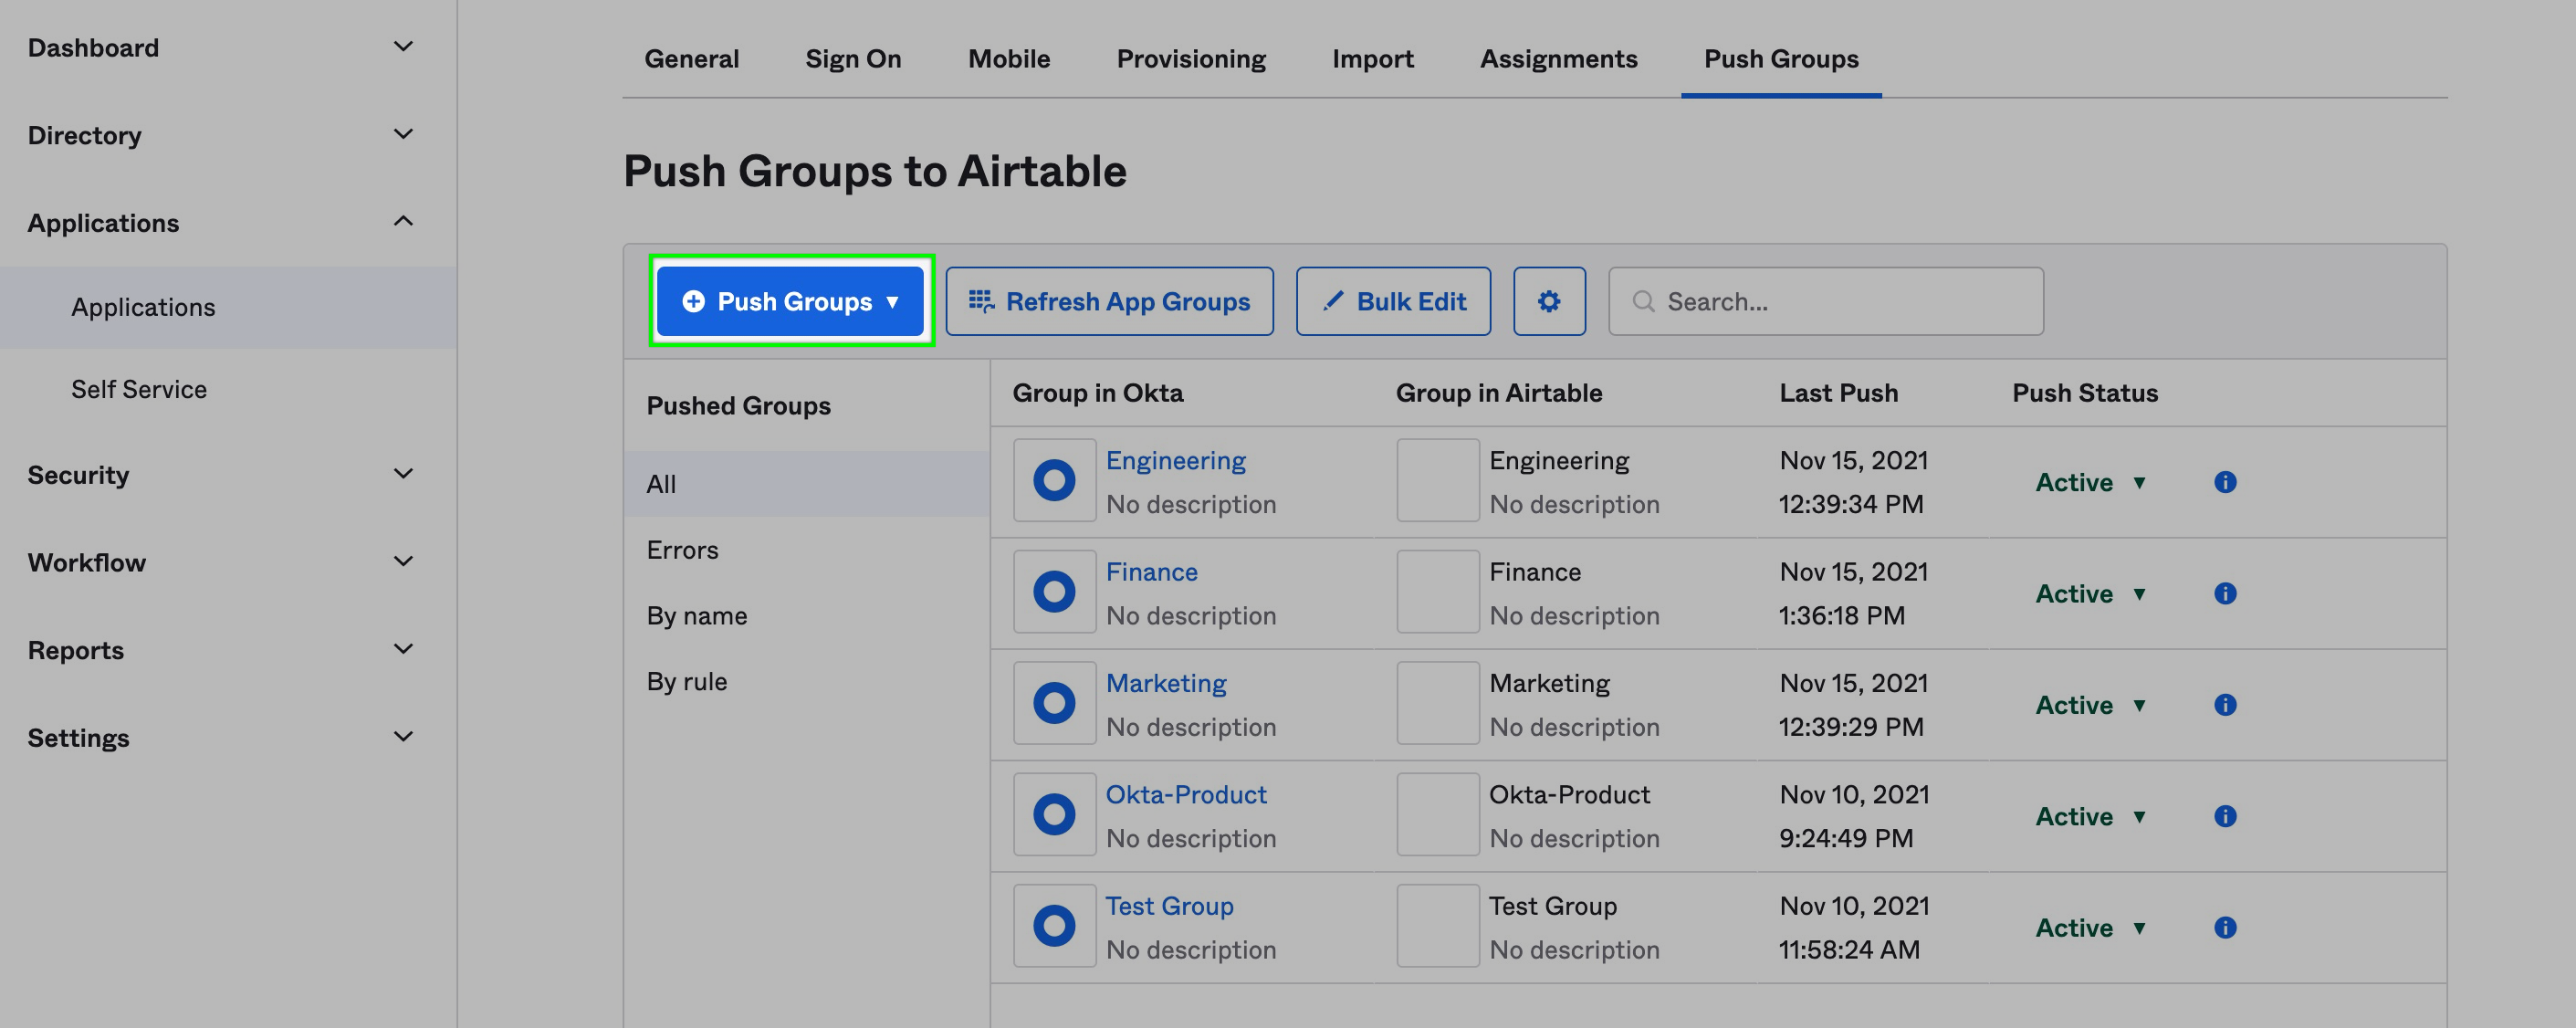
Step 6: Push group to Airtable
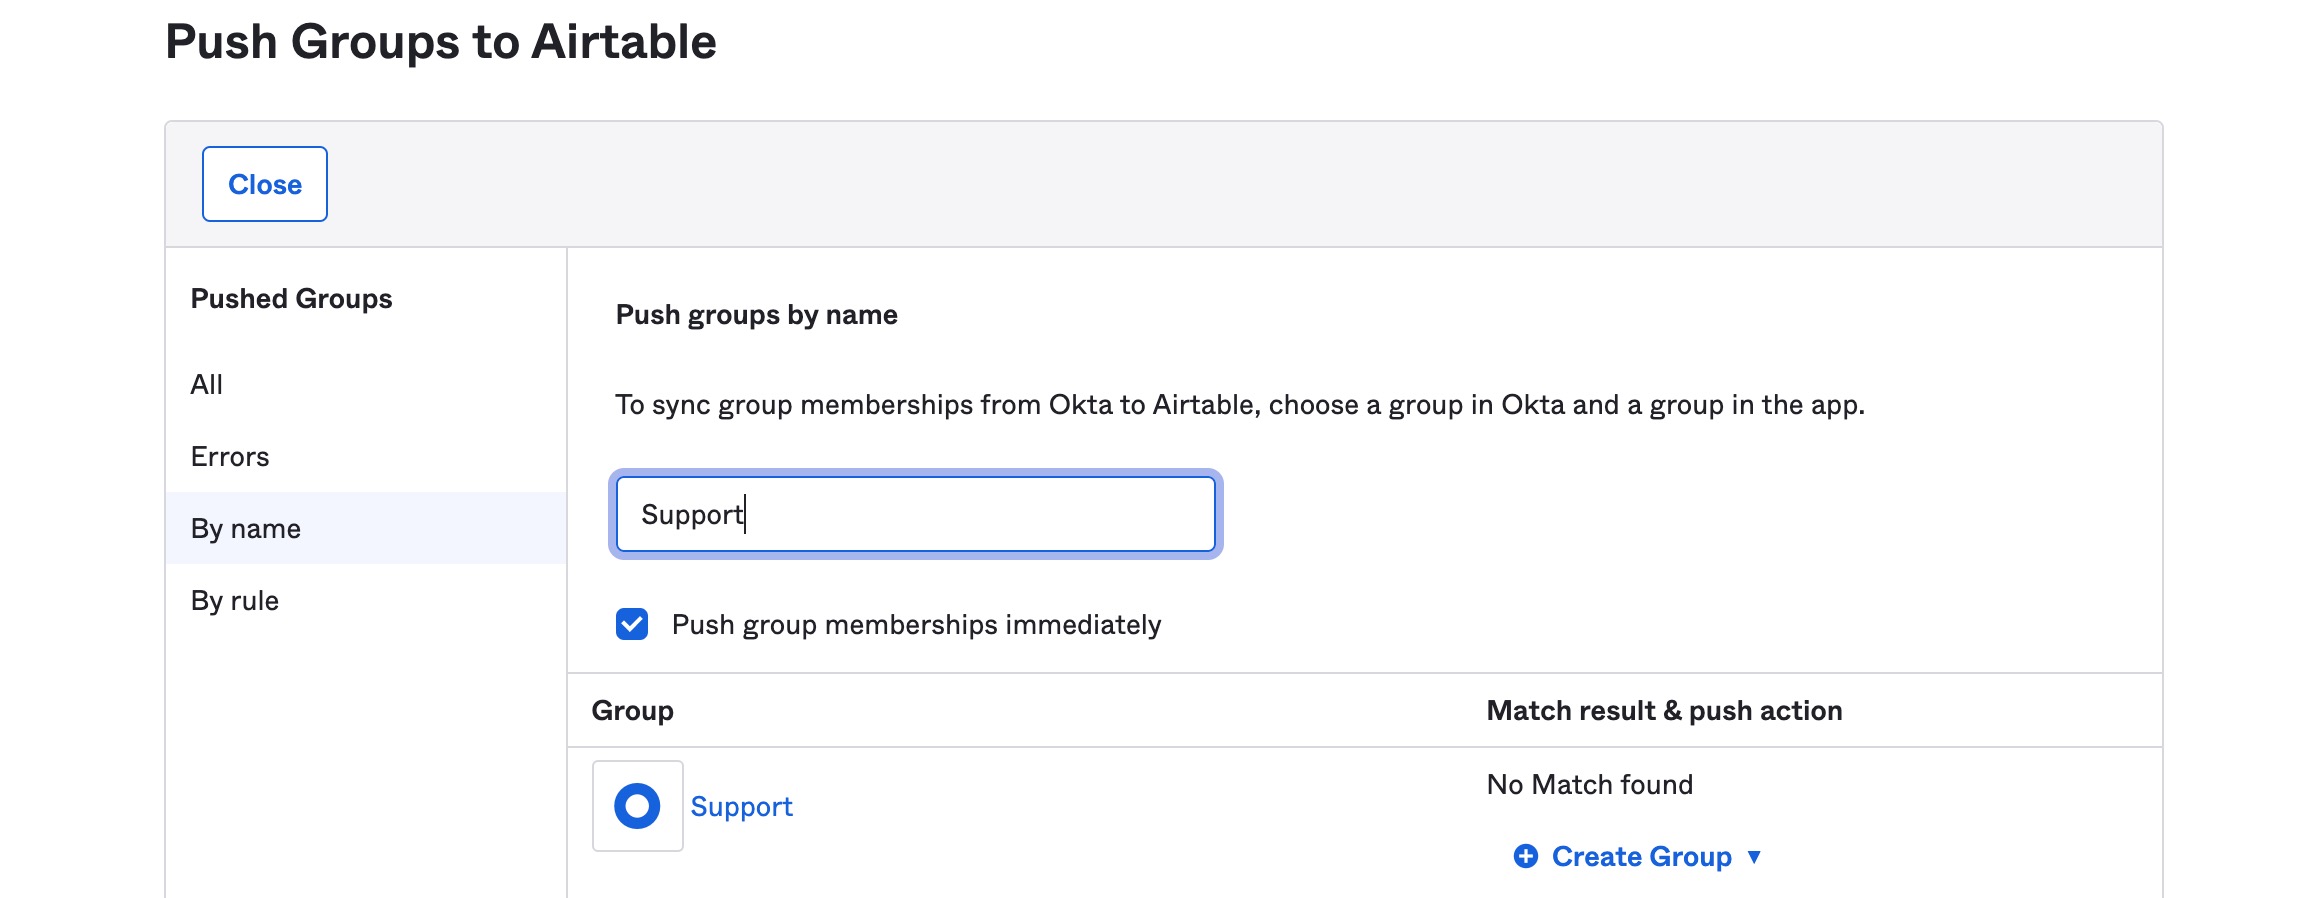
For the last setup step in OKTA, you'll need to head back to the "Applications" page and open the Airtable App. Under the "Push Groups" tab you'll find an option to "Push Groups." Click this to find the group by name or rule.
In this case, we'll find the group by searching for it's name. All that's left is to click the "Save" button at the bottom of the window.
The group should now appear in the Airtable Application's group list. It may take a moment for the "Push Status" column to change from pushing to "Active."
Step 7: Check Airtable Admin Panel
Once the push status in Okta is Active, navigate to the Admin Panel in Airtable to make further adjustments related to the group as noted in the Groups Admin Panel article—avoid making changes to the fields pushed from IdP (e.g., Group name) as a future sync can overwrite this.
Entra ID features via IdP sync
Provisioning users and managing users via IdP sync
There are 3 Entra ID features to consider related to syncing in Airtable:
Provisioning new users: Entra ID will automatically create an account for that user in Airtable when creating and assigning new users in Entra ID.
Provisioning user updates: When a user's mapped attributes in Entra ID are updated, the user's values in Airtable are also updated.
Provisioning user deactivation: When a user's access to Airtable is deactivated or disabled in Entra ID, the user will also be deactivated in Airtable.
Note
Airtable doesn't charge for deactivated users. If you need to reactivate (reprovision) users, we suggest leaving their account status as "deactivated."
Provisioning user groups
Provisioning user groups creates an Airtable user group with the same name and membership as the source group from Entra ID. (Airtable does not support nested groups.) The admin panel supports additional changes once user groups are pushed from Entra ID to Airtable.
We suggest avoiding changes to fields pushed from the IdP (group name), as future syncs can overwrite them.
Automatic provisioning in Entra ID
In the following example, we'll add a new group in Entra ID to push to Airtable, which will create a new user group in Airtable that matches the group coming from your organization's Entra ID instance.
Step 1: Check the SSO configuration
Suppose your organization has not integrated the Airtable gallery app into Entra ID. In that case, Microsoft provides a native Airtable integration that can be enabled by searching "Airtable" in their app integration gallery.
Search for the app with "Federated SSO" and "Provisioning" tags.
Follow the steps covered in Microsoft's Entra single sign-on (SSO) integration with Airtable documentation.
Step 2: Check the automatic provisioning configuration
After connecting Entra ID and Airtable, update the Airtable app provisioning settings.
click Airtable from the "Enterprise applications" page.
Select the “Provisioning” tab.
Follow the steps covered in Microsoft’s Configure Airtable for automatic user provisioning documentation.
.png "unnamed(4).png")
Step 3: Create a new group in Entra ID
If you are unfamiliar with user group creation in Entra ID, please refer to the Manage Microsoft Entra groups and group membership documentation.
Navigate to Entra ID’s “Groups” page under the “Manage” section.
Click New group.
.jpg "unnamed(1).jpg")
A new page opens, allowing you to configure your group settings. The group name chosen here will sync to Airtable using that same group name. In this case, we are creating a new security group for a “Support” team.
.jpg "unnamed(2).jpg")
Step 4: Assign group members
Locate your group name and open that group's overview after saving the newly created "Support" group.
.jpg "unnamed(3).jpg")
In this example, we are assigning Jacob, Kylie, and Victoria to this group since they are support team members.
.jpg "unnamed(4).jpg")
Step 5: Assign Airtable app in Entra ID
Assign the Airtable app to your group. (See step 4.)
Navigate to "Enterprise Applications" and select your Airtable instance.
Select Users and groups and then Add user/group.
.jpg "unnamed(5).jpg")
Click the checkbox next to the “Support” group and then click Select.
Click Assign to assign Airtable access to your group and its members.
.jpg "unnamed-1(1).jpg")
Step 6: Provision the group
Once assigned, this group should be provisioned in Airtable. The timing of this can depend on your provisioning cycle.
To Provision your group immediately:
Select Provision on demand, then your “Support” group.
.jpg "unnamed(6).jpg")
Select the users you want to provision, then click Provision.
.jpg "unnamed(7).jpg")
The "Support" group should now appear in the Airtable group list.
.jpg "unnamed(8).jpg")
Step 7: Check Airtable admin panel
Once provisioning is complete, navigate to the admin panel to make further adjustments related to the group, as noted in the Groups admin panel article. Avoid changing the fields pushed from IdP (group name), as future syncs can overwrite this.
.jpg "unnamed(9).jpg")
SCIM metadata via IdP sync
Note
SCIM is only available for ELA & CLAIM enterprises, and SSO is a prerequisite for creating and updating users since we don't allow setting passwords with SCIM. For CLAIM enterprises SCIM can only manage claimed users. More information and a complete list of SCIMP API points are available here.
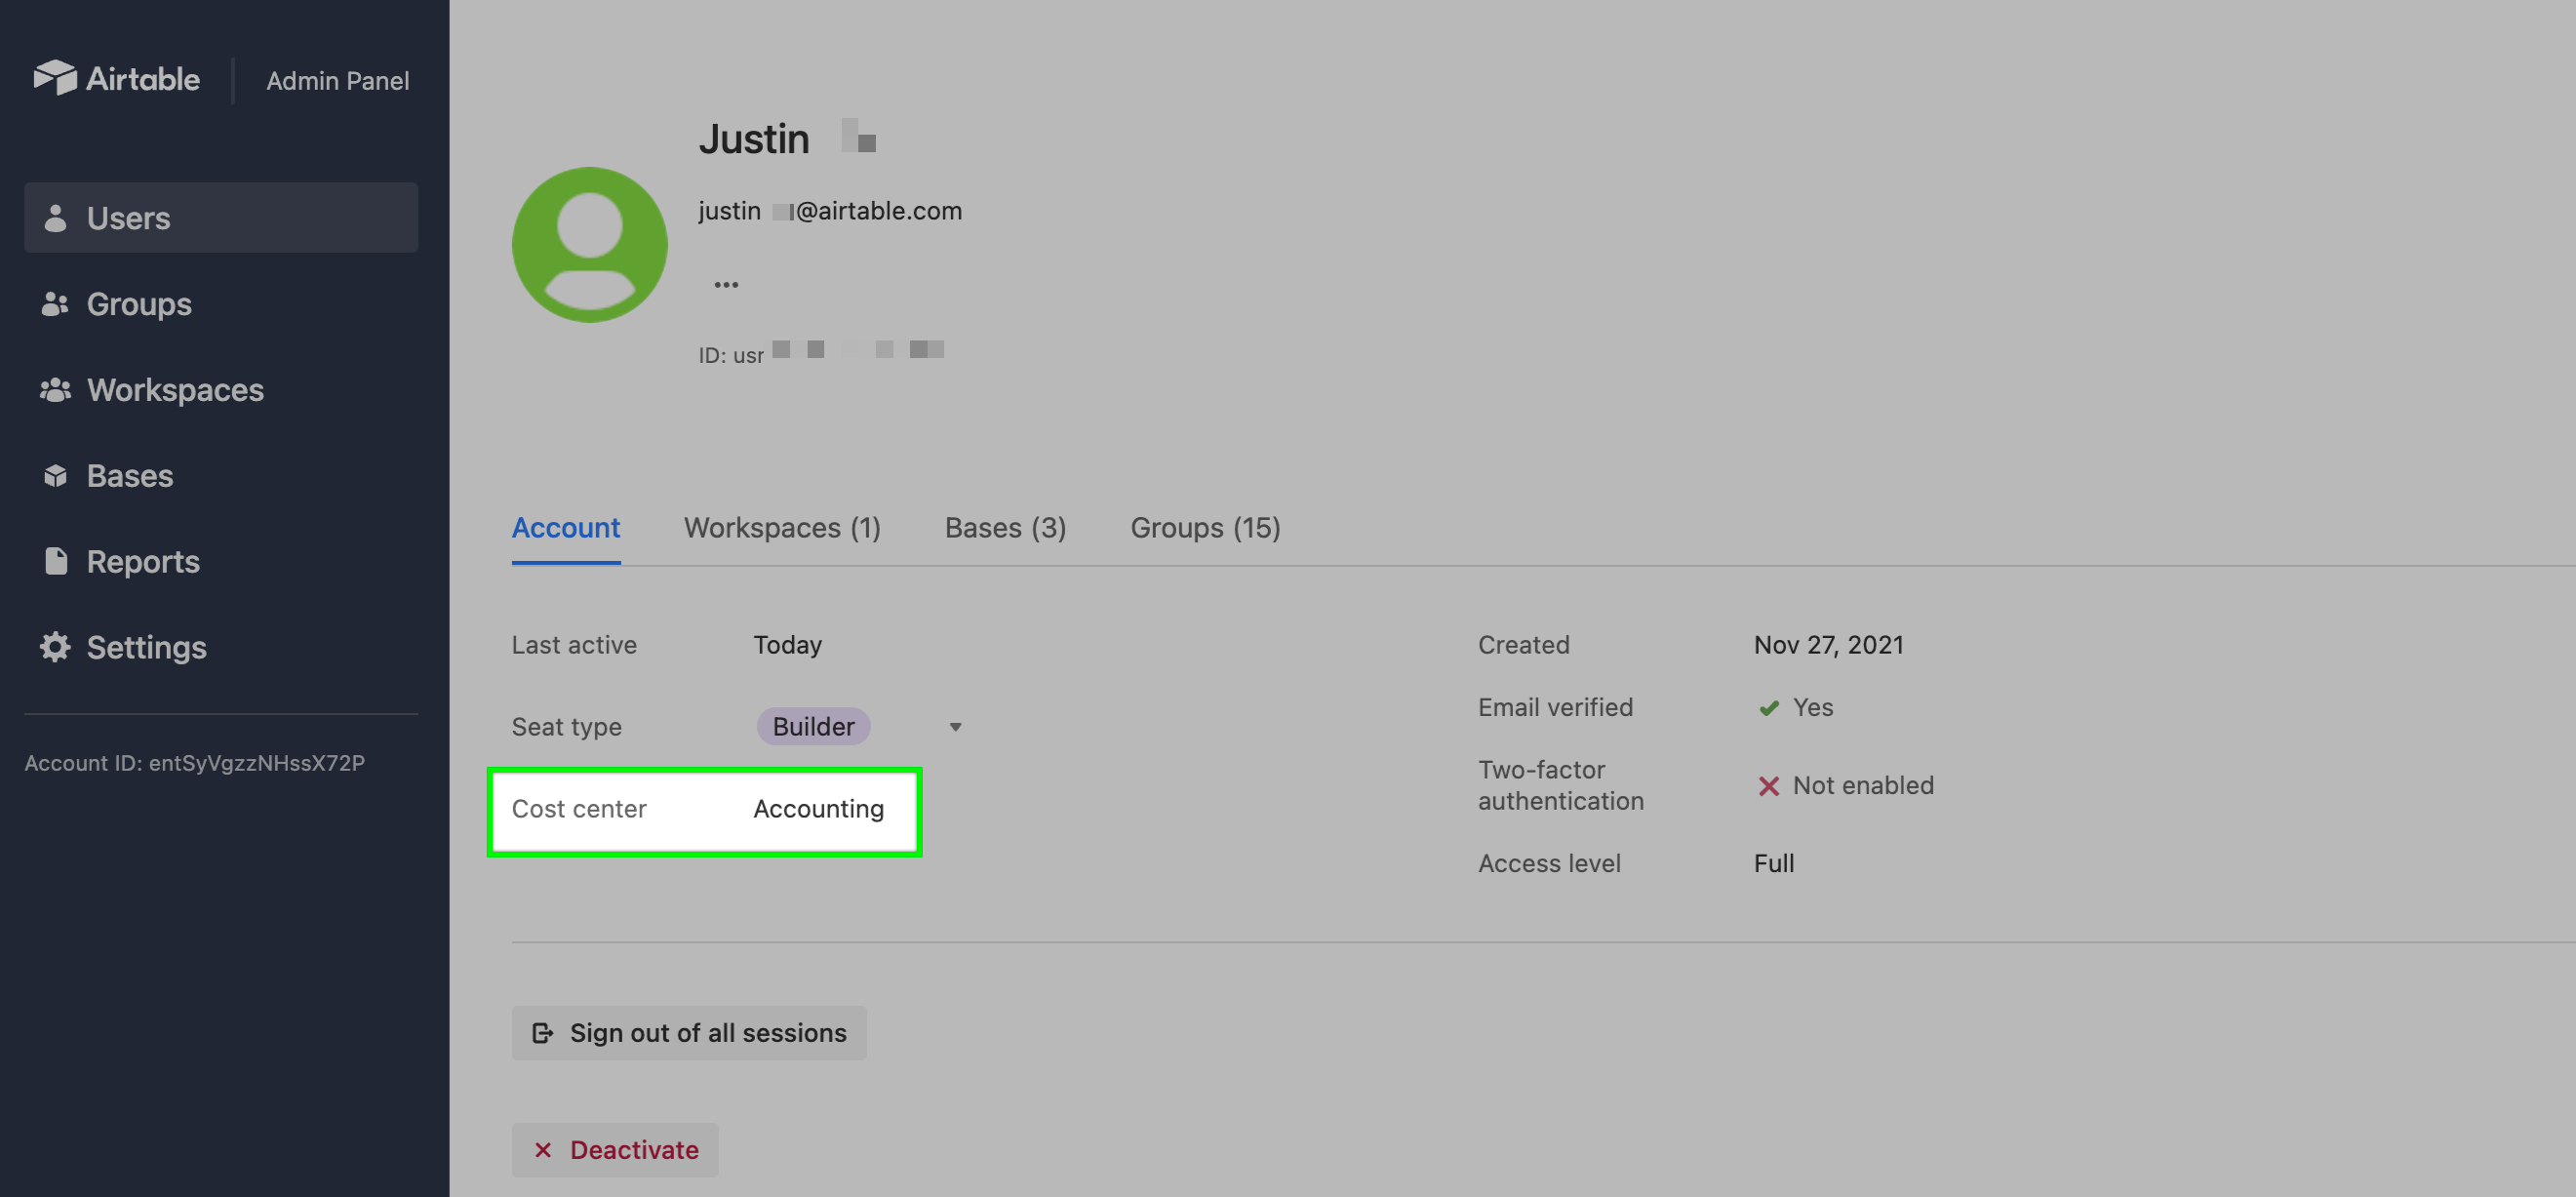
Any additional metadata pushed to Airtable cannot be edited from within Airtable. To edit a user's cost center attributes, you'll need to return to the IdP and change it there.
Before completing the steps below, your organization must have already set up Okta or Entra ID to provide SSO and connect to Airtable, as highlighted in the sections above. Okta and Entra ID provide documentation on setting up apps to push SCIM data to Airtable. See our API documentation for user metadata mapping of Airtable fields to SCIM Attributes—which allows additional user metadata held in the IdP to be displayed in various locations throughout Airtable's admin panel. Organizations that use cost centers for accounting purposes will find this feature helpful.
Finding “Cost center” information
After setting up attribute mapping in the IdP, Airtable populates a "Cost Center" field in the Users page of the admin panel with related data held in the IdP.
.png)
Additionally, if cost center data is available for a user, then it is visible on their individual user details page:
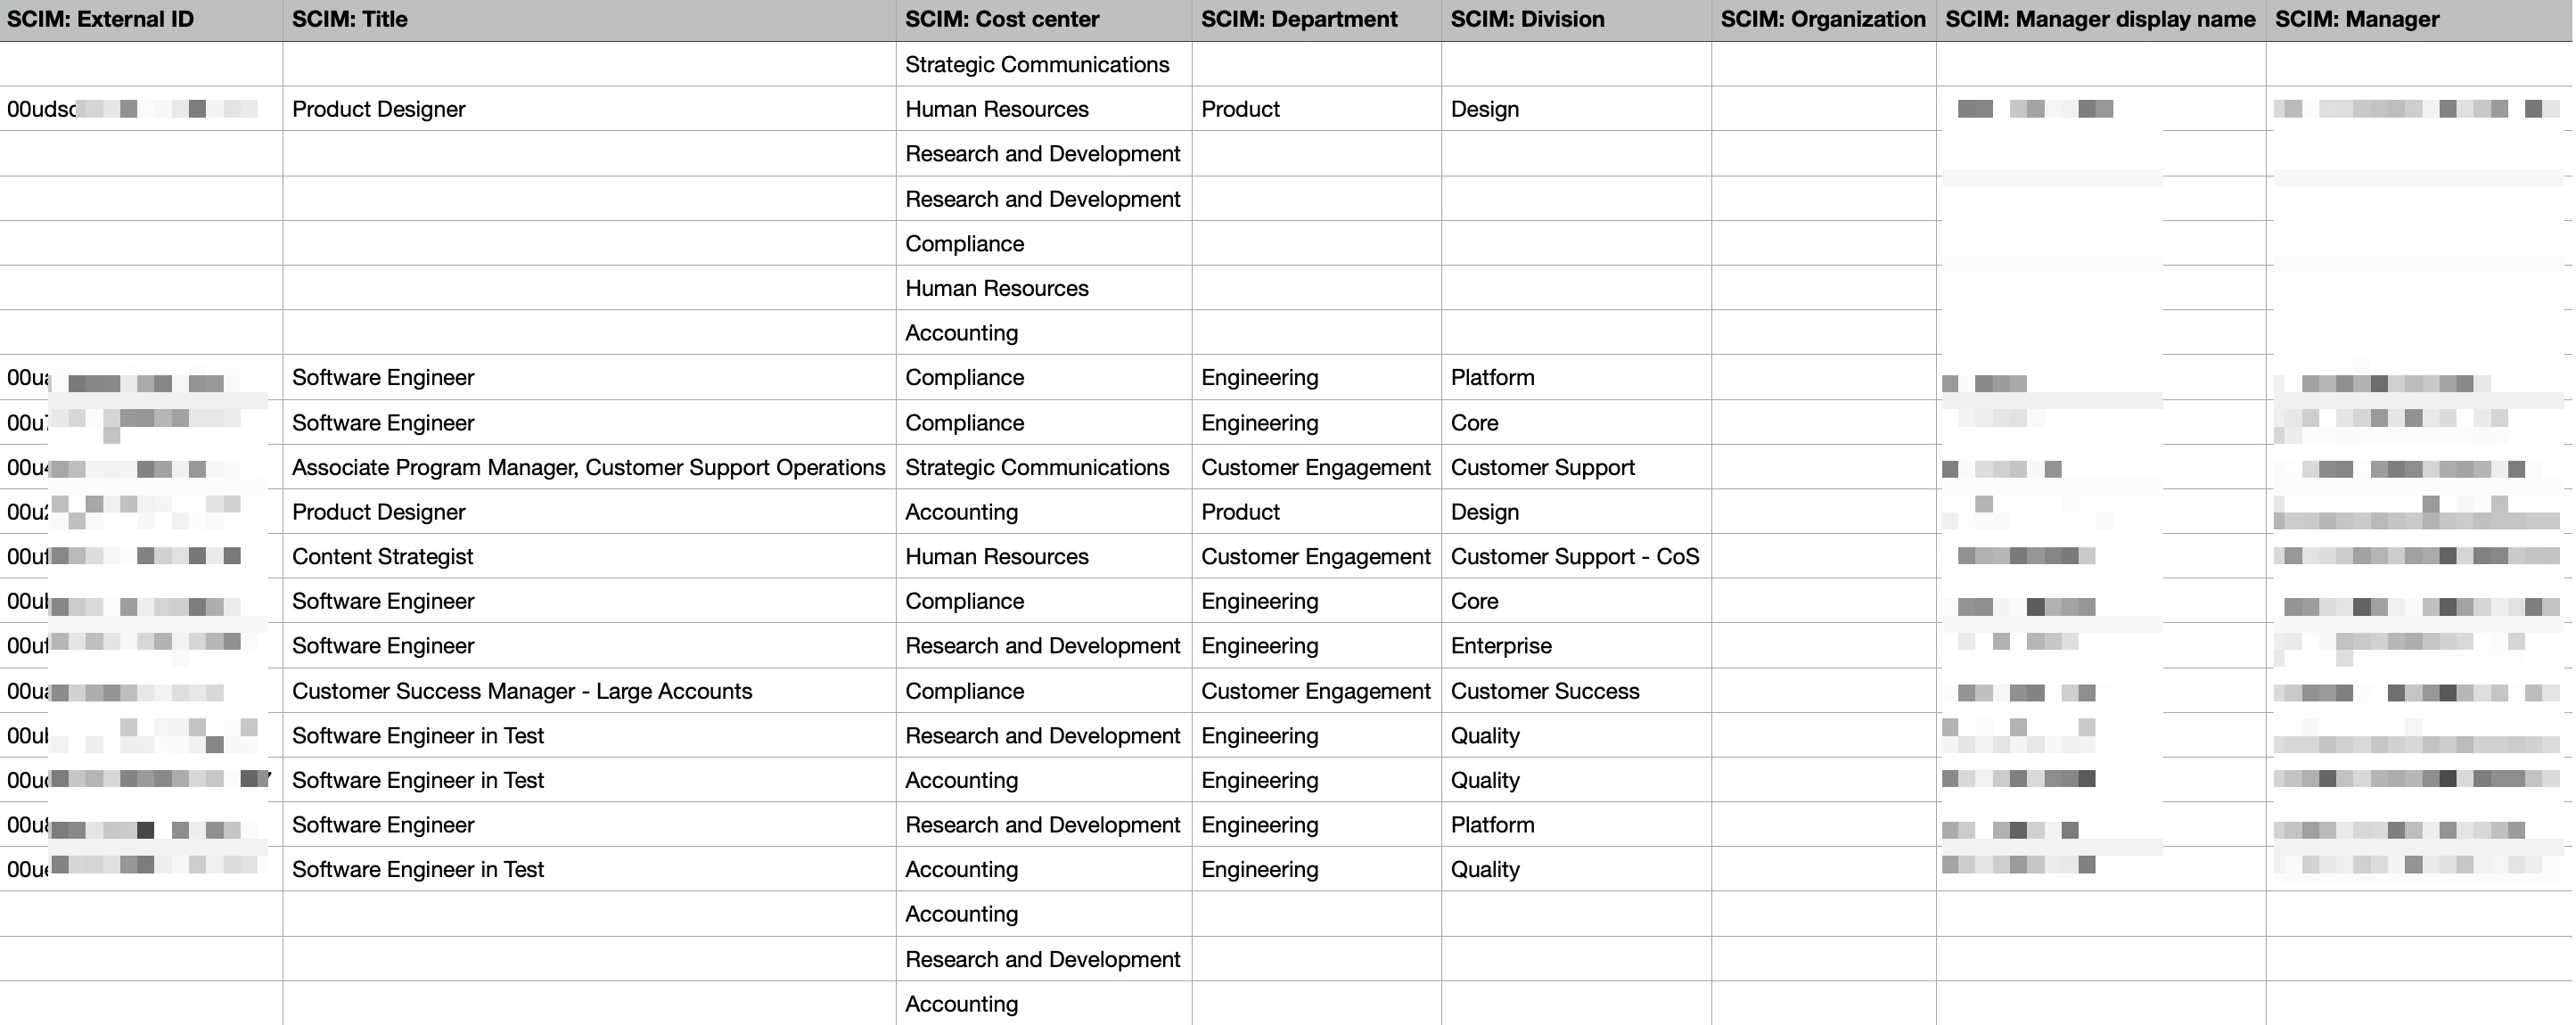
Available metadata for CSV export
The following information will be available in a CSV export from the admin panel:
External ID
Title
Cost Center
Department
Division
Organization
Manager name
Manager ID
Here is a redacted image of how that information will appear in the exported CSV:
SCIM with non-email SSO identifiers
If your SSO configuration uses an email attribute (the SAML NameID is a stable, non-email identifier such as a UPN or employee ID — see [SSO dependencies](/docs/configuring-sso-in-the-admin-panel#sso-dependencies)), SCIM provisioning behaves as follows:
The SCIM
userNameis the user’s SSO NameID, and the user’s email address comes from theemailsattribute instead.Your IdP’s existence checks (
filter=userName eq …) match users by email address or by SSO NameID, so provisioning works whether the connector sends one or the other.Email address changes made in the IdP flow through automatically. The NameID is the stable identifier, so no pre-work in Airtable is needed and no duplicate accounts are created.
SCIM can also provision users whose email domain is outside your organization’s verified domains via the Airtable SSO schema extension; these users become SSO-managed external users. See the SCIM API documentation for the extension schema and full details.
FAQs
Is cost center data able to be synced to Airtable via SCIM for any other IdP services besides Okta?
We support a subset of the specification for System for Cross-domain Identity Management, or SCIM. We also support a select list of user attributes.
Why isn’t automatic user deactivation working for me in Entra ID?
Suppose you use a custom Entra ID Integration rather than the Airtable Gallery App. In that case, you may encounter a known issue with automatic provisioning. Switching to the Airtable Gallery App or following the steps in Microsoft’s documentation should fix your problem.
Why aren't my SCIM-provisioned users being added to their org unit?
After connecting a group to an org unit, users are added automatically only if the org unit's membership setting is set to automatically add invited users. If the org unit requires admin review instead, SCIM-provisioned users are added to the group but aren't assigned to the org unit until an admin approves them. To apply membership automatically, open the org unit in the admin panel and set its membership setting to automatically add invited users.
Why do some provisioned users show a "Guest" label?
The "Guest" label indicates a user who is a member but hasn't yet been claimed by the org unit. It isn't the same as an "external" user, which refers to an off-domain user. Turning on Domain Capture doesn't remove the "Guest" label on its own — the user still needs to be claimed by the org unit.
Why can't I assign a license through SCIM/IdP user metadata?
SCIM and IdP user metadata (cost center, department, division, and similar attributes) can update user details in Airtable, but they can't assign or change a user's license or seat type. Attempting to set a license through SCIM user metadata may return a success response from your identity provider (IdP) without changing the user's seat in Airtable.
To assign licenses automatically for SCIM-provisioned users, use license-mapped user groups instead:
Create or identify a user group in your IdP that corresponds to the license or seat type you want to assign.
Push or provision that group to Airtable using IdP sync.
In admin panel, connect the group to the org unit or seat type that carries the license you want members to have.