All plan types with different automations usage limits | |
Owners/Creators - Can create or edit automations in Airtable | |
Platform(s) | Web/Browser, Mac app, and Windows app |
Understanding automated recurring record creation
Note
The article below is still useful in many cases, but you might also find value in creating record templates that have similar functionality at times.
The value of using automations in your workflow becomes immediately obvious when reducing manual errors by automating repetitive tasks. One common use case for automations is creating new records on a recurring basis. This article walks through a simple example workflow for creating recurring records, and showcases the" When a record enters a view" trigger, and the " Create record" action.
We'll start our example by first making sure our base is set up properly. Here's a quick list of everything we created for this workflow:
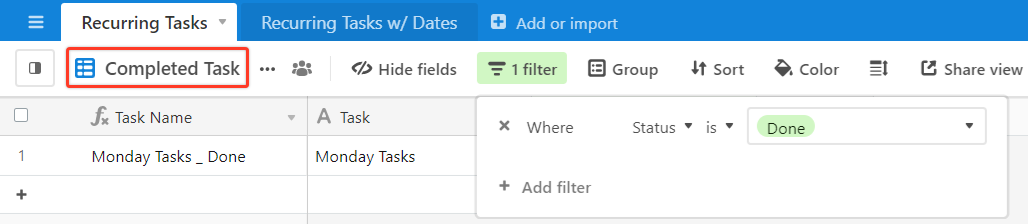
We created a new view to serve as the trigger for our automation
In the view we created, we added a filter to only show records that match a condition we set.
For our example, we created a filter to only show tasks where the Status is "Done" and named this view, "Completed Tasks.”
Feel free to copy the base below to your own workspace to follow along with this article. If you have copied this base note that the Task Name field is a formula field combining a task's name and the status of that task ( Task &" _ "& Status).
Configuring a recurring record automation
Step 1: Configure a trigger
Check out this support article if you'd like a refresher on how to create a new automation.
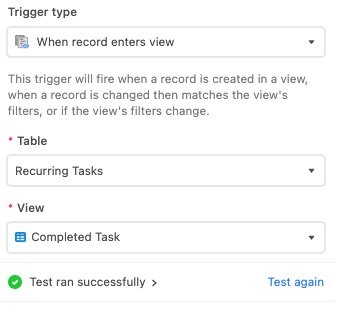
We'll start by creating a new automation, and then clicking to add a trigger. For this example, we will select the " When record enters view" trigger.
When using the "When record enters view" trigger the first thing we must do is select the table and view that will serve as the triggering point. For this example, we will use the "Completed Task" view we created above.
Here you can see what the trigger looks like with our "Completed Task" view in place.
Note
We strongly recommend pairing the "When record enters view" trigger with a locked view. By using a locked view, or ensuring a locked field is involved, you can decrease the likeliness of accidentally changing a view's filtering (therefore avoiding accidental automation runs for unintended records that enter that view).
Now, whenever a record enters this "Completed Task" view, which will only happen when a record's status is set as "Done" because of our filter, this trigger will fire.
Step 2: Configure an action
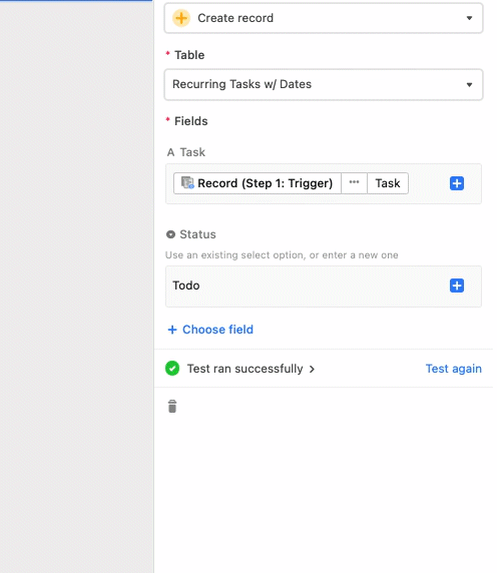
The next step is where things get fun—we can now setup an action to create recurring records. To create a new record we will make use of the " Create Record" action.
When our automation runs successfully, a record will be created in the specified table. The "Create record" action can be configured with multiple fields using dynamic values from previous steps, or static values. For this example, we will be using the "Create record" action to create records in our "Recurring Tasks" table.
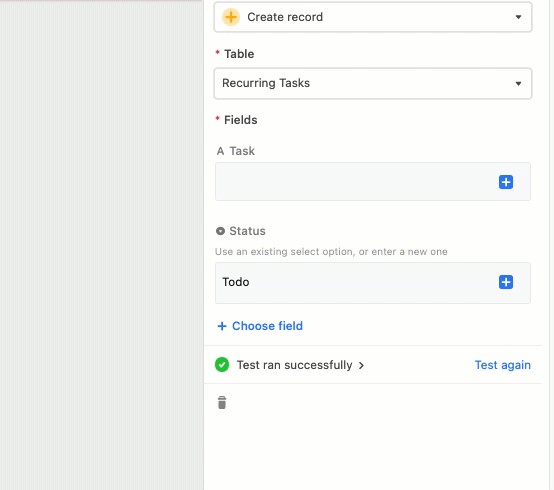
Note that in the above step, we pulled in the dynamic "Task" field value from our previous step (the trigger step) and set the "Status" field value to a static value of "Todo". After adding the fields, you will want to test the automation to make sure no errors occur.
Step 3: Test and turn on the automation
Once the test runs successfully, all that is left will be to turn your automation on.
After our automation is turned on we can see that every time we change a task's status from "Todo" to "Done" a new task will be added to our table!

Bonus step: Creating recurring tasks with dates
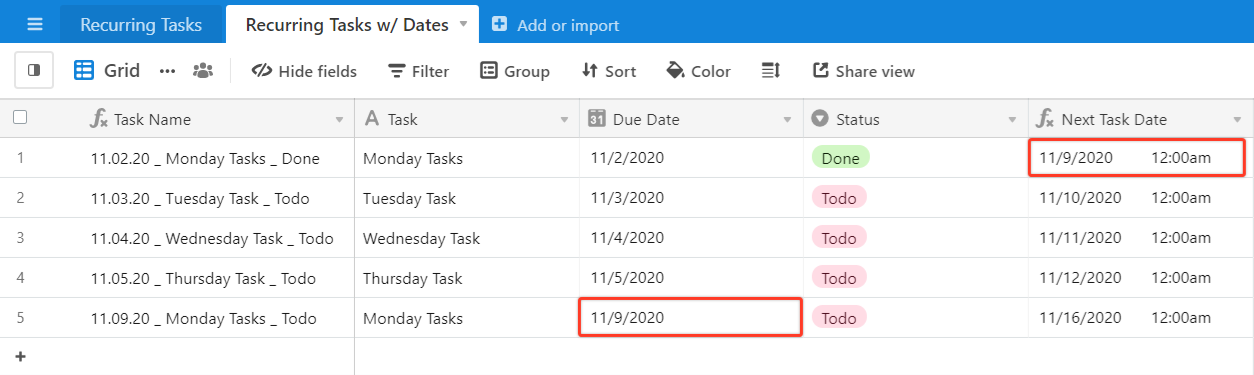
First, we'll move to the "Recurring Tasks w/ Dates" table of the embedded base above, and see that we added the due date to the primary field's formula, like so:
DATETIME_FORMAT({Due Date}, "MM.DD.YY") & " _ " & Task &" _ " & Status
Note that we use the DATETIME_FORMAT() formula to format our due date nicely.With our due date clearly visible for each task, we can move on. To create recurring tasks based on dates, you will want to add a formula field to your table and use
DATEADD([date], [#], 'units')to add additional days to the task date.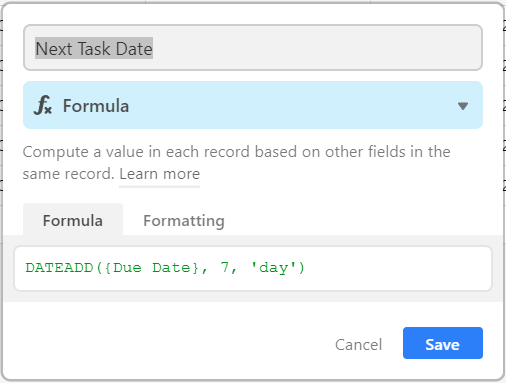
For our example, we added 7 days to our task due date. Now, our primary field has all the information represented, and we are able to see that our "Monday Task" has the DATEADD formula calculating for the next Monday.

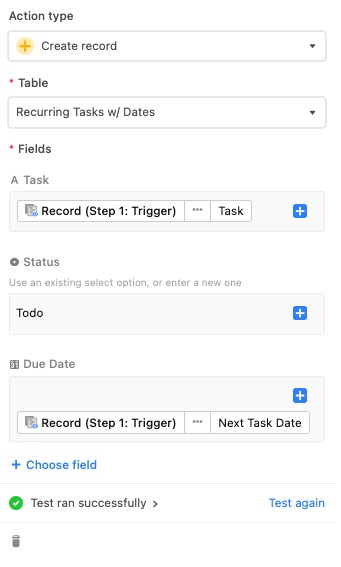
Once you have a formula in place, you will need to create an automation. You can follow the same configuration steps above, however, you will be adding an additional field to the automation action. In our example, we named the date field "Due Date" and inserted the formula dates. By doing this, our automation will create a new record with the date set 7 days after the date of origin from the previous record.
Once the "Due Date" field has the formula date value inserted, run a test to make sure the automation is working as expected. If the automation run is successful, you'll see a new record appear in the main grid view with the new date.
Now you can turn on your automation knowing that every time you mark a task as "Done" a new task will be created using the "Next Task Date" set on the previous task.