Note
Airtable’s form builder provides our recommended form-building experience. You can upgrade an existing form view to the new builder by clicking the Upgrade to new forms button in the top right corner of an open base’s form view. If you prefer to continue using the Airtable form views feature to create forms, then the article below will guide you.
Plan availability | All plan types |
Permissions |
|
Platform(s) | Web/Browser, Mac app, Windows app, and some basic functionality on iOS and Android mobile apps |
Overview of Airtable form views
Learn how to use Airtable form views to collect information from anyone and save it automatically to an Airtable base. Each form submission becomes a new record in the table where the form view was created.
Forms are perfect for logging expenses, collecting RSVPs, creating polls and quizzes, collecting customer information, and many other purposes. Airtable forms support file attachments, work well on mobile devices, and connect to the Airtable API. Unlike other products, which require you to build a form from scratch, Airtable form views are automatically generated from your existing table and then give you the ability to rearrange and remove fields.
Note
The form view is available on all plans, but certain features are only available on paid plans. The features mentioned as a paid plan-only feature throughout this article are available on Team, Business, and Enterprise Scale plans. If your workspace is on a paid plan, then you can customize your forms by adding a cover image and logo, customizing the form submission button, and removing the Airtable branding from the form. Visit our pricing page for more information for more details on upgrading a workspace's plan.
Choosing which form creation process to utilize
Airtable offers several form experiences that might be a better fit depending on your use case. Using the form builder is our recommended way to build and share forms, but consider all of the following options:
Sharing standalone forms
Form builder - A more creative and options-rich way to build standalone forms that can be shared with a variety of audiences. Over time, Airtable will continue adding sophistication. Form builder already offers enhanced functionality such as default values and warning messages that the form view does not offer.
Use cases: External-facing feedback, internal-facing feedback, complex data entry, condition-dependent forms
Form view - Airtable’s original form creation experience. Still powerful, but won’t receive the newest features that Airtable builds out in the form builder.
Use cases: External-facing feedback, internal-facing feedback, complex data entry, condition-dependent forms
Forms within an interface - Interface Editor permissions or higher needed
Interface Designer form layout page - A form that appears as an interface page only to logged-in users with edit access to that particular interface. If you want to duplicate an existing form layout page in the form builder, then learn more here.
Use cases: Internal-facing feedback, record creation from an interface
Record creation form buttons - Templated record creation forms that allow interface users with editor permissions to create new records without having to navigate the full complexity of the base on the backend. If you want to duplicate an existing record creation form button in the form builder, then learn more here.
Use case: Quick, simple record creation within an interface workflow
Creating a form in Airtable
To create a new form view, start by navigating to the table where you'll be collecting your new data. Open the view sidebar, then underneath the Create heading click the Form option. If your view creation section is collapsed, you will need to first expand it.
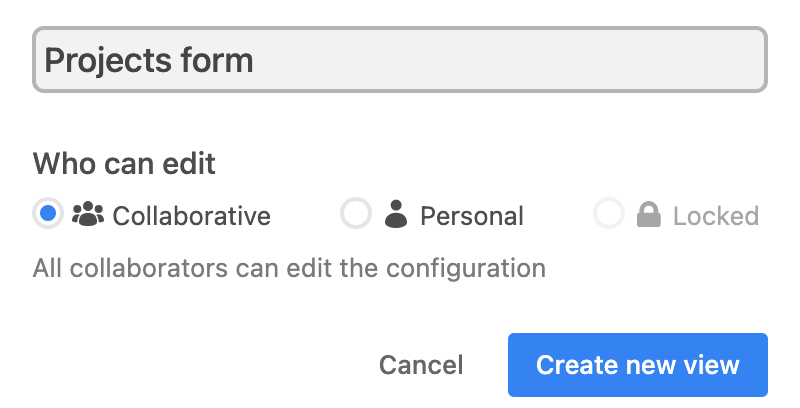
You'll have the opportunity to give the form view you are creating a unique title and set the view as Collaborative or Personal. Note, that you can't lock a form view until after you have finished the initial form view setup. When you have the title and view permissions set, click Create new view.
This will bring up the form view’s form builder, which you can use to customize the form further before sharing it with others.
Paid plans offer the ability to Add a cover image or Add a logo to a form.
You can give your form a description by clicking in the header section where it says Add a description for this form.
The fields on your form are automatically populated based on all of the fields shown in the grid view that appears first in the table.
To change the order of the fields on your form, click on a field and drag the field using its drag handle.
To hide a field from the form, you can either click the hide button in the top right corner of the field you wish to hide or drag and drop the field to the left side of the form builder.
To add a field to the form, drag it from the left side onto the form.
If you realize that you want to add a field to your form that doesn't yet exist in your table, then you can click the + Add a field to this table button in the Fields sidebar.
Note
There are times when you may need to return to a form later to add or remove fields. Simply return to the form's view and adjust the setup. You can also duplicate a form view to create a new form to test out changes without affecting the original form's setup. Additionally, you can customize your fields' settings by clicking on a field, clicking the dropdown arrow next to the name of the field, and selecting the Customize field type option from the dropdown menu. This will bring up the same field customization menu that you see when you customize fields in a grid view.
In addition to customizing which fields will appear on your form and their order, you can also adjust how a field will display to end users. Clicking on any of the fields in the form builder will bring up a number of display options. For all field types, you can change the field's name as it will appear on the form and add a subtitle to offer helpful context. Certain field types offer additional display settings options that are covered in a section below.
You can also toggle the Required option to make a field required before a form can be submitted.
Note that if you make a checkbox field required, the box must be checked for the form to be submitted.

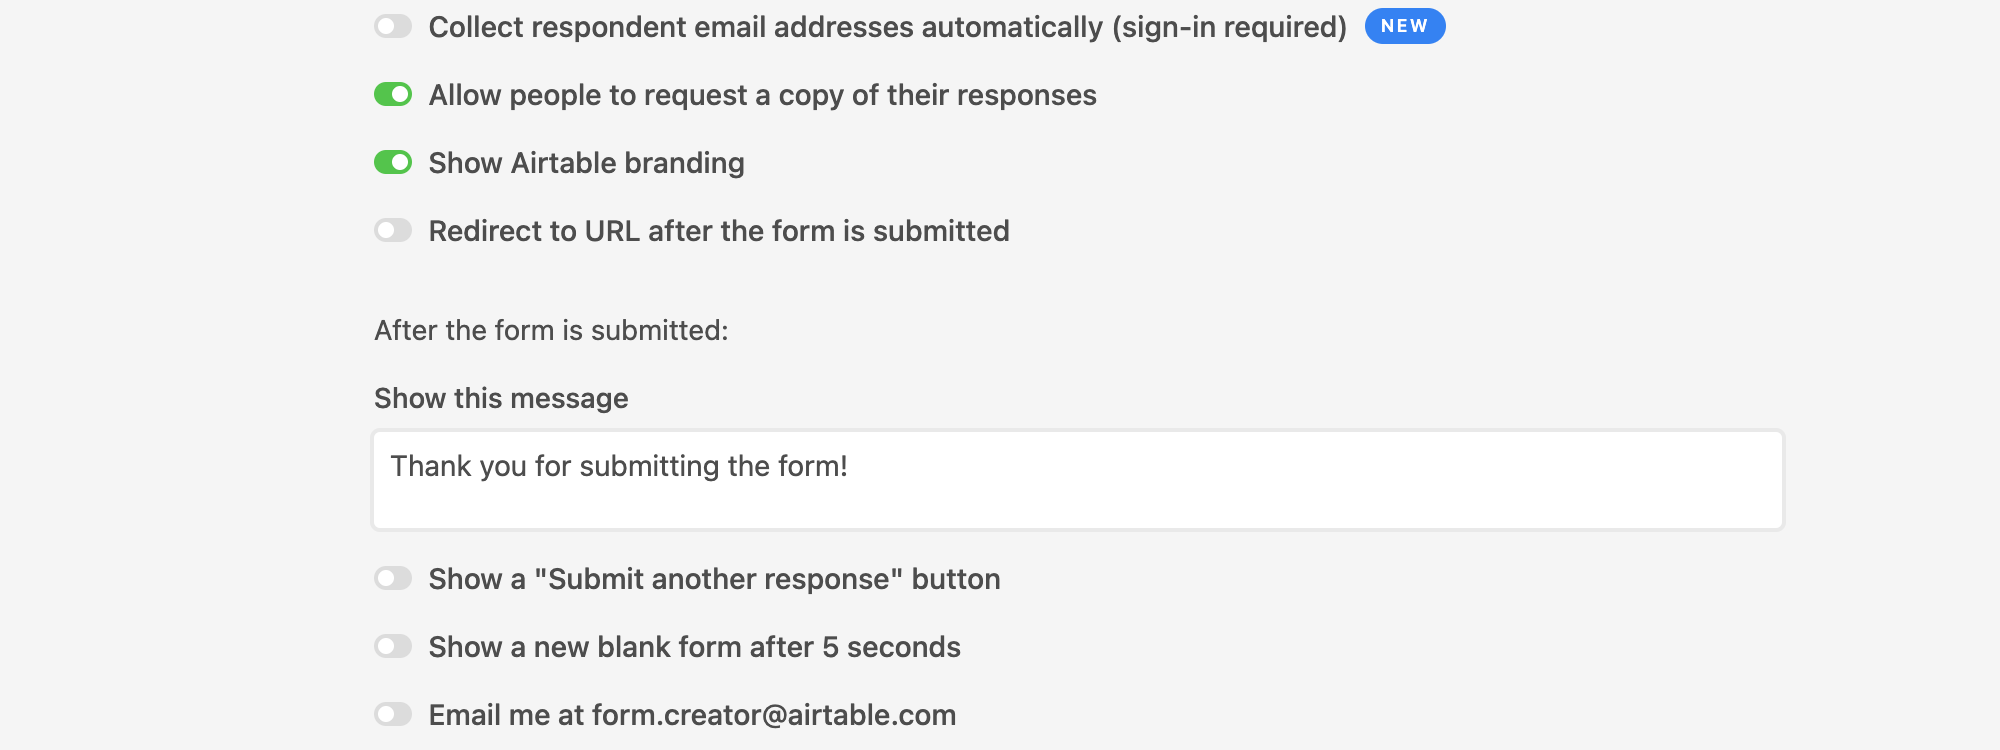
After customizing form fields, you can also configure what will happen after a form has been submitted. These options appear at the bottom of the form builder:
Edit the submission label (Paid plan-only feature)
The ability to See who submitted a response to the form
Allow people to request a copy of their responses (Paid plan-only feature)
Show/Hide Airtable branding (Paid plan-only feature)
Redirect submitters to a URL after the form is submitted (Paid plan-only feature)
Display a custom message after submission
Show a "submit another response" button
Show a new blank form
Email the form's creator after each submission
These configuration options are covered in more depth below.
Once you're done building your form, you can click the share form button in the view bar. This will give you a link that you can copy and paste. Clicking the preview button will also bring you directly to the form's share link in your browser. Additional form-sharing options are covered in another section below.
Other form configuration options
Add a cover image (Paid plan-only feature)
To add a cover image, click anywhere in the gray region where it says Add a cover image and upload the desired image. You can also crop or rotate the image in the file picker. As a note, the area of the form cover image is always 240px tall, and the width is the width of your browser window. It’s best to use the cover image for background graphics and adding a fun touch to your form, rather than for important information which may potentially get clipped out.
Note
As a general guideline, 800px by 240px is suggested as the minimum for cover images, with 1800px by 480px being a good target if your image is of higher quality/size.
Add a logo (Paid plan-only feature)
To add a logo, click on the Add a logo option and upload the desired image.
Edit the submission label (Paid plan-only feature)
To customize the form submission button/label, double-click the Submit button, add the text of your choice, and press return/enter.
See who submitted a response to the form
Toggling on this feature will automatically collect a form submitter's user information so that form responses can be tracked to a specific person. A few notes about expected behavior:
Form submitters will be asked to sign into Airtable (if they aren't already signed in on their browser) or make an Airtable user account so their name and email address can be collected with their form submission.
The respondent's information will appear in a Created by field in the table where the form has been created.
If the form doesn't already contain a Created by field, then a new field will be created in the table where the form has been created.
If a Created by field or fields already exist in the table, then respondents will populate those existing Created by fields after this toggle has been turned on. Note that submissions made before this option was turned on may appear as "Anonymous."
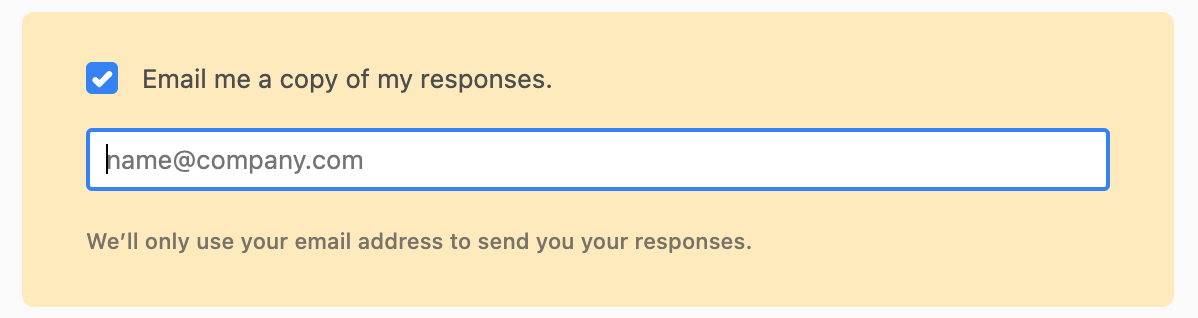
Allow people to request a copy of their responses (Paid plan-only feature)
When this option is toggled on, a form submitter will be able to enter an email address for a copy of their response to be sent. Note that the email sender will appear as "[email protected]" which cannot be customized.
As a workaround, you can use the feature covered above to collect a form respondent's email address and then set up a custom notification with Airtable Automations that will allow for more customization.
Show or hide Airtable branding (Paid plan-only feature)
To add or remove Airtable branding from the form, click the Show Airtable branding button, located at the bottom of the form builder.
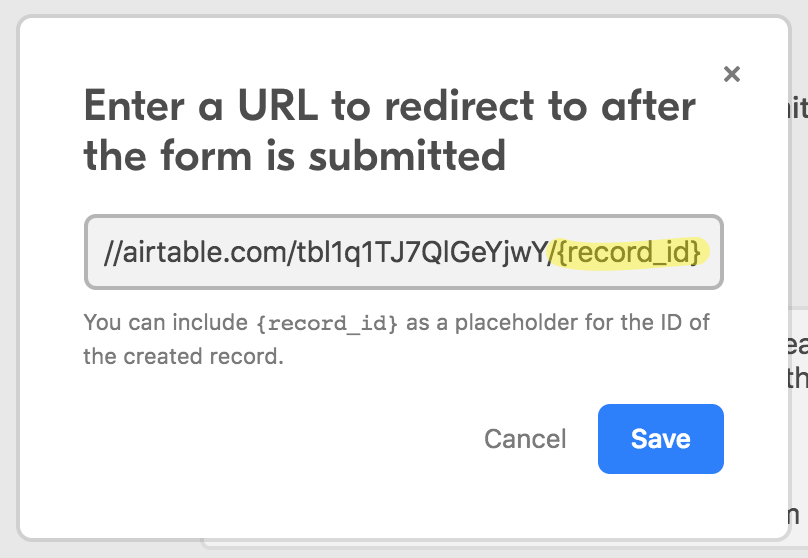
Redirect to URL after the form is submitted (Paid plan-only feature)
If you check the Redirect to URL after the form is submitted toggle, a prompt will appear for you to enter the redirect URL. This can be a URL internal to Airtable like links to a specific base or view, invite links, or an interface page. Or you can redirect submitters to other, publicly available, URLs.
One particularly helpful use case involves using the {record_id} variable. You can use this to redirect the submitter of the form to the record that they've just created (assuming that the form submitter has access to the base).
Note
If you choose to have a redirect URL, then the post-submissions options to Show this message, Show a "Submit another response" button, and Show a new blank form after 5 seconds will be disabled.
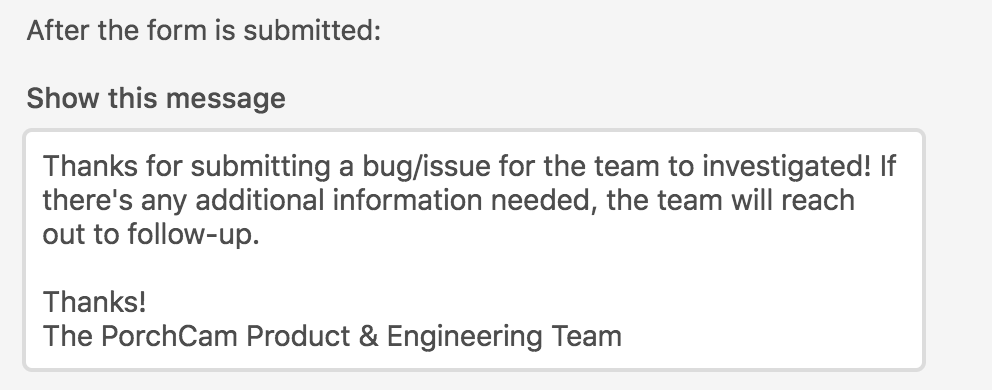
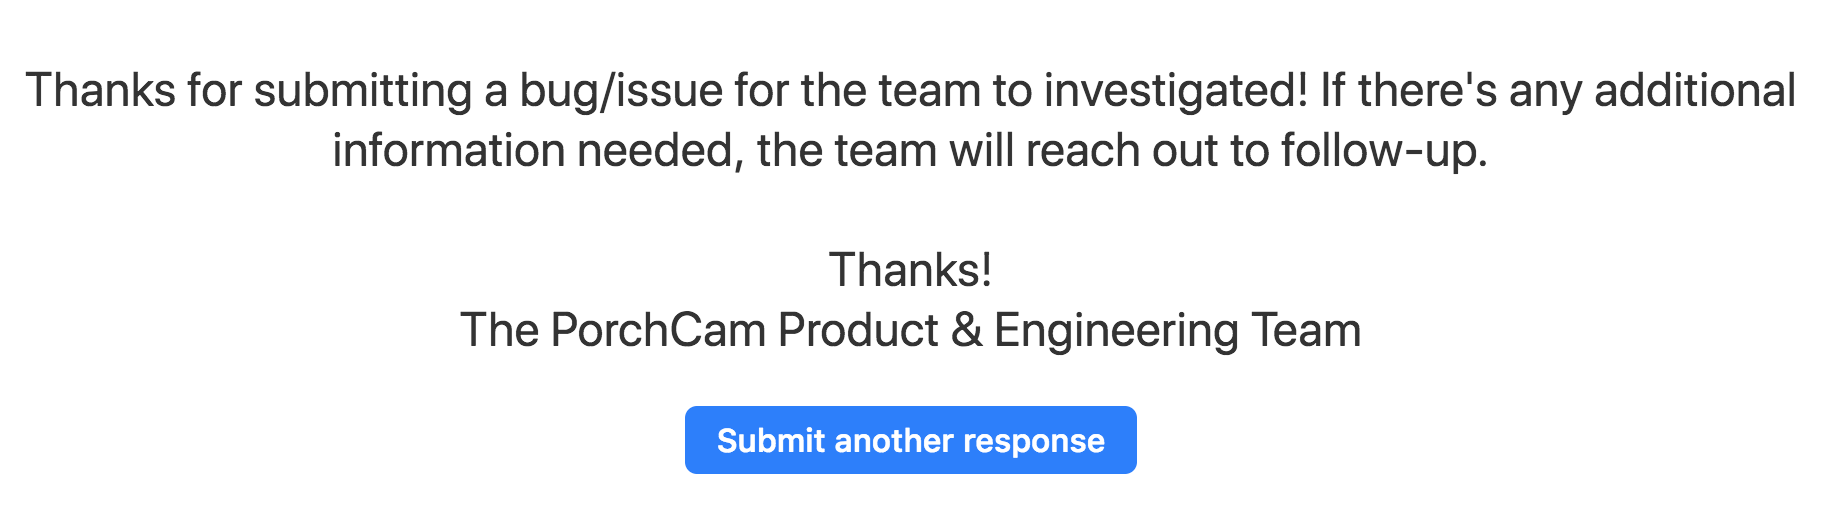
Show this message
If you don't have a redirect URL, you can customize the message that will be shown once a form has been submitted by typing it in the Show this message box.
Show a "Submit another response" button
If you don't have a redirect URL, toggle this option to show a button after a form has been submitted that will allow the user to submit the form again.
Show a new blank form after 5 seconds
If you don't have a redirect URL, toggling this option will make it so that after a form is submitted, the submitter will automatically be redirected to the form page after five seconds of waiting.
Submission email notifications
You can also choose whether or not to have email notifications sent to you after a form has been submitted.
Note that the email address to which the notifications will be sent is determined by email associated with the account of the user who is logged into Airtable and interacting with that particular form view—more than one user can go into the form and check the appropriate box in order to get notifications sent to the email address associated with their Airtable account.
Note
If you'd like to forward email notifications to someone who isn't a base collaborator, you could use an automation with the "Send email" action. Our guide about custom notifications is helpful for setting this up in your base.
Customizing form fields
Adding conditional logic to form fields
There are times when you may want to limit which form fields appear based on certain conditions. Some examples include:
Hiding certain fields that are unnecessary unless another field option is chosen.
Showing fields that will help submitters to give more in-depth information.
Showing fields that pertain to a certain team or individual based on previous form field entries.
The conditional logic functionality in this part of the form view setup is identical to the functionality found in other Airtable surfaces. For a more advanced breakdown of how conditional logic works in Airtable form views, please consult this support article.
Note
Keep in mind that if you require a certain field to be filled in, then it is likely not a field that should have conditional logic. This is because it will prevent form submissions unless the form submitter fills out the form with the appropriate conditions to show the required field.
Show field as a dropdown or list
Note
Single and Multiple Select field options will be limited on form views to under 70 characters—with any characters after that limit represented by ellipses.
Single select, multiple select, and user fields offer the option of showing the field options as a dropdown or as a list. For single select and single user fields, showing the field as a list will cause the options to display as radio buttons; for multiple select and multiple user fields, showing the field as a list will cause the options to display as checkboxes.
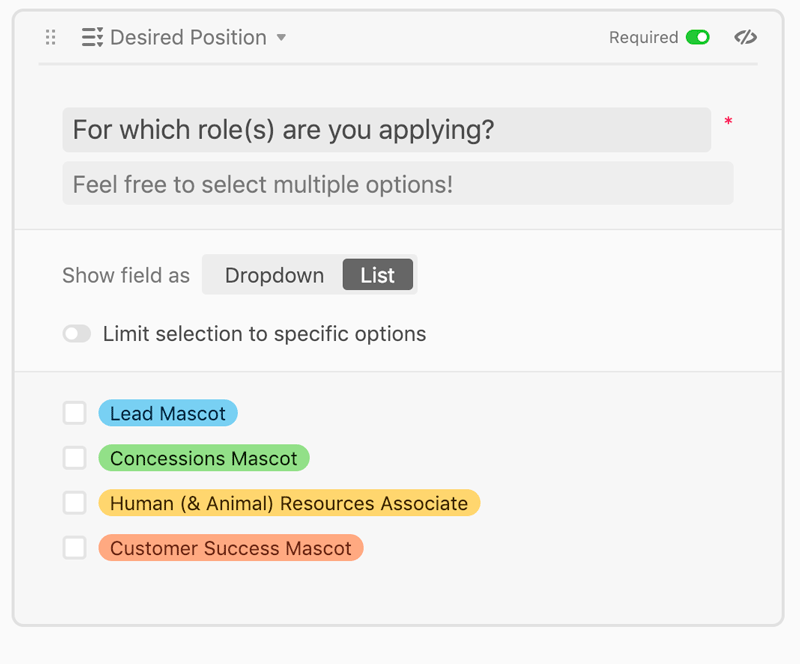
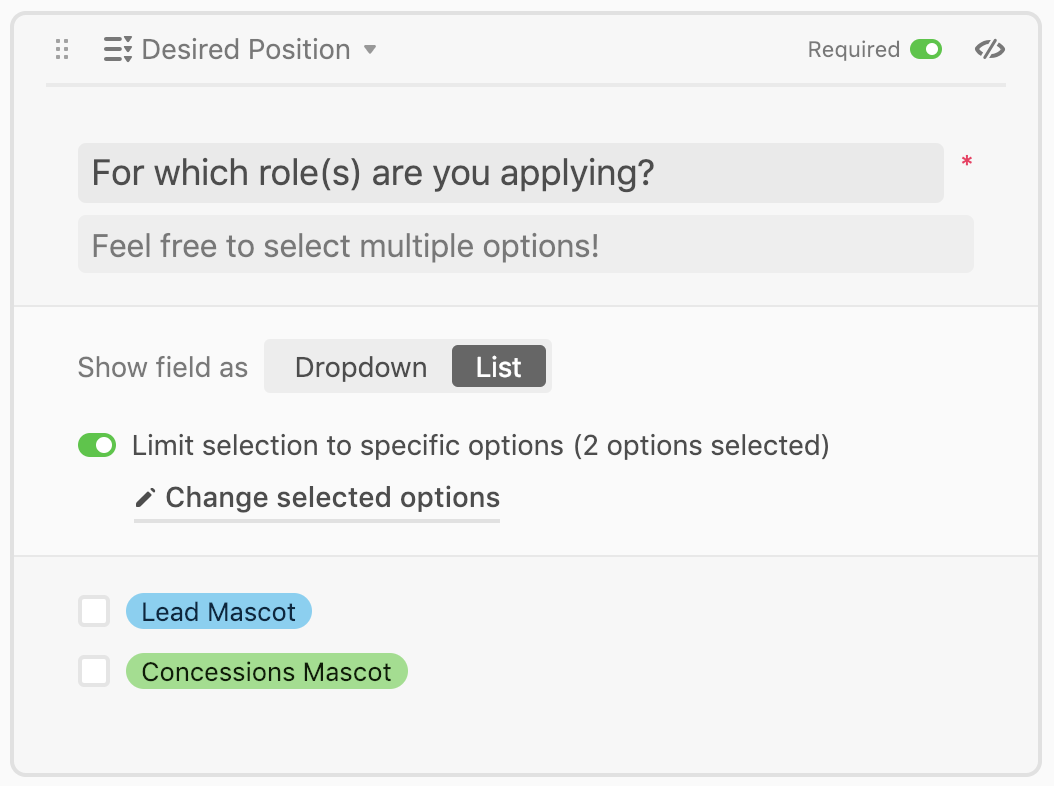
Limit selection to specific options
For single select, multiple select, and user fields, you have the option of limiting the available options on the form so that not all options will be visible to the person filling out the form.
To do this, click the Limit selection to specific options toggle. This will bring up a dialog window in which you can pick which options will be available for the people filling out the form. Click the Use selected options button to save your selections.
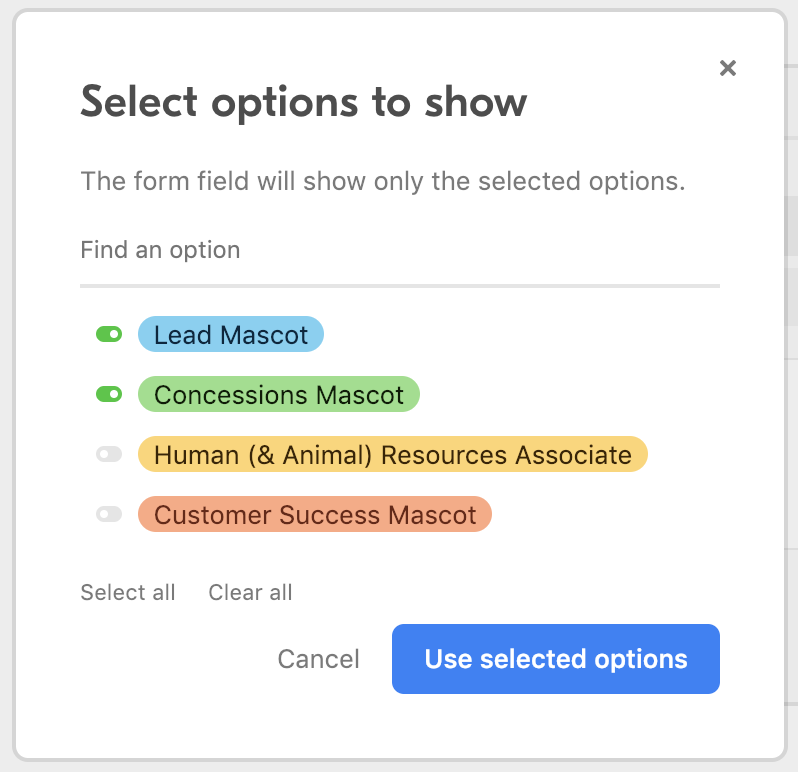
If you've decided to "Limit selection to specific options", the form builder will show the number of options that have been selected. You can alter which options have been selected by clicking the Change selected options button.
Note
There are times when you may want to prefill a form with information. Check out our support article here to learn more.
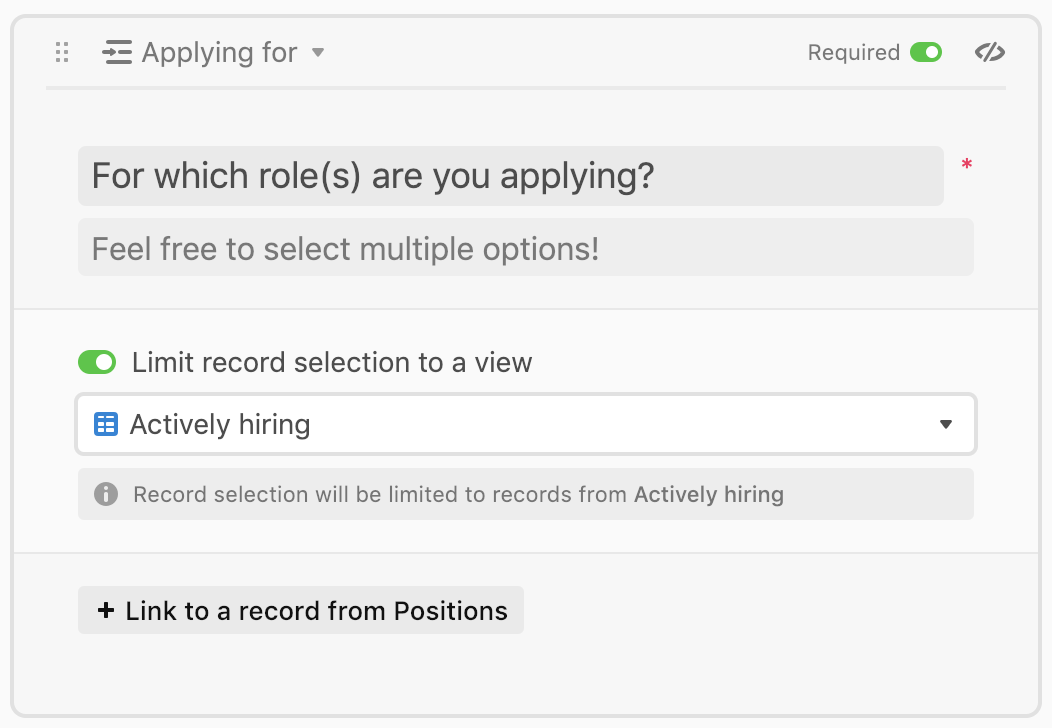
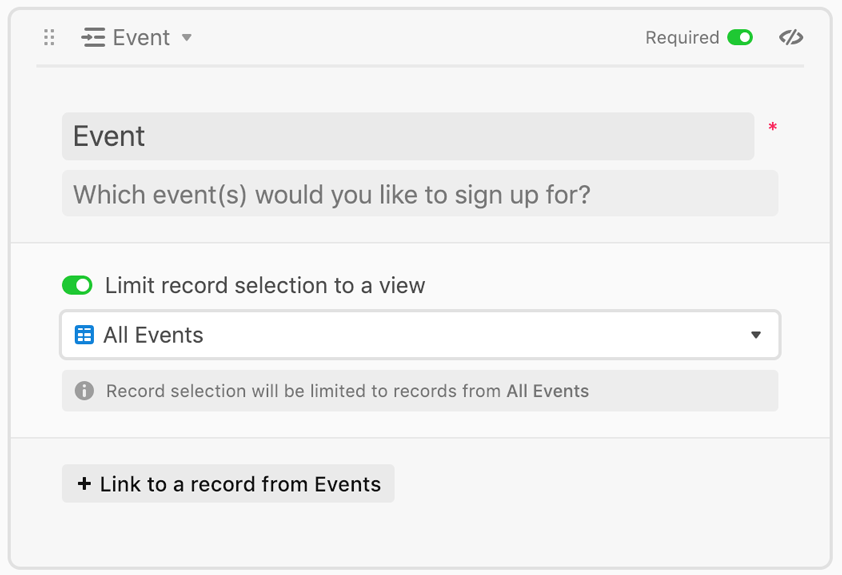
Limit linked record selection to a view
For linked record fields, you can use filtered views to control which linked records can be selected by the people filling out your form. To do this, click on the Limit record selection to a view toggle. This will bring up a dropdown menu showing all of the different views in the table to which the linked record field is linked. (If you don't have the filtered view that you need, you'll need to go to the appropriate table and make one.)
By selecting a view from this dropdown, the people filling out the form will only be able to select the linked records available in the specified view.
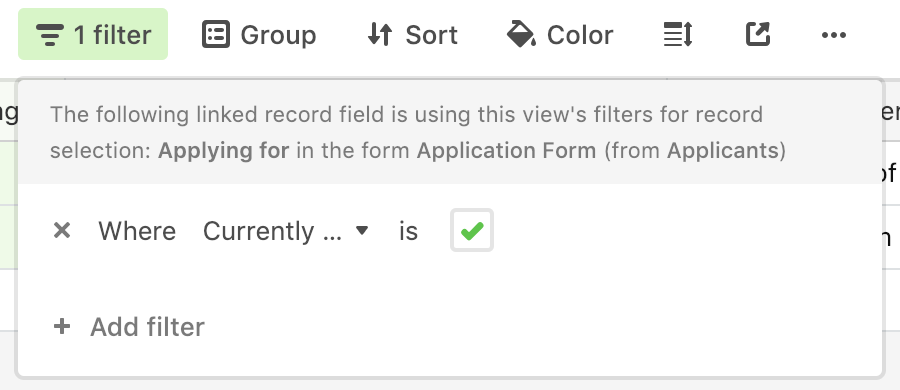
If you try and change the filters for a view that's being used to limit record selection in a form elsewhere, you'll see a notice telling you which form from which table is using this view's filters.
If you've already limited a linked record field's selection to a view from the view's configuration menu, you can override that limitation and limit linked record selection to a different view.
Form sharing options
Note
Users with Read-only or Commenter permission levels will not see the share option (or the option to open the form) from within the base.
Restrict by password (Paid plan feature)
Using this option will allow you to create a password to help prevent access to the form you are creating. After creating a password, users with Editor permissions or higher in that base will be able to change the password or toggle this option off to remove password protection.
Restrict by email domain (Paid plan feature)
To help further secure access to a form, an option to Restrict access to an email domain can also be used. Note that while any email domain can be chosen for this feature, only one domain can be set per form. As a workaround, you can duplicate a form view and set up a different domain restriction. This will, however, generate a different URL to access that form.
Stop accepting new responses
To stop accepting new form submissions you can toggle the "Stop accepting new responses" option on. This differs from disabling the form as it will keep the current form share link active in case you want to open the form again at a later time.
You can then type in a custom message that will show if someone attempts to access the form while it is in a non-response mode. By default, a "This form is not accepting responses." message will appear. If you later want to open the form again, simply toggle this option off.

Sync this form view to another base
Embedding a form
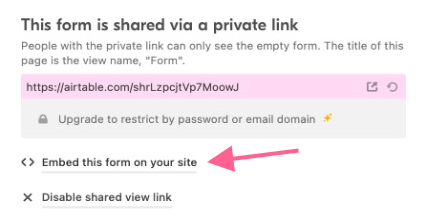
You can embed a form on a webpage by clicking on the option to "Embed this form on your site" from the "Share form" menu:
This will take you to a page where you can view the code necessary to embed your form on a website and see a preview of what the embedded form will look like in both desktop and mobile formats.
Note
Embedded forms use popups for redirects so you must allow popups on your site in order for forms to function properly. In addition, the redirect page will open in a new tab.

To learn more about the process of using an iframe to embed a form view on a webpage, please see this support article.
Disabling a form link or generating a new form link
If you need to disable the form link, click on the Share form button and then the X Disable shared view link option. Alternatively, you can regenerate the form link by clicking on the refresh button next to the URL. We cover deleting a form altogether in the next section.
Deleting a form
To delete a form view, click the view menu button (...) and then select Delete form at the bottom of the dropdown menu that appears. Note that as an alternative, you can also choose to Stop accepting new responses, Generate a new link, or Disable shared view link rather than fully deleting the form. These options are covered in the section above.
FAQs
How can I create customized form submission notifications?
You can use the Airtable Automations feature to create your own, customized form submission. Here are the basic steps to set this up. If this is your first time setting up this type of automations, then more information can be found in the support articles linked below:
Navigate to the base where the form is located.
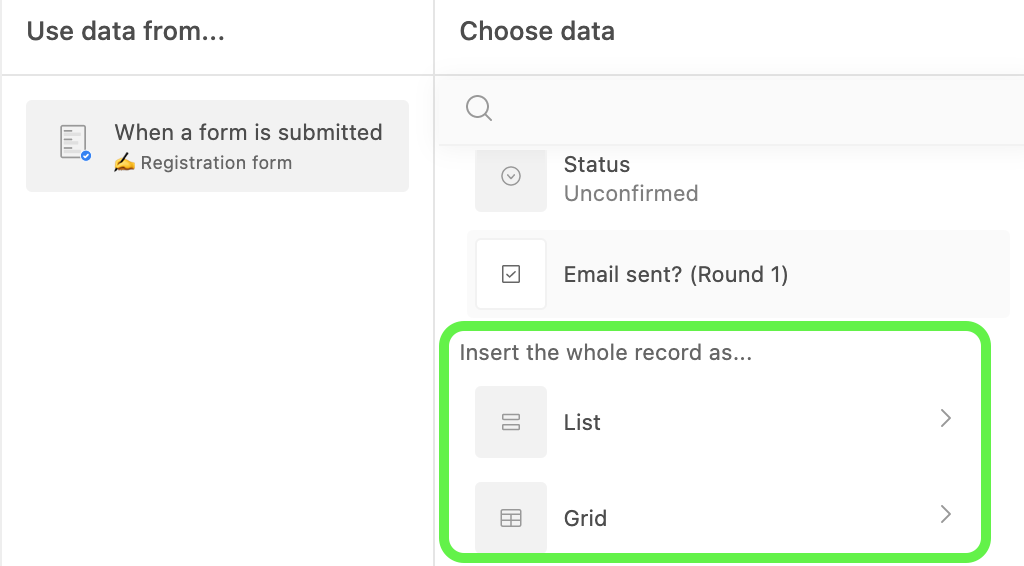
Add an automation using the When a form is submitted trigger, pointing to the desired form.
Add a Send Email action, inserting the record submitted as a list or a grid. This will allow you to choose which fields to include in the email by toggling on those particular fields. If you'd like the email to send to multiple recipients, be sure to put all the desired emails in the To field.
Where does form data go?
Submissions via forms will show up as a new record at the bottom of a grid view so long as the grid view is not filtering or grouping the records in some way that would cause the submission to be hidden or show up in a different order.
Can I create forms on a mobile version of Airtable?
At the moment, mobile versions of Airtable do not allow you to create or view in the native Airtable app. To submit a form, you must use a share link in your device's browser.
Can forms be used to update records?
Forms do not natively support the ability to update records. However, a workaround using linked records as well as our Automations feature can be used to create a workflow that will update records.
You might also consider using Airtable's Interface Designer feature in certain use cases. Learn more about Interface Designer here.
Can forms be split into multiple pages or sections?
No, currently Airtable forms cannot be split or paginated.
Can I remove all Airtable branding from my form?
You can remove the Airtable label from forms on our paid plans, but it isn't currently possible to remove all Airtable branding or add your own custom branding within the Airtable UI.
Can I add default information to a form response?
Yes, this can be accomplished in a few different ways. Here are two ideas to consider:
Automations - Using the "When a form is submitted" trigger, you can build an automation that will append information to a form response as they are received.
Prefilling/Hiding - Our "Prefilling a form" article goes into more depth, but essentially you can construct a URL that will prefill and hide a field or fields that are part of a form.
Can I create section headers for my forms?
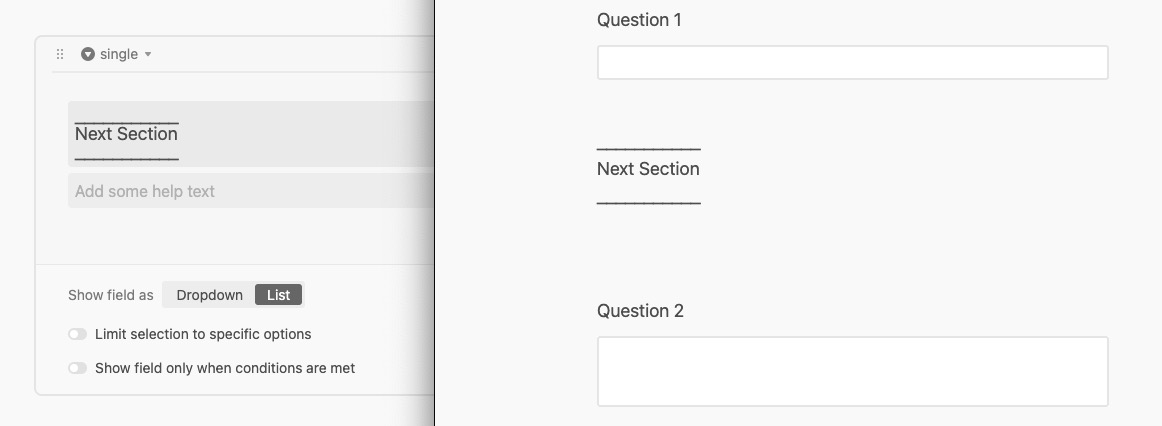
We do not currently support creating custom sections, or headers, within the form view. However here is a workaround suggested by the Airtable Community, where you can create a visual difference in a form by creating a single select field with no options, then adding it to a form as a list:
Can read-only users add attachments to forms?
Read-only users can upload attachments when filling in a form via a form view’s or standalone form’s share link. However, read-only users cannot upload attachments when using other form types within Airtable interfaces such as interface form layout pages or record creation forms.
What actions for Airtable forms require a third-party tool?
Native Airtable forms cover many cases but have specific limits. They do support conditional field visibility (show/hide a field based on a previous answer — note the first field can't be conditional, and a required field shouldn't be conditional). They do not currently support:
Multiple pages / branching paths — native forms are single-page; there's no pagination or multi-step conditional flow.
Save-and-resume / partial submissions — a respondent can't save progress and return later.
Updating an existing record — a native form creates a new record per submission (you can approximate record updates with linked records + automations, or use an Interface).
If you need save-and-resume, multi-page/branching forms, or form-based record updates, a third-party form builder that integrates with Airtable is a common approach.