Plan availability | All plan types with additional sharing options for paid plans |
Permissions | Owner, Creator, and Organizational Admins. |
Platform(s) | Web/Browser, Mac app, and Windows app |
Related reading |
|
Note
Business and Enterprise Scale plans admins can manage interfaces in the admin panel. Customers on these plans can also consider adding the Portals feature to share interfaces with external guests.
Check out our Transferring workspaces, bases, and interfaces ownership article if you’re planning to leave your company or organization.
Working with interfaces
Learn how to share interfaces with new collaborators, manage existing collaborators, and manage previously configured share settings. Interface Designer offers three primary ways for Airtable collaborators to use interfaces:
Base collaborators with Creator permissions can build interfaces.
All base collaborators can view and interact with published interfaces at the same access level as their base permissions.
Interface-only collaborators can view and interact with published interfaces without having access to the underlying base. (Team, Business, and Enterprise Scale plans only)
Interface Designer allows creators to control when their interfaces are visible to other collaborators by controlling when those interfaces are published. Collaborators without Creator” permissions can only see published interfaces. This allows creators to experiment as they please because they can control which interfaces are published, republished, or unpublished with just a few clicks.
Note
Enterprise organizations with SSO enabled must provision users for them to be able to access interfaces internally associated with their organization's instance. However, interfaces that are publicly shared can potentially be accessed by people not associated with your organization.
For Free and Team plan workspaces, unlike share views, interfaces can only be shared with users who have a verified Airtable account.
Sharing Airtable interfaces
To share an interface:
Open your Airtable home screen.
Open the base hosting the interface you want to share.
Click Interfaces at the top of your base.
Click Share interface in the upper-right corner.
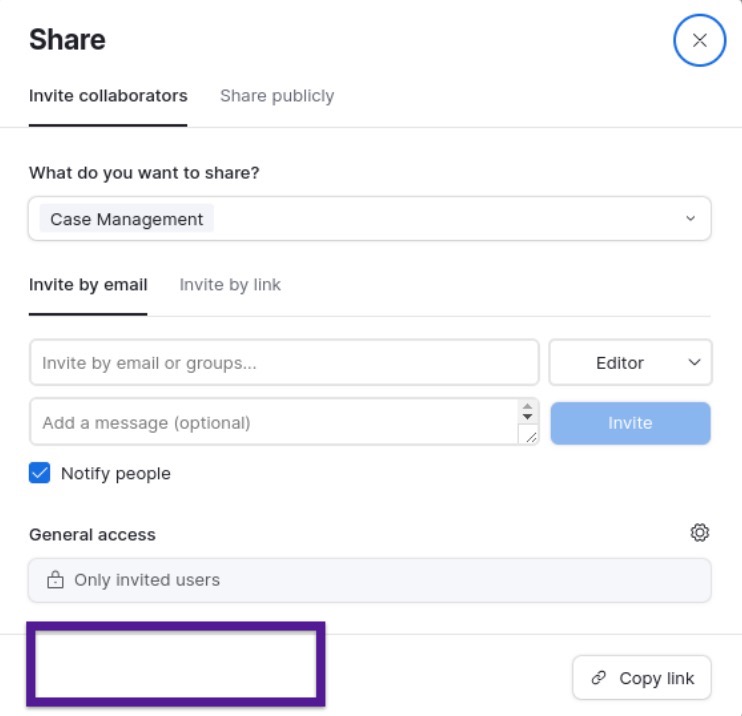
A window opens, allowing you to share the interface in the following ways:
Invite collaborators
Under the “Collaborators with access” you can click the > icon to open a page that will allow you to see who has access to the interface. Here, you can manage access for interface-only collaborators. Note that this list will include workspace-level and base-level collaborators who cannot be managed via this screen.
Under “General access” you can click the > icon to adjust general access to the interface and all of it’s pages. Note that this is only available for Business and Enterprise Scale customers.
Under “Invite via link” you can click the > icon to create a link that will grant interface-only access to users who click the link.
To configure an interface sharing link, begin by clicking + Create new link.
You’ll then choose which interface to share if there are multiple published interfaces.
Next, choose what permission level the link will grant when accessed (Editor, Commenter, or Read-only).
Under the “Access” section, you can opt to either "Only allow access to individual interface sections” or to “Allow access to base and all interface sections.” Note that allowing access to the base and all interface sections can impact billing and will grant access to the underlying base and ALL of the information held in that base.
Under the “Who can access” section, you can either “Allow any email address” or gate access to an individual email domain by entering an email domain next to “Only allow emails from.”
Once you have configured the link to your needs, click Create invite link.
This will take you back to the previous menu where you can click Copy link to share the invite link.
Invite guests - This feature is only available for organizations utilizing the Portals add-on feature.
Share to web - This allows read-only access to a particular interface page.
After enabling this option, you will set additional link settings by clicking Manage link settings.
Additionally, you can access iframe embed code and a preview of what an embed of the page will look like if you click Embed this page.
Unpublishing Airtable interfaces
To unpublish an interface:
Open your Airtable home screen.
Open the base hosting the interface you want to unpublish.
Click Interfaces at the top of your base.
Click the … icon next to the interface’s name on the left side.
You may need to click the three horizontal bars icon
 to open the sidebar.
Click Unpublish.
Click Confirm.
Deleting Airtable interfaces
Open your Airtable home screen.
Open the base hosting the interface you want to delete.
Click Interfaces at the top of your base.
Click the … icon next to the interface’s name on the left side.
You may need to click the three horizontal bars icon
to open the sidebar.
Click Delete, then Delete for confirmation.
Sharing interface pages publicly
Note
The public interface sharing feature is only available for paid plan workspaces.
You’ll need creator permissions in the base to be able to adjust the share settings described below.
Choosing to share an interface page publicly allows other people, in some cases even non-Airtable users, to view a read-only version of an interface page similar to a shared view.
Like a shared view, it’s worth noting that the page content doesn’t automatically refresh which means that end users will need to refresh the page in order to see any updates since the last refresh.
Creating a public interface page share link allows you to configure embed code similar to the methods outlined in this article.
To share an interface page publicly:
Navigate to the base containing the interface that you want to share publicly and click the Interfaces option at the top of the base.
Depending on where you last were, this will either take you to the interface editor or to a published interface page:
From the interface editor, click Share interface in the upper-right portion of the page.
From a published interface, click Share button in the lower-left portion of the page.
Click the Share to web tab within the sharing dialog.
Click into the box below the “Only individual pages can be shared publicly:” section.
Choose the interface page that you want to share.
Then, toggle on the “Share to web” option.
Since sharing information publicly could potentially expose hidden information, you’ll need to confirm that you understand this potential factor by clicking the blue Enable public sharing button.
Once you’ve enabled public sharing for the interface page a share link will be generated.
From here you can click Manage link settings to configure link access settings, require a password, disable the link, or generate a new link as discussed in more detail in this article.
Additionally, you can choose to create embed code that can be used to show this interface page on some other web-based surface.
Click the link at any time to see how the interface page will appear to end users who access the publicly shared interface page.
Public interface page disclaimer:
In some cases, some hidden data that powers elements on your interface page may be accessible to users who are technical and can inspect your pages closely. This is possible in these scenarios:
Field values that are used for charts are sent to a client. Consider the dashboard below that shows data for 28 deals in the pipeline. The chart shows the sum of the all the estimated value of each deal per stage. Even though you can’t tell the deal worth for each of the individual deals by looking at the chart, if you inspect the network logs, you could see the individual values for each deal.

Conditionally hidden field values on record detail pages can always be accessed. In the following example, “Estimated Value” is only shown when the opportunity Priority is “Very Low.” However, in the network logs, you can always see the “Estimated Value” for each record no matter what the Priority field is set to.

Understanding unsupported features in public interface pages
Note
Even when an interface is publicly accessible, exporting data—such as downloading a CSV—requires the viewer to be logged in to Airtable with at least read access to the underlying base.
Standard interface pages and publicly shared interface pages have different functionality. Some attempts to access unavailable functionality may trigger a sign-up/login flow, since logging in to Airtable and accessing an interface shared with you would reveal that feature or functionality. Learn about those differences below:
Filtering by the current user or the current user's email isn't supported.
View the main section above for a detailed list of unsupported layout types.
Viewers of public interface pages cannot copy multiple cell values at the same time.
Only 1 level of record detail pages can be shown on a public interface page. For example, linked records cannot be expanded from within record detail pages even if the “Click into record details” option has been enabled for that linked record field.
Cells containing foreign keys (i.e. linked records) cannot be expanded. This most often occurs in grid visualization records/cells or within record detail pages as mentioned above.
Record detail pages can only be shown as sidesheets. Record detail pages configured as full-screen layouts will be rendered as sidesheets on public interface pages.
While Commenting and revision history are available on internally shared record review and record detail layout pages, those features are unavailable on public interface pages.
Charts and numbers will not be shown in public record detail pages.
Linked records will only reveal the primary field value of the linked record from another table. Other field values will not be shown.
Linked record visualizations are unavailable on public interface pages. Those users who have access to the underlying interface can click the View data button to view the linked records within the interface which will trigger the sign-up/login flow.
Interface page buttons that link to a non-public interface page or buttons that would add a record will trigger the sign-up/login flow in order to access that functionality.
The following button actions are unsupported in public interface pages: Update record, Delete record, Copy link to record, Apply record template, Go to URL in record.
Unsupported interface layouts for public sharing:
Blank layout (these layouts are not optimized for public sharing, mobile support, or our newest interface features)
Overview layout (these layouts are primarily links to other pages in an app, requiring users to log in)
Record review (legacy element-based versions)
Legacy dashboard (dashboards created before February 2024)
Record summary (Unsupported legacy layout as of August 2024)
Managing interface access
Owners can manage interface access from the same share flow shown in the section above. The only difference here is that you will click Manage access. This will bring you to a window showing a list of collaborators and their permission levels.
From the “Manage access” menu you can:
Search for collaborators by name or email.
Filter the list of users shown by clicking the "Permission" access level and/or "Interfaces" they have access to.
See and change the permissions of access for users - Click the "Permission" level of an individual user or group to change it.
You can only change permission level access for other interface collaborators at or below your permission level. Otherwise, users with base or workspace access must be changed from those respective locations' share menus.
From this menu, you can remove access to an interface for your own user account only when you are an interface-only collaborator. If you are a base or workspace collaborator, you will need to adjust your permissions in those respective locations' share menus.
Additionally, by clicking Requests you can manage any open requests for access, which is covered in the next section below.
Managing interface share requests
Note
Only collaborators with Owner permissions receive emails and notifications.
Collaborators with Creator permissions can manage requests from the share menu.
Periodically, users might reach an interface page that they do not have access to. In these cases, those end users will be brought to their Airtable home page and shown a message where they can Request access to the interface. When a user makes these requests, those requests can be managed in several places:
Email inbox - From your inbox, click the Grant access button. This will take you to the share dialog covered in option 3 below.
Notifications - Click on the notifications icon and click on the request that you want manage. This will take you to the share dialog covered in option 3 below.
Manage access button - From an interface's share menu, click Manage access. Then click the Requests button at the top to Approve or Reject the request. You can also adjust the permission level that the user will receive before approving the request.
A few notes on this function:
Users can only request access once every 12 hours
End users will only receive a notification if their access is approved
Understanding interface access request scenarios
When requesting access to an interface, the experience depends on context.
Form submission requests
When someone uses a form inside an interface, the same 12-hour access-request limit applies as for other interface access requests. If the form sits on an interface page that requires edit access they don’t have:
Contact the interface owner for urgent, time-sensitive work.
The owner can adjust permissions from the share experience.
The owner may be able to share a standalone Airtable form so people can submit without interface access.
General interface access requests
For view or edit access to interface pages, the standard 12-hour limit applies: if they already submitted a request in the last 12 hours, they should:
Reach out to the interface owner (Email, Slack, etc.).
See if the same information is available another way (e.g. shared view, publicly shared interface pages, etc.).
Wait until 12 hours have passed before trying again.
Setting collaborator visibility
Note
The collaborator visibility feature is only available to Business and Enterprise Scale plan customers.
For privacy and security reasons, it may not always be desirable for these outside stakeholders to be able to see information about each other. This feature will cause user field values and collaborator dropdowns to be redacted. Additionally, comment mentions and authors will be redacted, but the actual comment will not be. However, you can choose to turn off comments in the user actions settings of record detail layouts, if the exposure of user information in comments is concerning.
It’s important to understand how Airtable determines Internal vs. external collaborators in this feature’s context:
Internal collaborators - Airtable users whose emails have one of the domains of the root enterprise in which the interface is created.
External collaborators - Airtable users whose emails do not have one of the root enterprise domains.
You should use this restriction when you have an interface when:
The interface is shared with both internal and external collaborators.
The external collaborators are vendors from different companies with different email domains.
External collaborators from one company should not be able to see collaborators from another company.
Note
You should not use this restriction when you have an interface where workflows rely on external vendor collaborators from different companies being able to collaborate (e.g. handing off work, discussions in the comments).
Configuration settings to prevent external users from seeing each other:
Navigate to the interface where you want to apply this setting in Edit mode.
In the properties panel on the left side of the page, click the … icon.

Click the toggle next to the “Prevent external users from seeing each other” option so that it is turned on/green.
There is no need to re-publish the interface as the changes will take immediate effect.
As a builder:
You will still be able to see all internal and external collaborators on the interface even when this restriction is turned on.
You can leverage the “Preview” experience to view the interface through the eyes of an external vendor collaborator.

Note
This setting is applied on a per-interface basis meaning that if you have multiple interfaces where internal and external collaborators have access, you will need to change this setting for each interface individually. Additionally, this setting cannot be applied on an individual interface page basis.
Understanding end-user experience
When this setting is enabled:
External users will have a redacted interface experience. They will only be able to see internal collaborators (from the enterprise in which the base was created) and external collaborators with the same email domain as themselves. Note that external users with free email domains (gmail.com, yahoo.com, etc) will not be able to see other users and are not considered to be on the “same email domain.”
Collaborator list dropdowns (comment mentions, user fields, user filters) - When the visibility restriction is enabled, external users will only see internal collaborators and collaborators on their same email domain.

Comment authors and mentions - When the visibility restriction is on, external vendors will see all comment authors and mentions, but the collaborator tokens will be redacted (shown as “Unknown”) unless the user is an internal collaborator or on the same email domain.

Manage access in share dialog - When the visibility restriction is enabled for any interface in the app, external vendors cannot see or select the "Manage access" button on the interface share dialog, preventing them from having access to the full list of collaborators.
Interface builders and internal collaborators will be able to see both internal and external collaborators on all of the surfaces covered above.
Restricting interface sharing
In some cases, creators on Team/Business/Enterprise Scale plans may want to restrict interface sharing to only allow base collaborators to share the interface with other users. This is where interface sharing restrictions come into play.
A few notes to consider about this feature:
When this toggle is turned on, only users with base access are able to share the interface with other users.
Users with interface-only access will not be able to share the interface with other users.
Users with interface-only access can still request access for other users and the workspace owner(s) will ultimately decide if access to the interface is granted.
This feature is on a per-interface basis. For bases that contain multiple interfaces, this option will need to be configured for each separate interface.
Creators will also be able to invite new users by email. However, to limit new users from getting access without approval, they will no longer be able to view or manage invite links. The Invite by Link tab will be disabled in the Share dialog.
When this toggle is turned off (default), users with interface or base access are able to share the interface with other users.
This means that a user with interface-only access can grant interface-only access to other users at or below their permission level.
If a workspace has workspace sharing restrictions enabled, sharing will always be disabled for all bases and interfaces within that workspace.
This feature is only available to Creators/Owners with base access on paid plans.
To restricting interface sharing:
Navigate to an interface in "edit" mode. Then click the Pages button on the left side of the page if the sidebar isn't already open.
Hover over the interface that you would like to restrict.
Click the ... icon.
Toggle on/off the Restrict interface sharing setting.

FAQs
Who can share interfaces?
All interface users can share the interface and update existing collaborators' access at their permission level or below.
For paid plans with workspace sharing restrictions enabled, only workspace owners can add new collaborators to the interface. However, these restrictions do not affect the ability of existing interface collaborators to edit permissions for other existing collaborators—they only restrict adding new collaborators to the workspace. See this workplace restrictions article for more information.
Users added through user groups can also update permissions at their permission level or below, regardless of workspace settings.
How do I show/hide, rename, duplicate, delete, clear unpublished changes, or save a draft of an interface?
From "Edit" mode in an interface:
Click the Pages button in the upper left corner of the screen if the left sidebar isn't already open.
Find and hover over the interface page you want to perform an action on. This will reveal new icons.
Click the eye icon to show or hide and interface page from end user's navigation menu.
Click the ... icon to open a menu where you can Rename, Duplicate, Delete, Clear unpublished changes, or mark the interface page as a draft by toggling the Keep as draft option.
You'll also see when the page was last published, if it ever has been published
I changed the look of one of my interfaces, why is that not showing up for my other collaborators?
If you made a change to an interface or layout, you must first Publish the changes for that interface in order for other collaborators in a base to see those changes. Keep in mind that interfaces marked as a draft cannot be published until that option has been toggled off.
If I share an interface with another individual or team, can they see the underlying data?
Not necessarily. It depends on whether the option to allow access to the base was checked when the invitation was sent. Ultimately, only base collaborators can view the underlying base. More on sharing bases with users is available here.
Can Creators restrict who is allowed to share specific interfaces?
What happens when I try to access an interface I don’t have permission to view?
If General access (organizational sharing) is configured for that interface is enabled, then users in scope can open it at the level that was configured. This is only an option for Business and Enterprise Scale plan customers.
Otherwise, users are usually taken to their home experience and see a prompt to request access to that interface. If you share an interface URL with someone who is not an invited collaborator, they will not be able to see the contents of the interface. They will have the ability to request access to see the interface, but their request will have to be approved by a workspace owner or base creator before they are able to access it. Owners are notified when someone requests access.
Keep in mind:
Users can only submit an access request once every 12 hours (per the product’s rate limiting).
If they try again too soon—especially when using Ask to edit—they may see:
Request to edit failed. A request was made in the past 12 hours. Request again later.
For urgent needs, contact the interface workspace owner directly.
Can I duplicate an entire interface and all of its pages?
Yes, interface creators can duplicate an interface and all of its pages or even individual pages. In edit mode, click the ... icon/spillover menu next to the name of the interface or specific page that you want to duplicate. When the spillover menu opens, you'll see the option to Duplicate appear. As mentioned below, it's only possible to duplicate the interface or interface page in the same base not to another base.
Can I duplicate or copy an interface into another base?
We do not support duplicating an interface or an interface page into another base because an interface’s configuration options rely on the underlying base’s structure (field names, source tables, etc.) to build the interface layer.
What happens to changes made to my published interface if I don't publish those changes?
Any changes made to an interface in editing mode will automatically be saved. So you can choose to publish changes to an individual interface whenever you are ready.
Can I embed an interface page?
Yes, customers on Business or Enterprise Scale plans can set up an individual interface page to be shared publicly and then configure embed code to use outside of Airtable.
For Free and Team plan users, bases and share view embeds are the best Airtable features for embedding Airtable content in external locations.
Users on all plan types can embed standalone forms as covered in this article.
Why aren't my page updates showing up for end users after publishing?
This is usually due to that page being in a "Draft" state. To remedy this, hover over that page in edit mode, click the ... icon and toggle the "Keep as draft" setting off. Then republish the interface by clicking Publish.
What does the "Clear unpublished changes" feature do?
Changes made to an interface page can be reverted up until the page is published. If you wish to revert the configuration edits that were made prior to publishing, click the three dots ... next to the page name and then click the Clear unpublished changes option. Note:
The current published version of the page and the version in the interface building editor will now match until new edits are made.
Unpublished changes will only clear from the main interface page you're editing. Changes made to other interface pages or record detail pages within this interface page will not be cleared.
I'm trying to delete my interface page, but I'm not able to. What might be happening?
The last remaining page on an interface cannot be deleted. Either the entire interface must be deleted or a new page must be added to the interface in order to delete the undesired page.
Why am I getting the "Failed to share interfaces" error when I try to share my interface?
Each interface is allowed to have a maximum of 5,000 collaborators. If you attempt to add a collaborator or a group of collaborators and that exceeds the limit, you will receive an error message.
Can I share just one of the pages in my interface?
Sharing an interface will share all published interface pages on that interface. Consider creating a different interface containing just that single interface page to accomplish your intended goal of just sharing that individual page.
Interfaces connected to workspaces on our Business or Enterprise Scale plans can share individual interface pages publicly
Can I share an interface without sharing the base?
While interfaces are available to all customers on all plans, the ability to share interfaces separately from the base is only available to workspaces on Team, Business, and Enterprise Scale plans. Additionally, interfaces on Team, Business, and Enterprise Scale plans can share interface pages publicly.
What happens if someone who is not a base collaborator tries to navigate to an interface URL?
If organizational sharing has been set up in the “General access” configuration (Business and Enterprise Scale only) covered in step 4 here, then those users will be able to access the interface at the configured permission level. Otherwise, users will be sent to their home screen where a pop-up will allow them to Request access to the interface.
How do field and table permissions impact interfaces?
Field and table permissions set in the base will extend to and be respected in interfaces as well.
Is it possible to allow collaborators to comment and see revision history in interfaces?
Yes, it is possible to allow collaborators to comment and see revision history in interfaces, however, there are a few restrictions to be aware of:
Comments and revision history can only be made from inside record review and record detail pages with the “Comments” and/or “Revision history” toggles enabled.
Comments and revision history are not available on publicly accessible interface pages.
Is it possible to move pages between interfaces either within the same base or to another base?
It is only possible to move interfaces pages between interfaces within the same base. It is not possible to move an interface page out of one base and into another.
To “move” a page between interfaces on the same base, you will need to duplicate the page and select the new interface where it should live. To move the page:
Select the … icon next to a page you want to move.
Click Duplicate.
Select the interface (within the same base) where you would like to create the duplicate.
Delete the page in the original interface by clicking the … icon next to the page
Finally, click Delete.
Why can users see some fields but not all records in a shared interface?
Field visibility and record visibility are controlled separately in Interface Designer. When users can see fields but not all records, the interface's field configuration is working correctly, but record-level filters are limiting what appears.
Field configuration determines which fields display in the interface layout. This is set when designing the interface page through the properties panel.
Record filtering determines which records appear to users. This is controlled through the "Filter by" setting in the interface page properties under the "Data" section.
To allow users to see all records, open the interface in edit mode, click on the canvas to access page properties, locate the "Filter by" option under "Data," and ensure it's set to "All records" rather than "Specific records" or "Viewer's records." Remember to publish the interface after making changes.
For more details on configuring record visibility, see the filtering data section in the Interface Designer permissions article.
Can I restore an interface to a previously published version?
No, Airtable doesn't support interface version history or the ability to restore an interface to a previous published state. Once changes are published to an interface, those changes replace the previous version.
The "Clear unpublished changes" feature only works for changes that haven't been published yet. Once you publish changes, the previous version is no longer accessible.
If you need to restore an interface to a previous state, consider these workarounds:
Duplicate interfaces before major changes - Before making significant updates, duplicate the interface to preserve the current version. This creates a backup you can reference or restore if needed.
Use base snapshots - Base snapshots include all interfaces and their current state. Restoring a base snapshot creates a new base with the interface as it existed at the time of the snapshot. Note that this restores the entire base, not just the interface. Learn more about taking and restoring snapshots.
Why is the delete option greyed out for my interface page?
The delete option for an interface page may be greyed out for two main reasons:
Permission requirements
Deleting interface pages requires Owner or Creator permissions for the base.
If the delete option is unavailable, check that you have the appropriate permission level. Learn more about interface permissions in our Interface Designer permissions article.
Last page restriction
The last remaining page on an interface cannot be deleted. To delete the final page, either:
Add a new page to the interface first, then delete the unwanted page
Delete the entire interface instead of the individual page. To delete an entire interface, click the … icon next to the interface's name in the sidebar, then click Delete.
How do I edit interfaces?
Check out our Interface Designer article to learn how to edit exiting interfaces.
I shared a link to an interface, but a collaborator I’m working with doesn’t have access, what might be happening?
When sharing access to an interface, always use the Share > Invite link generated from the interface's sharing settings, do not copy the URL from your browser's address bar and send that instead.
Copying the raw page URL can send recipients to a "Request access" screen even if they're logged into Airtable, because that URL doesn't carry the proper invite/access grant. To avoid this:
Open the interface and click Share in the top right.
Copy the generated invite link (not the browser address bar URL).
Send that link to your collaborator.
If a recipient still sees "Request access" after using the correct invite link, ask them to log out and back in and then load the invite link again. If they are still unable to access the interface, check that the invite link is still active before contacting Airtable Support.
Why is interface content visible to me while editing but blank for other users/viewers on a published interface page?
If an element of an interface page displays correctly while you're editing an interface but appears blank or missing for viewers of the interface, check the following:
Confirm the page has actually been published, since edits made after the last publish won't appear to viewers until you republish. Click Publish in the top right of the interface.
If you duplicated an interface or page, confirm the duplicate itself has been published; duplicates start as unpublished drafts even if the original was live.
Check that the interface page’s content isn't conditionally hidden based on permissions or view filters that exclude the viewer's role.