Plan availability | Business and Enterprise Scale plans only |
Permissions |
|
Platform(s) | Web/Browser, Mac app, Windows App, and the Airtable iOS and Android mobile apps |
Related reading |
|
Airtable terminology |
|
Understanding Two-way sync
Two-way sync allows existing records to be edited in one or more targets and synced back to a single-source-of-truth table. This article covers configuring an ecosystem of bases and interfaces so multiple teams can have the most up-to-date information. Using two-way sync helps to prevent data silos and other inefficiencies in today’s hybrid work environment.
A two-way sync will always have a single source table where the initial sync share view is created. Edits made in one or more target tables or interfaces in other bases will sync back to the source table. To illustrate how the two-way sync schema works consider the image below.
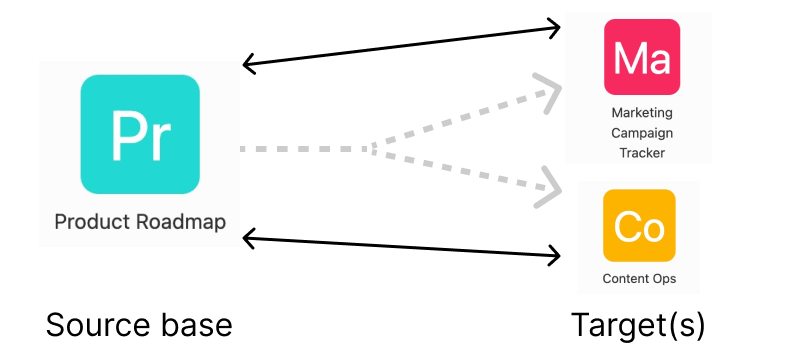
There are two overarching concepts worth digesting before moving on:
The black two-sided arrows represent the direct connection between a source table and its target(s).
The lighter grey and dotted line arrows represent the indirect relationship between targets. Changes made in a target will first sync back to the source before pushing to other targets upon the next sync.
Two-way sync source view configuration
To start, navigate to a grid view of the information you want to enable for syncing and click Share and sync.
Then, click Sync data to another base.
If you are new to setting up syncs in Airtable, you can follow the setup flow outlined in this support article. The main, and very important, difference with two-way syncs is that you need to enable the option Allow edits from other bases. If this toggle is not enabled, then two-way syncing cannot occur.
There are additional options below this toggle to consider:
All editable fields - All editable fields in the source table will be editable in the target table. Additionally, editable fields added in the source table will be editable in any target tables in the future. An editable field is any field within a table that is not locked. As a reminder, individual field-level editing permissions can be set across the view you are using as the sync source. We cover more on permissions and Two-way sync here.
Specific fields - Only certain fields in the source will be available for syncing.
The Allow creating new records and Allow deleting records options are covered below.
Creating and deleting records in two-way syncs
Similar to how two-way sync edits work, actions taken in a target synced table will be “synced” with the source view. This means that creating a record in a synced table will create a corresponding record in the sync source view. Similarly, deleting a record in a synced table will delete its corresponding source record in the sync source view.
Whenever possible, consider using a filterless view as a two-way sync source to remove complexity from the process of creating and deleting record in two way syncs. Since a synced table’s source is a shared view, there are some dependencies related to view filters that are extremely important to consider:
As records that are created in synced tables are also created in the source view, it is necessary that any records created in the synced table must match the filter criteria of the source view. If they do not, the system will not allow the row to be created and you may see a pop-up message asking you to refresh your page.
When possible, the system will populate rows created in the target table with default values inferred from the source view filters to ensure that rows created match the source view filters. However, this is not possible when view filters are complex (i.e. if default values cannot be inferred, or if the filter is applied on a field that is not editable from the downstream sync).
Setting default values in fields in downstream synced tables is not supported.
Two-way Sync record creation is disabled in situations where default value inference is not possible and the system predicts that newly created rows in downstream tables will fail to meet the filter criteria in the source. The user will instead see the following message next to the “Allow creating new records” setting: “Record creation is unavailable because it is not possible to infer default values for new rows that satisfy this view’s filters.”
Filter default value inference is supported on filter operators such as “is”, “is empty”, etc (and such operators joined by “AND” conjunctions) where there exists only one unambiguous value that satisfies the filter condition.
Filter default inference is not supported on filter operators such as “is any of”, “contains”, “has any of”, etc or compound filters joined by “OR” conjunctions, where multiple values exist that satisfy the filter condition.
When a record is created from a synced target table, empty cells are populated in the following order of precedence:
Default values inferred from source filters (if and only if the field upon which the filter is present is also editable from the downstream sync).
Source field default values.
Configuring a two-way sync source to allow record creation/deletion
In the source base, find the sync source view’s setting menu and
Next, click on Sync data to another base.
If the Allow edits from other bases option is not enabled, click the toggle to enable it. You will see field editability options. Configure those options as necessary for your use case.
Below those options, you’ll find the “Allow creating new records” or “Allow deleting records” toggles. These options are turned off by default, but can be enabled singularly or in tandem.
Requirements for creating/deleting records in two-way syncs
Source
The source view’s table cannot be a target sync of another source. e.g. No “daisy-chaining” of syncs are allowed.
The source view’s parent table must have table permissions set to “Editors and above”. Any other permission level will disallow record creation and deletion from synced tables.
The source view must contain at least one editable field.
Target
The target table’s sync configuration must enable the Edit source records option.
The target’s permission setting must allow a user to create and/or delete rows. Granular permissions will be respected.
Example 1: A base collaborator with commenter permissions won’t be able to create or delete records in the synced table just like any other table in the base.
Example 2: A user may have access to both bases where the source and the target of the two-way sync reside. However, if they have creator permissions in the source, but only have read-only permissions in the target, then that user will not be able to create or delete records in the target table/base.
Understanding two-way sync default values as they pertain to record creation/deletion
When a record is created from a synced target table, empty cells are populated in the source view in the following order of precedence:
Default values inferred from source view filters (if and only if the field upon which the filter is present is also editable from the target sync)
Source field default values.
It’s also important to note that:
Filter default value inference is supported on filter operators such as “is”, “is empty”, etc (and such operators joined by “AND” conjunctions) where there exists only one unambiguous value that satisfies the filter condition.
Filter default inference is not supported on filter operators such as “is any of”, “contains”, “has any of”, etc or compound filters joined by “OR” conjunctions, where multiple values exist that satisfy the filter condition.
Limitations of record creation/deletion in two-way syncs
Records created within synced tables must meet the source view’s filters or the action will error. These filters are not visible to downstream users.
The ability to create records in multi-source synced tables is not available
Similar to two-way sync edits, the ability to create/delete records in synced tables is not available through Airtable’s API.
The ability to create/delete records in synced tables with automations is unavailable.
Form views are not supported in synced tables.
It is not possible to set column default values in downstream synced tables.
Record creation/deletion is supported in interfaces leveraging a table set up for two-way sync in this way. However, you’ll need to adjust any sync settings from the base layer.
Consult the other limitations of two-way syncs listed below.
Two-way sync target configuration
Note
If you are looking to adjust a previously configured sync to have two-way sync enabled, you’ll want to click the drop-down next to the table’s name. Then, select the Update sync configuration option and toggle the preferred editing access level discussed further in this section.
In another base, you can follow the normal flow of adding a new table that will sync with the source table that has been configured. Click the + Add or import button. This sometimes just appears as a + button next to the name of the table furthest right in your base.
Click the Airtable base option below the “Add from other sources” section.
From here, you can either select a view from a base that you collaborate in or use a sync share link that has been shared with you by another user. In either case, the source view you are syncing with must have two-way sync enabled to edit information in the target table.
Note
End users are only able to choose shared views in bases where they have editor-level permissions or higher. More information on this behavior is available here.
Click Next and then choose which fields (All fields or Specific fields) you would like to sync over from the source to this target table. Even though you might be able to see a field in the target table, it doesn’t necessarily mean that it will be editable. The ability to edit is dependent upon the configuration made in the source as well as an upcoming step in the target sync’s setup.
Note
Under the “Advanced” section, you can choose which field from the source you would like to set as the primary field in this target table. By default, the primary field will match the source table’s primary field. More information about this option is available here.
Once the field selections have been set, click Next to move onto the final setup screen.
Before creating your synced table, there is a setting that allows you to choose who can edit source records. Click Change below the Edit source records toggle to make adjustments based on your needs. This option is specific to the two-way sync feature. Learn more about source editing in two-way syncs in the section below.
Note
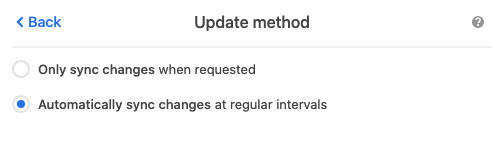
The other two options in this section should not be changed! Changing the sync frequency to Only sync changes when requested or the record deletion option to Leave the records in this table will cause two-way syncs to break and render as a one-way sync.
Once you’ve selected your desired settings, click Create table. It’s a good idea to check that the functionality of the table matches your expectations. If you need to adjust any parameters of this synced target table, then click the drop-down next to the table’s name and select the Update sync configuration option.
Understanding source editing in two-way syncs
It’s possible that not all of the workspaces that you collaborate in will have two-way sync functionality. If you don’t see the option to set who can edit source records, then it’s likely the case that the target base you are trying to create the two-way sync in resides inside a workspace that does not support this feature currently.
To remedy this, you may need to reach out to an admin to make a change inside admin panel, specifically, the global Synced view restrictions setting outlined in the accordion in this section of the support article about the admin panel settings page.
There are three options available for source editing:
Allow creators and above in this base to edit source records
Allow editors and above in this base to edit source records (Default)
Don't allow anyone in this base to edit source records
Two-way sync permissions have many considerations, we recommend consulting this article to dig into permissions dependencies more deeply.
Two-way syncing in interfaces
Once a table with two-way sync enabled has been set up following the steps listed in the section above, interfaces can be configured to allow edits to be made from an interface page. These edits will sync back to the source just like edits made in a target table. There are two general interface surfaces where two-way syncing can be enabled:
Visualization layouts - These layout types offer quick configuration options and an experience similar to views in Airtable bases.
Interface elements - The following interface elements support two-way syncing: Grid, Record detail, Calendar, Kanban, Timeline, Gallery, List, and Record picker.
Enabling two-way sync edit-ability in visualization layouts
There are two surfaces within visualization layouts that allow end-users to edit records. You can choose to use one of these options independently, or both of these options together:

Click into record details - Setting up this option allows end-users to open up more details for a specific record. Builders can customize this record detail page as a sidesheet or fullscreen experience. Each field that you want end-users to be able to edit will need to be configured individually. From the customization screen for the record detail page, click a field that you want to make editable. Under the “Permissions” section change the setting to Editable.

Edit records inline - You can choose to also make inline editing possible for all available fields from the source. To do this click on the Edit records inline option and then toggle on the option that appears in the settings.
Note
If you see a message that "This field is synced from a source that doesn't allow it to be edited," then there are likely field editing permissions in the source base preventing the field from being set as Editable.
Enabling two-way sync edit-ability for supported interface elements
Individual interface elements can be set as editable as well. Under Permissions, choose the Editable option to allow editing for all available field from the source. In certain elements, like the record picker element, you can also choose to allow records to be edited. However, to accomplish this, each field that you want end-users to be able to edit will need to be configured individually. Click each field to change it's Permissions settings to Editable.

Tips and notes for two-way syncing
Below we’ll cover some helpful best practice tips, limits, and functionality notes. These are worth digging into and fully understanding as they will help you create more efficient workflows that involve two-way sync.
Records can only be created in the source view
Explanation: Like any other sync setup, the source table is meant to be the main source of truth for the information that is being stored within Airtable. For this reason, it is only possible to add new records to the source, not target tables.
Workaround: There are several workarounds for this. Depending upon the way that your team is using two-way sync you might consider using Forms, Interface designer, or even setting up another sync. In most cases, creating a “record creation” form in the source table usually works as a solution.
Fields created in target syncs do not sync back to the source
Explanation: New fields can be created in target tables, but they will not be “syncable” back to the source. New fields will merely enrich existing synced data like any other sync setup. A few things to note on this behavior:
Synced field names won’t match if the same field name is added to a target before it’s added in the source base.
Example: If you create a field named “Date field” in target base C, then a field created in source base A named “Date field” would sync over to the target as another date field, but will be named “Date field 2”
Field names won’t match if they are changed in targets, even if they are changed back to match the naming in the source sync.
Workaround: Create a form for other teams can use to request “global” changes be made to the source base instead of adding “enriched” fields that won’t sync back to the source or other targets. Additionally, consider using a naming structure for target bases to help prevent field names syncing in a way that doesn’t match.
Customized fields in target bases become non-editable
Explanation: We cover synced field customization in this support article. Fields that are customized in a target will no longer match the source. This causes any customized fields in a two-way sync target to no longer be editable. However, the field will still sync with the source and update similar to a one-way sync.
Workaround: There are many potential workarounds for this depending upon the particular scenario you are encountering. For instance, you could maintain the original field so that it remains editable, and create a “copy” field that holds similar information in a different field type. Let’s say that the original field is a single line text field, but you want to change it to be a single select field. In that case, you could create an automation that will copy the single line value over to the single select field in that record. You could also build another automation that finds records where the single select value is different from the single line value and have the automation update the single line field so that it maintains parity in the source base via the 2-way sync.
"Side-chaining" two-way syncs is not possible
Explanation: For security reasons, tables in target bases with two-way sync enabled will not be able to be “side-chained” with other bases. For example, let’s say base A is the source of the sync. Three target tables (inside bases B, C, and D) are connected to the source with two-way sync turned on. If you then wanted to set up any of these target tables to have two-way sync enabled in another base (base E), you’d be unable to do so.
Workaround: Sync the other base (base E) with the original source sync (base A) that was set up. Note that if base E only needs to be a one-way sync target, then it’s fine to sync from any of the base targets (bases B, C, or D).
Multi-source syncing is possible, but there are considerations
Explanation: For syncs that utilize multi-source syncing, the expected behavior may not be apparent. Additionally, multi-source syncs do not support two-way syncs that allow record creation and/or deletion.
Example: Let's say there are 2 source bases (base A and base B). Base A has two-way sync toggled on, however, base B does not have 2-way sync enabled. In the target, base C, every source must have two-way sync enabled in order for the table to be editable. In this example, base C would function as only a one-way sync from both sources. To remedy this, an owner or creator from base B would need to turn on two-way sync in order to allow base C to utilize two-way syncing functionality.
Using Automations with two-way syncing
Two-way syncing supports certain Airtable automation runs. It's important to note that:
Edits to synced tables are now possible via the Update record action.
Edits made via custom scripts leveraging the Run script action are not supported at this time.
Automation actions that edit synced fields cannot be followed by any other automation action(s).
Due to a delay in syncing, outputs shown in automation test results or the Run History may not be the most current value.
The Edit source record permission setting on synced tables must be set to Allow Editors and above to allow edits by an automation.
All other permissions that apply to a two-way synced table apply to automations as well, such as field permission settings.
Automations in two-way syncs with record creation or deletion enabled are not supported.
Limitations
We cover these limitations in more detail as well as dependencies and best practice considerations in a separate article.
Edits (two-way syncs) are not allowed in Gantt views.
Attachment fields are not editable.
You’ll need to specifically enable linked record fields to sync, otherwise they will sync as single line text fields.
Button, formula, and other computed field types are not available for syncing purposes since they can rely on information that is unavailable in targets.
Fields that are added, or customizations to fields (e.g., adding a select field option) in a target table will not sync back to the source.
Sync may take a few minutes to propagate in both directions.
Edits cannot be made using API calls in target bases.
Additional limitations and special considerations exist in two-way syncs that have record creation or deletion enabled. Consult this section for more information.
FAQs
How often does synced information update?
When you configure a table sync, you can choose to manually or automatically sync changes to your base. Automatic syncing occurs in real-time 1.
1 Time-based formula fields (and all dependent columns) will not be instant – instead, they will periodically update. Table syncs with Field Type Customized Linked Records will not be instant – instead, they will periodically update.
Is there a limit on which sync sources can be used for two-way syncs?
Yes. Views containing more than 200,000 cells (e.g. 10k records x 20 fields) are not available for use as a two-way sync source.
Will the person who made the edit appear in the record activity log?
Just as with one-way sync, in the target table, any changes will be attributed to “Table Sync.”
Can I build an interface that allows edits in the target?
If I add a field in the target, will it appear in the source?
No. Just like in a one-way sync, that field will appear in, and be owned by, the target base.
If I edit a field’s configuration in the target (e.g., adding a select field option), will it be reflected in the source?
Field type customizations are specific to the target base and won’t apply to source bases.
Can linked records be edited/clicked into in the target?
Yes, for more information consult this information.
Can I create or delete a record in a target table?
Yes, however, you’ll want to consult this section of the support article to understand how to enable this functionality and its implications fully.